Build and publish your Unity Game using Github Actions
(TL;DR: Build and publish your Unity app using Github Actions via GameCI)
When you’ll be done and setup, this project should be able to build your app for all the major platforms supported by Unity *except consoles* (Windows, macOS, Linux, iOS, Android, WebGL) (mono or IL2CPP for desktops). You’ll have an automatic workflow to publish your app to the macOS / iOS App Store, Google Play Store and hosting on S3. No need to own a Mac or maintain an external web server!
This is very much opinionated, feel free to use as a starter-pack and modify as needed.
(coming soon: Steam, itch.io, Windows Store and whatever is the flavor of the month for a Linux App Store)
(final part of my series on code-signing / distributing apps, check Part 1 on Windows Code-Signing)
Introduction
Unity Cloud Build doesn’t do much, is pricey AND they also removed older versions of Unity from selection (just because…), so I needed a robust solution where I could simply click one button and have my build ready and published (and with self-hosted runner in a timely manner at 0 cost!).
Having a good CI/CD workflow setup is a must when doing cross-platform development, especially since manually submitting an app to the different App Stores is quite cumbersome and there is a risk for errors. Once setup, it’s just works. And in a couple of years when there will be new requirement and your old app risk being removed from an app store, you’ll be glad that you have reproducible builds and not waste days trying to figure out how to rebuild it and submit it.
Even as a solo developer, there’s tons of benefits to it, you can simply start a build whenever without disrupting your computer and if you find a regression bug, quickly find at which point in time it was introduced by testing older builds and figuring the commits.
Distributing on all major App Stores can be quite the headache, so I’ve break it down into separate steps.
Basically, once all the secrets are added to the repository, the workflows are able to properly sign and publish your app for the given platform.
Use the template
Start by creating a new repository using this template, it includes a sample “Hello World” Unity project in the folder Unity.Test which you can replace with your own. But I suggest you first starts by running the various actions using this simple project first to eliminate any issues that might be specific to your project.
Secrets / Variables
There’s a bunch of secrets / variables we need to gather to have everything working, so buckle up. Skip any platforms / app stores you don’t need. You need to set them in your repository settings in Github.
I suggests that you also add all of those secrets to a Password Manager. They can be re-used for your next projects, speeding up the process.
Windows
Optional code-signing for the EXE is available if you follow this guide.
Windows Secrets
AZURE_CLIENT_ID: Your app client IDAZURE_CLIENT_SECRET: Your app secret valueAZURE_SIGNING_ACCOUNT: Your Trusted Signing Accounts nameAZURE_SIGNING_CERTIFICATE: Your Certificate profile nameAZURE_TENANT_ID: Your Tenant IDAZURE_ENDPOINT: Your azure endpoint
Windows Variables
WINDOWS_SETUP: Generate a setup.exe as well, set it toyes
macOS / iOS
Allow publishing to the App Store / Testflight for your macOS and iOS version of your app. Also notarize / staple your macOS app for external distribution (.dmg). Follow this guide.
Apple Secrets
APPSTORE_ISSUER_ID: The Issuer ID for API KeyAPPSTORE_KEY_ID: The Key ID from your generated API KeyAPPSTORE_P8: The text content of the P8 fileFASTLANE_USER: Your Apple ID usernameFASTLANE_PASSWORD: Your Apple ID passwordFASTLANE_SESSION: The value offastlane spaceauthMATCH_REPOSITORY: Your private repo containing certsMATCH_PASSWORD: Password for the match repositoryAPPLE_DEVELOPER_EMAIL: Your Apple IDAPPLE_CONNECT_EMAIL: Apple Connect email (same as above if using a single shared developer)APPLE_TEAM_ID: Team Id from your Apple Developer Account
Apple Variables
IOS_BUNDLE_ID: The iOS bundle IDMAC_BUNDLE_ID: The macOS bundle IDTESTFLIGHT_INVITE: (Optional) Links to the Testflight Invite included in the notification
Android
Code-signing and publishing to the Google Play Console, follow this guide. The keystore can also be generated using an action, follow this guide.
Android Secrets
GOOGLE_PLAY_KEY_FILE: The JSON file content from the Service AccountANDROID_KEYALIAS_NAME: The alias used for the .keystoreANDROID_KEYSTORE_PASS: The password used for the .keystoreANDROID_KEYALIAS_PASS: The password used for the .keystore (same as above)ANDROID_KEYSTORE_BASE64: The base64 value of the .keystore file
Android Variables
ANDROID_PACKAGE_NAME: The package name of your appGOOGLE_PLAY_INVITE: (Optional) Links to the Google Play Invite included in the notification
WebGL / hosting releases
We will be hosting the releases (optional) and the WebGL files on S3. The releases can also optionally be included in the Github Releases.
S3 Secrets
S3_KEY_ID: Your S3 Key IDS3_SECRET_ACCESS_KEY: Your S3 Secret Access KeyS3_REGION: Your S3 regionS3_ENDPOINT: Optional, needed if you use a clone (ex; DigitalOcean Space)
S3 Variables
S3_BUCKET: Your S3 bucketS3_PATH: Path where we will save the files inside the bucket (ex;apps/unity-test)S3_URL: URL prefix to use when sharing links (ex;https://cdn.domain.com)
Discord Notifications
Optional notifications to a channel of your choice in Discord when a build is done with links to test the app. Follow this guide.
Discord Secrets
DISCORD_WEBHOOK: Your Webhook URL
Discord Variables
DISCORD_USERNAME: Username of your botDISCORD_AVATAR: URL to an image file
Personal Access Token (PAT)
We also need to generate a Personal Access Token for Github. This will enable us to create Github Release and increment the build number variables for each platforms. Need all repo access. Follow this guide.
Github Secrets
GH_PAT: The value of your token
Unity
For the Unity’s license activation we need to add a few more secrets. Follow this guide.
Locate your license file:
- Windows:
C:\ProgramData\Unity\Unity_lic.ulf - Mac:
/Library/Application Support/Unity/Unity_lic.ulf - Linux:
~/.local/share/unity3d/Unity/Unity_lic.ulf
Unity Secrets
UNITY_SERIAL: If using a professional license, copy your serialUNITY_LICENSE: Copy the contents of your.ulflicense file if using a personal licenseUNITY_EMAIL: Enter the email address associated with your Unity accountUNITY_PASSWORD: Enter the password for your Unity account
Misc
Some miscellaneous secrets to personalize the workflows.
Misc Variables
APP_NAME: The value that will be used to name the file (ex;my-gamefor “my-game.zip”)APP_NAME_DISPLAY: Name of your app for display (ex;My Game)APP_COMPANY: Company name for some metadata (ex;Your Name)APP_UNITY_PATH: Path to your Unity project (ex;Unity.Test)APP_UNITY_VERSION: The unity version (ex;6000.0.35f1)
Run the actions
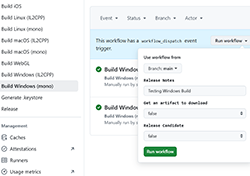
Now that we have all the needed secrets and variables, we can call the workflow for each platforms individually to test each release. To do so, go to the Actions tab of your repository in Github, select a platform on the left panel and click Run workflow.
iOS / macOS requires that you run the Apple Setup workflow once to link it to the match repository.
For Android, iOS and macOS you’ll also want to create the App Page in their respective app store, make sure you followed the guide for each platform carefully.
The workflows reference the original files available in another branch. This allow to provide update easily. But feel free to simply copy the originals instead and adapt.
Use self-hosted runners
(optional) While you can build all the platforms using Github’s runners, to keep the bills low and speed up the build process, I strongly suggest that you setup your own self-hosted runners.
Except for the workflows that require a specific platform to compile on (ex; macOS for iOS), they should all be cross-platforms.
Keep your repository private just to be safe if you use one!
Personally, I’ve setup a Linux VM (via VMWare) that auto-start on my Windows machine. This allow me to better control how much resources it can use so it doesn’t disrupt my work (I never notice a build is compilling).
Execute the scripts/workflows/self-host.sh script to install missing softwares from a fresh Ubuntu 24.04.
Apart from the jobs that requires a specific OS, a linux runner should be enough to ensure that the vast majority of the work is done locally so you save both time and money.
Simply set the runner and runner-extra variables in each workflows to use self-hosted.
Use a local cache
(optional) By using the Actions Cache Server we can use a local cache for our self-hosted runners without any modifications to our workflows instead of going back and forth with Github’s servers.
Create a yml file for docker (follow this guide to setup docker).
docker-compose.yml
version: '3.9'
name: cache-fix
services:
  cache-server:
    image: ghcr.io/falcondev-oss/github-actions-cache-server:4
    ports:
      - '3000:3000'
    environment:
      URL_ACCESS_TOKEN: XXXXXXXX
      API_BASE_URL: http://localhost:3000
      CLEANUP_OLDER_THAN_DAYS: 30
    volumes:
      - cache-data:/app/.data
    restart: unless-stopped

volumes:
  cache-data:
And start the cache server: docker compose up (inside your VM)
Set this environment variable inside ~/actions-runner/.env
ACTIONS_CACHE_URL=http://localhost:3000/XXXXXXXX/
Now we need to patch the DLLs of our Github Runner to use our ACTIONS_CACHE_URL environment variable that will point to our cache server.
cp -n ~/actions-runner/bin/Runner.Worker.dll ~/Runner.Worker.backup.dll
sed -i 's/\x41\x00\x43\x00\x54\x00\x49\x00\x4F\x00\x4E\x00\x53\x00\x5F\x00\x43\x00\x41\x00\x43\x00\x48\x00\x45\x00\x5F\x00\x55\x00\x52\x00\x4C\x00/\x41\x00\x43\x00\x54\x00\x49\x00\x4F\x00\x4E\x00\x53\x00\x5F\x00\x43\x00\x41\x00\x43\x00\x48\x00\x45\x00\x5F\x00\x4F\x00\x52\x00\x4C\x00/g' ~/actions-runner/bin/Runner.Worker.dll
sed -i 's/\x41\x00\x43\x00\x54\x00\x49\x00\x4F\x00\x4E\x00\x53\x00\x5F\x00\x43\x00\x41\x00\x43\x00\x48\x00\x45\x00\x5F\x00\x53\x00\x45\x00\x52\x00\x56\x00\x49\x00\x43\x00\x45\x00\x5F\x00\x56\x00\x32\x00/\x41\x00\x43\x00\x54\x00\x49\x00\x4F\x00\x4E\x00\x53\x00\x5F\x00\x43\x00\x41\x00\x43\x00\x48\x00\x45\x00\x5F\x00\x53\x00\x45\x00\x52\x00\x56\x00\x49\x00\x43\x00\x45\x00\x5F\x00\x56\x00\x31\x00/g' ~/actions-runner/bin/Runner.Worker.dll
Don’t worry, it simply replace the string ACTIONS_CACHE_URL inside the DLL so our variable doesn’t get overwritten.
(they should really allow this option officially…)
Use an organization
(optional) By using an organization instead of your personal account, you can setup all the secrets to be shared accross all the repositories (only paid plans), making it even faster to setup a new project. Bonus: you only need to setup one self-hosted runner as well since they are locked to one repository each otherwise.
You’ll need to fork this template and replace all instances of uses: starburst997/unity-github-actions with uses: <YOUR_ORG>>/unity-github-actions. This is needed because referenced workflows needs to be from the same organization to inherit secrets. See this diff.
(temporary until I fix this issue) You’ll also need to fork this repository and replace all instances as well in your forked template repository in the v1 branch to use this new fork instead. See this diff.
LFS
Enable LFS by renaming .gitattributes.disabled to .gitattributes.
Doing a release
The way I do my releases, I first create a build for a given platform by using Run workflow in Actions and set the Release Candidate option to true. I test it, fixes any issues and then move to the next platform. If an issue is platform specific, I fix it but I don’t make another build for the other platforms I’ve already built and tested.
Once I’m satisfied, I run the Release action by selecting the Use release candidates option which will then look in S3 for all the latest candidate builds for all the platforms and copy them to the release folder. The action will create a neat Discord notification, increment the release number and do a Github release.
The Release workflow will also output variables for each platforms that you can use to personalize your final release action (ex; ping your server).
For Google Play / Apple App Store, I manually select the build I vetted from the internal lanes. I don’t do automatic release on stores.
End results
-
Build the platform of your choice with Github Actions.
-
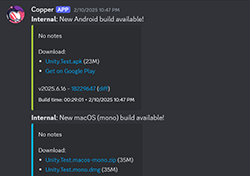
Discord notifications with links to download, play in your browser and commit diff.
-
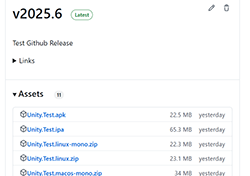
Github release with binaries for all platforms.
-
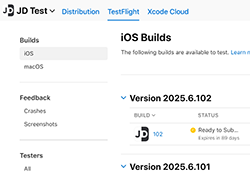
Automatic publishing to Apple App Store and Google Play.
Conclusion
It took a bit more time than I expected but at least I have a workflow for building and publishing my unity apps that doesn’t sucks, is easy to setup and that I can re-use from project to project.
I don’t need to worry about certificates or read the same stack overflow answer years after years on how to generate some keys, I can simply set it up one time and be done (with automatic renewal).
The “building the unity app” step is pretty self-contained and could be adapted for any frameworks / engines, maybe Godot could be next…
Code-signing / distributing app series:
- Part 1: Code Signing for Windows as an Individual Developer
- Part 2: Code Signing for Apple without a mac
- Part 3: Code Signing for Android via Github Actions
- Part 4: Build and publish your Unity Game using Github Actions
 's Devlog


