<?xml version="1.0" encoding="utf-8"?><feed xmlns="http://www.w3.org/2005/Atom" ><generator uri="https://jekyllrb.com/" version="3.10.0">Jekyll</generator><link href="https://jd.boiv.in/feed.xml" rel="self" type="application/atom+xml" /><link href="https://jd.boiv.in/" rel="alternate" type="text/html" /><updated>2025-03-15T16:46:50+00:00</updated><id>https://jd.boiv.in/feed.xml</id><title type="html">JD’s Devlog</title><subtitle>Personal blog to showcase my works, mostly related to the development of Notessimo</subtitle><author><name>Jean-Denis Boivin</name></author><entry><title type="html">Fix for Unity Editor multi-screens setup</title><link href="https://jd.boiv.in/post/2025/03/14/unity-editor-multi-screen.html" rel="alternate" type="text/html" title="Fix for Unity Editor multi-screens setup" /><published>2025-03-14T22:00:00+00:00</published><updated>2025-03-14T22:00:00+00:00</updated><id>https://jd.boiv.in/post/2025/03/14/unity-editor-multi-screen</id><content type="html" xml:base="https://jd.boiv.in/post/2025/03/14/unity-editor-multi-screen.html"><![CDATA[<p><em>(<strong>TL;DR</strong>: Fix for dropdown components in Unity Editor from appearing on the wrong screen in a multi-screens setup on Windows)</em></p>

<p><br /></p>

<h2 id="introduction">Introduction</h2>

<p>Ever worked in the Unity Editor using a multi-screens setup in Windows and got UI components (like dropdown) to show in the wrong screen?</p>

<center class="images borders">
  <div><a href="/assets/posts/2025-03-15-unity-editor-multi-screen/screen-1.png" target="_blank"><img src="/assets/posts/2025-03-15-unity-editor-multi-screen/screen-1.png" alt="Weird position of dropdown" title="Weird position of dropdown" height="200" /></a><br />1</div>&nbsp;&nbsp;
  <div><a href="/assets/posts/2025-03-15-unity-editor-multi-screen/screen-2.png" target="_blank"><img src="/assets/posts/2025-03-15-unity-editor-multi-screen/screen-2.png" alt="Wrong screen" title="Wrong screen" height="200" /></a><br />2</div>&nbsp;&nbsp;
  <div><a href="/assets/posts/2025-03-15-unity-editor-multi-screen/screen-4.png" target="_blank"><img src="/assets/posts/2025-03-15-unity-editor-multi-screen/screen-4.png" alt="What's supposed to look like" title="What's supposed to look like" height="200" /></a><br />3</div>
</center>

<ol>
  <li>
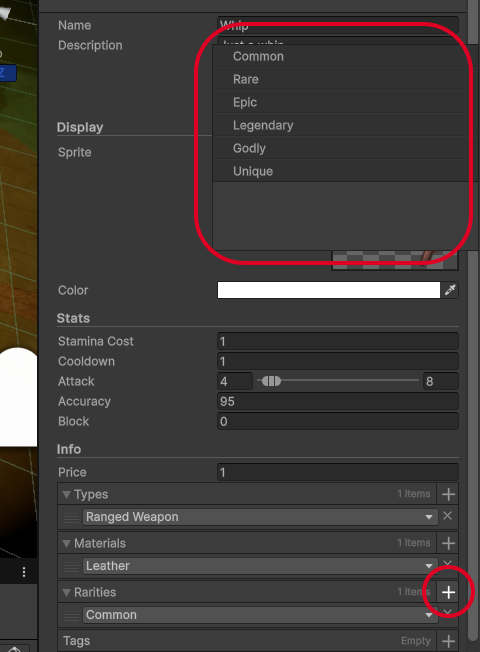
    <p>When I click on the <strong>[+]</strong> button for rarities, it shows up with the wrong dimension and position.</p>
  </li>
  <li>
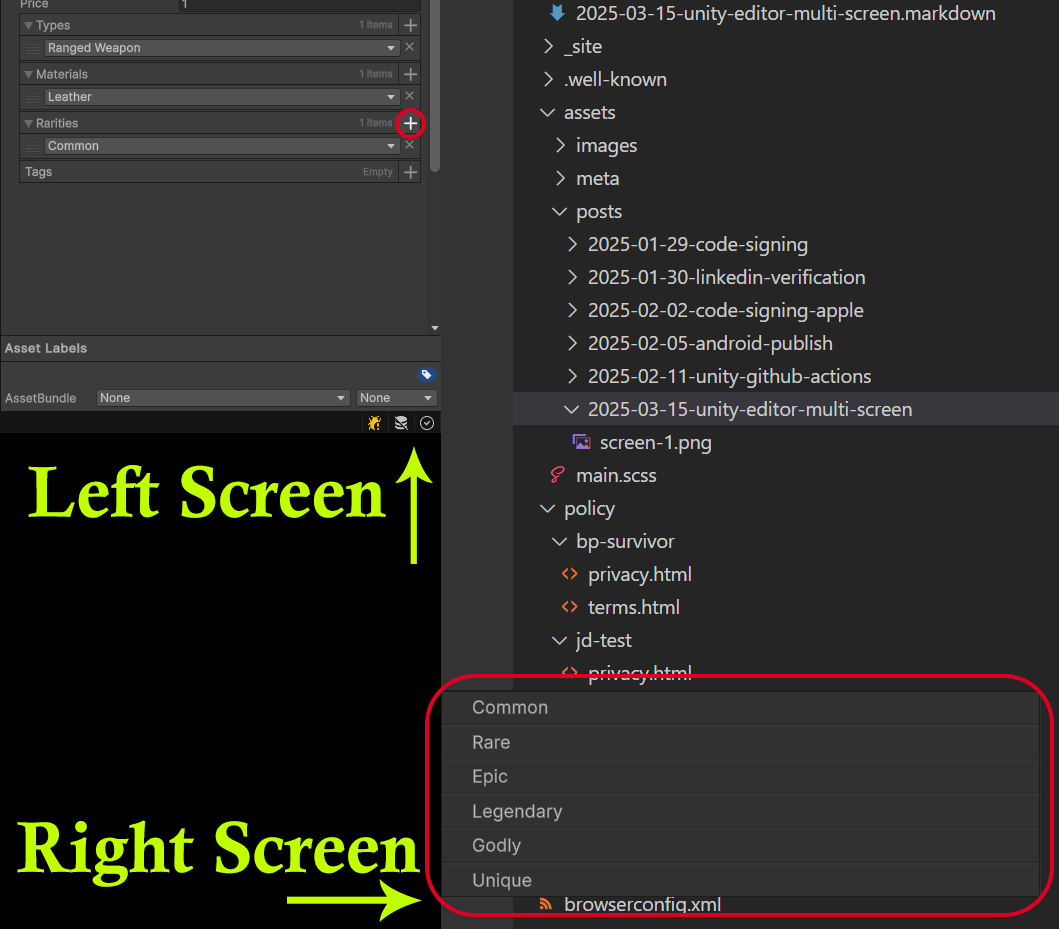
    <p>It can even show up on the wrong screen!</p>
  </li>
  <li>
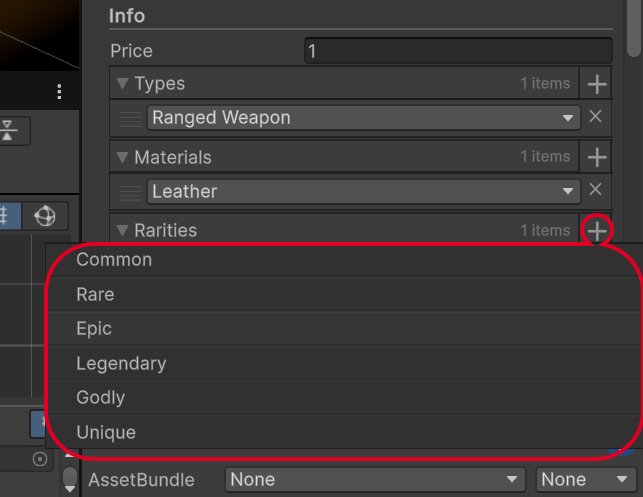
    <p>What is supposed to look like.</p>
  </li>
</ol>

<p><br /></p>

<p>This is an issue that has been bothering me for years and it doesn’t seems like Unity will fix it anytime soon.</p>

<p><br /></p>

<h2 id="investigating-the-issue">Investigating the issue</h2>

<center class="images borders">
  <div><a href="/assets/posts/2025-03-15-unity-editor-multi-screen/screen-3.png" target="_blank"><img src="/assets/posts/2025-03-15-unity-editor-multi-screen/screen-3.png" alt="My multi-screens setup" title="My multi-screens setup" height="200" /></a><br />My multi-screens setup</div>
</center>

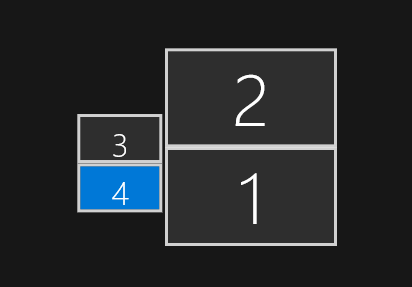
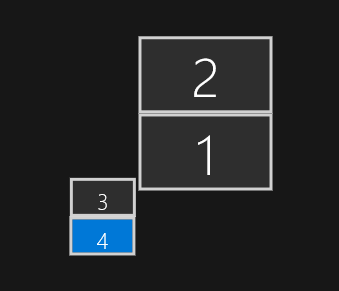
<p>My multi-screens setup isn’t fancy but it does offer clues as to why it is messing up the layout of certains elements. My Unity editor is on the left screen <strong>4</strong> (1080p, 100%), while my main screen is <strong>1</strong> (4k, 150%).</p>

<p>My guess is that since the dropdown would normally overflow to the right side (so it would be on both 4 &amp; 1), it get moved to snap to the edge of the screen. However, while doing so, it read the incorrect values thinking it needs to apply a scaling of 150% when it get snapped to a 100% screen or even snap to the wrong screen entirely.</p>

<p>The root issue doesn’t seems to be fixable without access to Unity’s source code, they should makes sure that whatever component triggered a dropdown ensure to use that component’s screen for the calculation when snapping them to the edge of a screen rather than “guessing” the correct screen.</p>

<p><br /></p>

<h2 id="fixing-the-issue">“Fixing” the issue</h2>

<center class="images borders">
  <div><a href="/assets/posts/2025-03-15-unity-editor-multi-screen/screen-5.png" target="_blank"><img src="/assets/posts/2025-03-15-unity-editor-multi-screen/screen-5.png" alt="New multi-screen layout" title="New multi-screen layout" height="200" /></a><br />New multi-screen layout</div>
</center>

<p>It’s a stupid fix, but it works! It does confirm my suspicions about the root issue.</p>

<p>Now we have a new problem tho, the mouse won’t transition between the screen in a natural manner…</p>

<p><br /></p>

<h2 id="using-littlebigmouse">Using LittleBigMouse</h2>

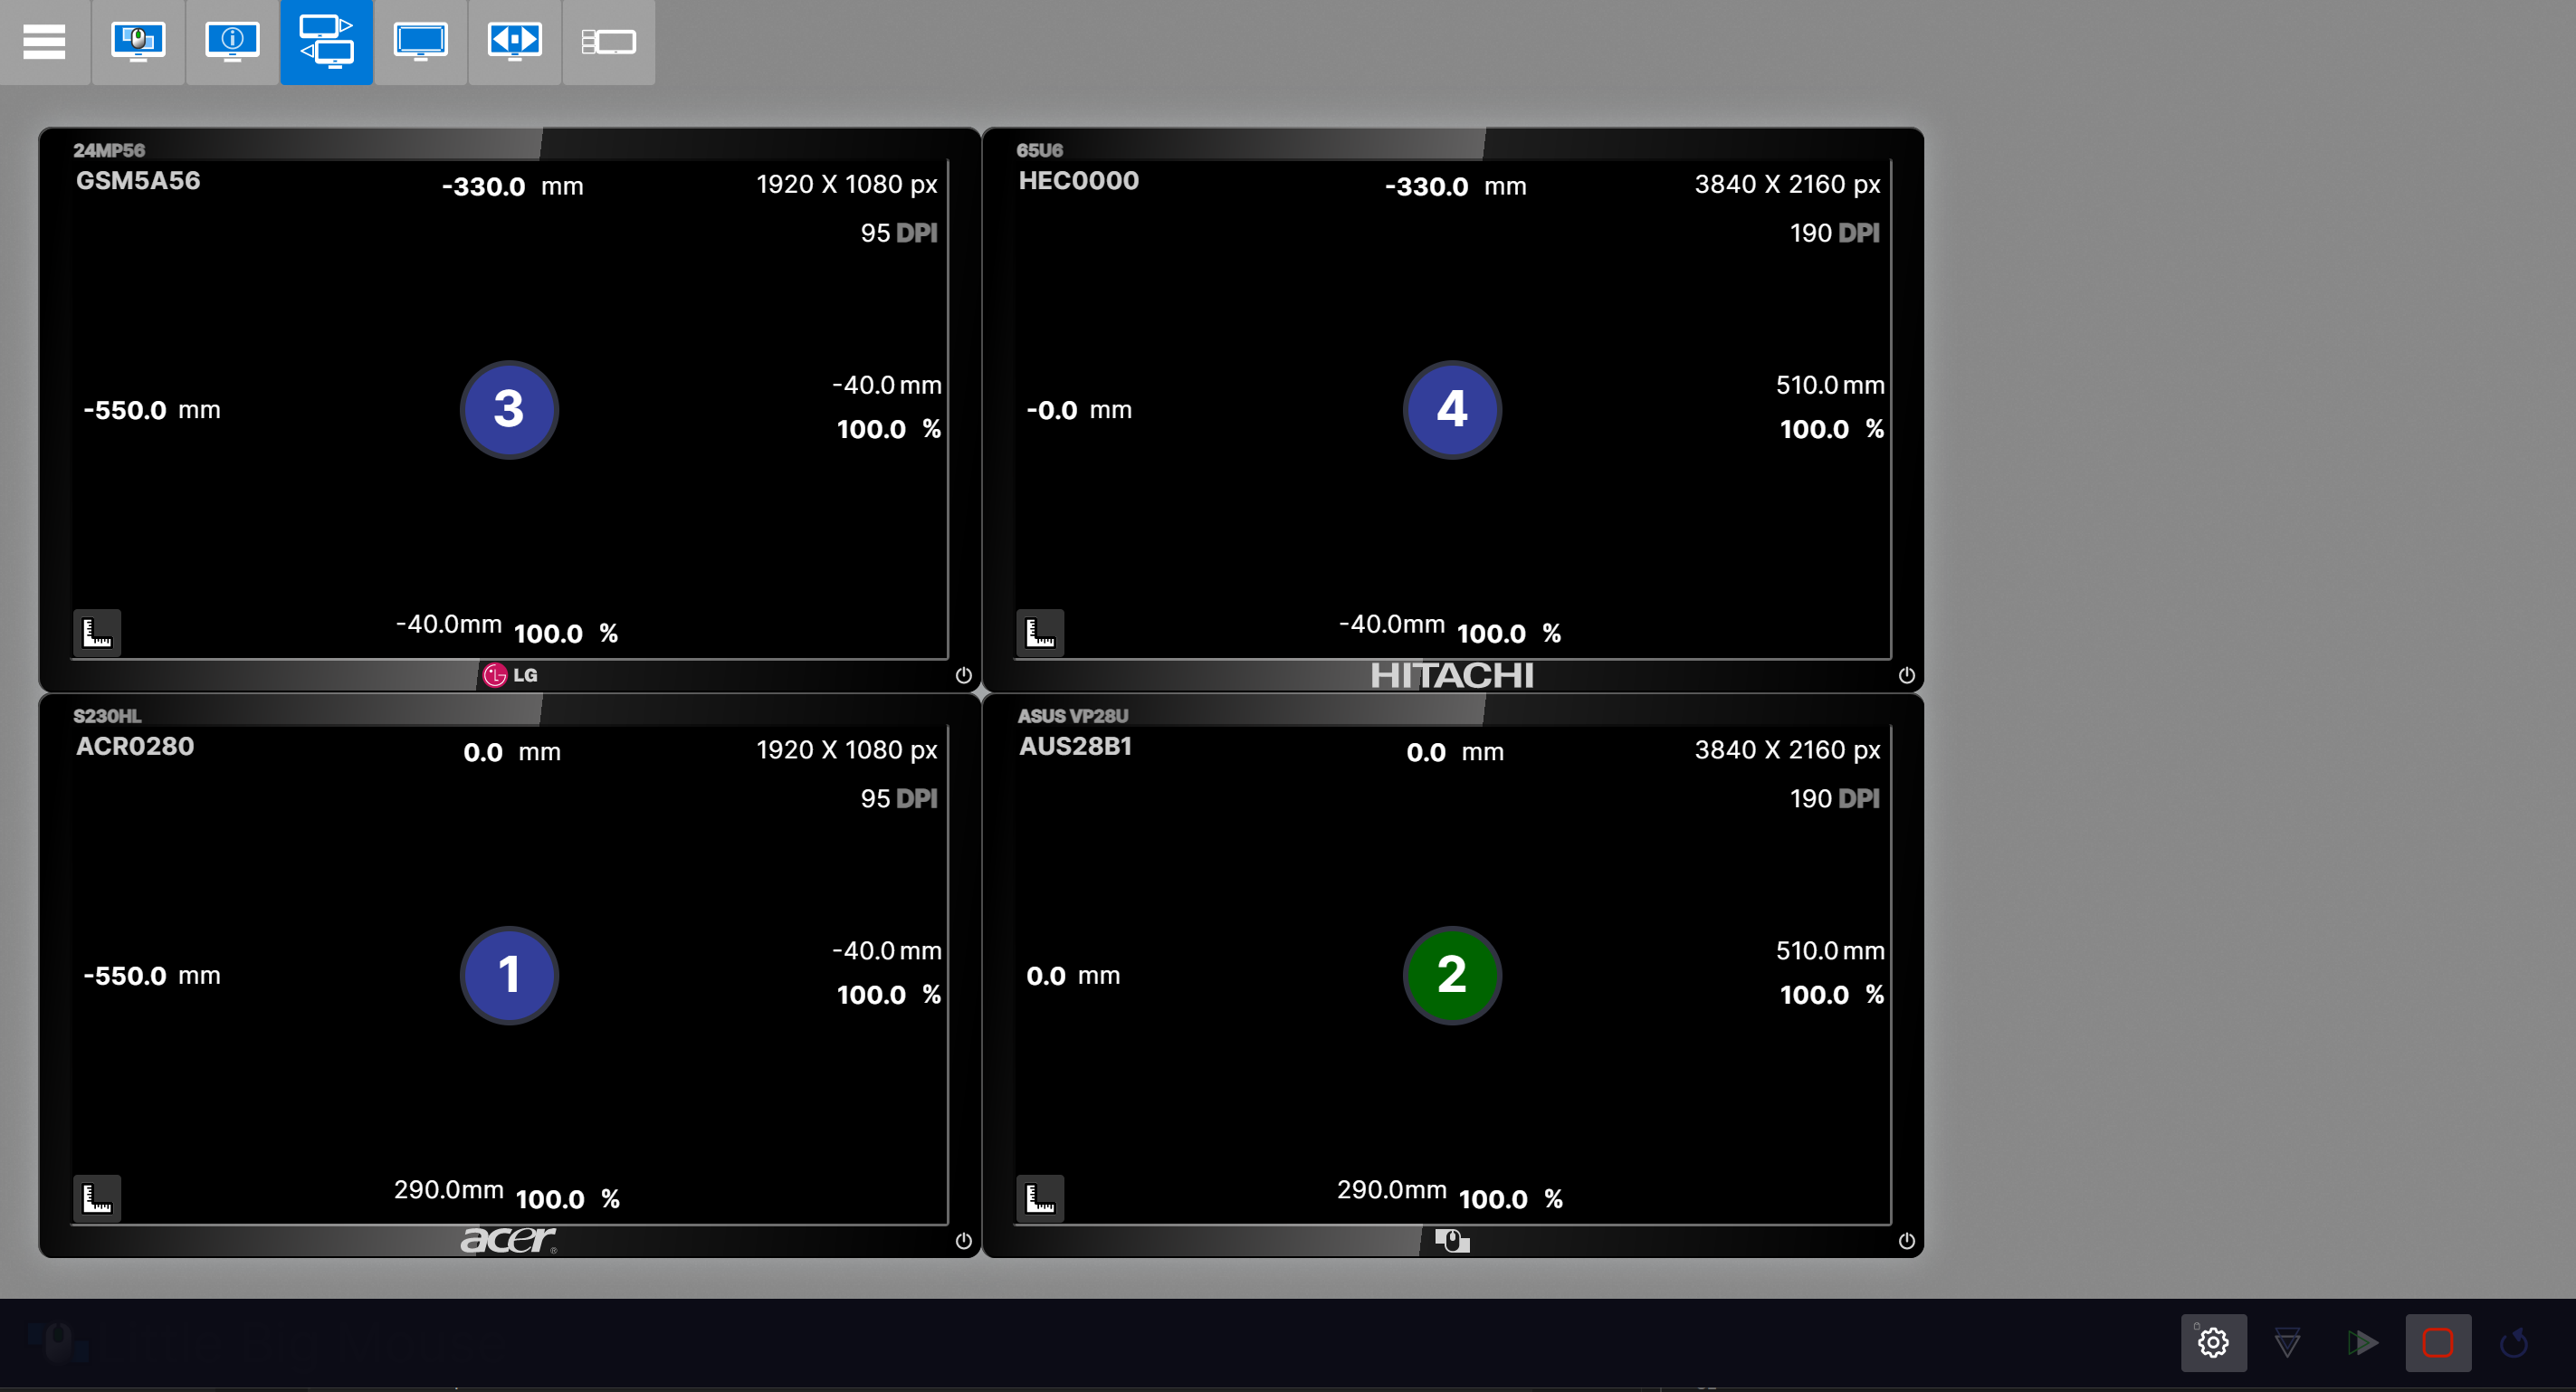
<p>To fix the mouse transition between screens we can use <a href="https://github.com/mgth/LittleBigMouse">LittleBigMouse</a>. It allows you to remap the edges of screens differently than the Windows settings. Bonus, it can scale the screens so the transitions between screens of different resolution is much more close to the physical world.</p>

<center class="images borders">
  <div><a href="/assets/posts/2025-03-15-unity-editor-multi-screen/screen-6.png" target="_blank"><img src="/assets/posts/2025-03-15-unity-editor-multi-screen/screen-6.png" alt="Patched multi-screens setup in LBM" title="Patched multi-screens setup in LBM" height="200" /></a><br />Patched multi-screens setup in LBM</div>
</center>

<p>LittleBigMouse is a bit ugly and unintuitive but it get the job done and in the end works much better than the alternatives (like <a href="https://cursr.app/">Cursr</a> which is too slow for any real world work).</p>

<p><br /></p>

<h2 id="conclusion">Conclusion</h2>

<p>Not exactly a proper fix but in the end, it works, and I did get slightly better mouse transitions between my screens, so not too bad.</p>

<p>I couldn’t find an isssue in the issue tracker for it but did find a couple of posts mentioning the problems. Maybe I’ll create an issue eventually but I’ve had bad experience with unity support before and my time is precious (maybe it did get better over the year with the new CEO).</p>

<p><br /></p>]]></content><author><name>Jean-Denis Boivin</name></author><category term="post" /><summary type="html"><![CDATA[(TL;DR: Fix for dropdown components in Unity Editor from appearing on the wrong screen in a multi-screens setup on Windows)]]></summary></entry><entry><title type="html">Build and publish your Unity Game using Github Actions</title><link href="https://jd.boiv.in/post/2025/02/11/unity-github-actions.html" rel="alternate" type="text/html" title="Build and publish your Unity Game using Github Actions" /><published>2025-02-11T22:00:00+00:00</published><updated>2025-02-11T22:00:00+00:00</updated><id>https://jd.boiv.in/post/2025/02/11/unity-github-actions</id><content type="html" xml:base="https://jd.boiv.in/post/2025/02/11/unity-github-actions.html"><![CDATA[<p><em>(<strong>TL;DR</strong>: Build and publish your <a href="https://unity.com/">Unity</a> app using <a href="https://github.com/features/actions">Github Actions</a> via <a href="https://game.ci/">GameCI</a>)</em></p>

<p>When you’ll be done and setup, this project should be able to build your app for all the major platforms supported by Unity *<em>except consoles</em>* (<strong>Windows</strong>, <strong>macOS</strong>, <strong>Linux</strong>, <strong>iOS</strong>, <strong>Android</strong>, <strong>WebGL</strong>) (<strong>mono</strong> or <strong>IL2CPP</strong> for desktops). You’ll have an automatic workflow to publish your app to the <strong>macOS / iOS App Store</strong>, <strong>Google Play Store</strong> and hosting on <strong>S3</strong>. No need to own a Mac or maintain an external web server!</p>

<p>This is very much opinionated, feel free to use as a starter-pack and modify as needed.</p>

<p><em>(coming soon: Steam, itch.io, Windows Store and whatever is the flavor of the month for a Linux App Store)</em></p>

<p><em>(final part of my series on code-signing / distributing apps, check <a href="/post/2025/01/29/code-signing.html">Part 1 on Windows Code-Signing</a>)</em></p>

<p><br /></p>

<h2 id="introduction">Introduction</h2>

<p><a href="https://unity.com/solutions/ci-cd">Unity Cloud Build</a> doesn’t do much, is pricey AND they also removed older versions of Unity from selection (just because…), so I needed a robust solution where I could simply click one button and have my build ready and published (and with self-hosted runner in a timely manner at 0 cost!).</p>

<p>Having a good CI/CD workflow setup is a must when doing cross-platform development, especially since manually submitting an app to the different App Stores is quite cumbersome and there is a risk for errors. Once setup, it’s just works. And in a couple of years when there will be new requirement and your old app risk being removed from an app store, you’ll be glad that you have reproducible builds and not waste days trying to figure out how to rebuild it and submit it.</p>

<p>Even as a solo developer, there’s tons of benefits to it, you can simply start a build whenever without disrupting your computer and if you find a regression bug, quickly find at which point in time it was introduced by testing older builds and figuring the commits.</p>

<p>Distributing on all major App Stores can be quite the headache, so I’ve break it down into separate steps.</p>

<p>Basically, once all the secrets are added to the repository, the workflows are able to properly sign and publish your app for the given platform.</p>

<p><br /></p>

<h2 id="use-the-template">Use the template</h2>

<p>Start by creating a new repository using <a href="https://github.com/starburst997/unity-github-actions">this template</a>, it includes a sample “Hello World” Unity project in the folder <code class="language-plaintext highlighter-rouge">Unity.Test</code> which you can replace with your own. But I suggest you first starts by running the various actions using this simple project first to eliminate any issues that might be specific to your project.</p>

<p><br /></p>

<h2 id="secrets--variables">Secrets / Variables</h2>

<p>There’s a bunch of secrets / variables we need to gather to have everything working, so buckle up. Skip any platforms / app stores you don’t need. You need to set them in your repository settings in Github.</p>

<p>I suggests that you also add all of those secrets to a Password Manager. They can be re-used for your next projects, speeding up the process.</p>

<p><br /></p>

<h3 id="windows">Windows</h3>

<p>Optional code-signing for the EXE is available if you follow <a href="/post/2025/01/29/code-signing.html">this guide</a>.</p>

<h4 id="windows-secrets">Windows Secrets</h4>

<ul>
  <li><code class="language-plaintext highlighter-rouge">AZURE_CLIENT_ID</code>: Your app client ID</li>
  <li><code class="language-plaintext highlighter-rouge">AZURE_CLIENT_SECRET</code>: Your app secret value</li>
  <li><code class="language-plaintext highlighter-rouge">AZURE_SIGNING_ACCOUNT</code>: Your Trusted Signing Accounts name</li>
  <li><code class="language-plaintext highlighter-rouge">AZURE_SIGNING_CERTIFICATE</code>: Your Certificate profile name</li>
  <li><code class="language-plaintext highlighter-rouge">AZURE_TENANT_ID</code>: Your Tenant ID</li>
  <li><code class="language-plaintext highlighter-rouge">AZURE_ENDPOINT</code>: Your azure endpoint</li>
</ul>

<h4 id="windows-variables">Windows Variables</h4>

<ul>
  <li><code class="language-plaintext highlighter-rouge">WINDOWS_SETUP</code>: Generate a setup.exe as well, set it to <code class="language-plaintext highlighter-rouge">yes</code></li>
</ul>

<p><br /></p>

<h3 id="macos--ios">macOS / iOS</h3>

<p>Allow publishing to the App Store / Testflight for your macOS and iOS version of your app. Also notarize / staple your macOS app for external distribution (.dmg). Follow <a href="/post/2025/02/02/code-signing-apple.html">this guide</a>.</p>

<h4 id="apple-secrets">Apple Secrets</h4>

<ul>
  <li><code class="language-plaintext highlighter-rouge">APPSTORE_ISSUER_ID</code>: The Issuer ID for API Key</li>
  <li><code class="language-plaintext highlighter-rouge">APPSTORE_KEY_ID</code>: The Key ID from your generated API Key</li>
  <li><code class="language-plaintext highlighter-rouge">APPSTORE_P8</code>: The text content of the P8 file</li>
  <li><code class="language-plaintext highlighter-rouge">FASTLANE_USER</code>: Your Apple ID username</li>
  <li><code class="language-plaintext highlighter-rouge">FASTLANE_PASSWORD</code>: Your Apple ID password</li>
  <li><code class="language-plaintext highlighter-rouge">FASTLANE_SESSION</code>: The value of <code class="language-plaintext highlighter-rouge">fastlane spaceauth</code></li>
  <li><code class="language-plaintext highlighter-rouge">MATCH_REPOSITORY</code>: Your private repo containing certs</li>
  <li><code class="language-plaintext highlighter-rouge">MATCH_PASSWORD</code>: Password for the match repository</li>
  <li><code class="language-plaintext highlighter-rouge">APPLE_DEVELOPER_EMAIL</code>: Your Apple ID</li>
  <li><code class="language-plaintext highlighter-rouge">APPLE_CONNECT_EMAIL</code>: Apple Connect email (same as above if using a single shared developer)</li>
  <li><code class="language-plaintext highlighter-rouge">APPLE_TEAM_ID</code>: Team Id from your <a href="https://developer.apple.com/account/#/membership/">Apple Developer Account</a></li>
</ul>

<h4 id="apple-variables">Apple Variables</h4>

<ul>
  <li><code class="language-plaintext highlighter-rouge">IOS_BUNDLE_ID</code>: The iOS bundle ID</li>
  <li><code class="language-plaintext highlighter-rouge">MAC_BUNDLE_ID</code>: The macOS bundle ID</li>
  <li><code class="language-plaintext highlighter-rouge">TESTFLIGHT_INVITE</code>: (Optional) Links to the Testflight Invite included in the notification</li>
</ul>

<p><br /></p>

<h3 id="android">Android</h3>

<p>Code-signing and publishing to the Google Play Console, follow <a href="/post/2025/02/05/android-publish.html">this guide</a>. The keystore can also be generated using an action, follow <a href="https://github.com/starburst997/keystore-gh-actions">this guide</a>.</p>

<h4 id="android-secrets">Android Secrets</h4>

<ul>
  <li><code class="language-plaintext highlighter-rouge">GOOGLE_PLAY_KEY_FILE</code>: The JSON file content from the Service Account</li>
  <li><code class="language-plaintext highlighter-rouge">ANDROID_KEYALIAS_NAME</code>: The alias used for the .keystore</li>
  <li><code class="language-plaintext highlighter-rouge">ANDROID_KEYSTORE_PASS</code>: The password used for the .keystore</li>
  <li><code class="language-plaintext highlighter-rouge">ANDROID_KEYALIAS_PASS</code>: The password used for the .keystore (same as above)</li>
  <li><code class="language-plaintext highlighter-rouge">ANDROID_KEYSTORE_BASE64</code>: The base64 value of the .keystore file</li>
</ul>

<h4 id="android-variables">Android Variables</h4>

<ul>
  <li><code class="language-plaintext highlighter-rouge">ANDROID_PACKAGE_NAME</code>: The package name of your app</li>
  <li><code class="language-plaintext highlighter-rouge">GOOGLE_PLAY_INVITE</code>: (Optional) Links to the Google Play Invite included in the notification</li>
</ul>

<p><br /></p>

<h3 id="webgl--hosting-releases">WebGL / hosting releases</h3>

<p>We will be hosting the releases (optional) and the WebGL files on S3. The releases can also optionally be included in the Github Releases.</p>

<h4 id="s3-secrets">S3 Secrets</h4>

<ul>
  <li><code class="language-plaintext highlighter-rouge">S3_KEY_ID</code>: Your S3 Key ID</li>
  <li><code class="language-plaintext highlighter-rouge">S3_SECRET_ACCESS_KEY</code>: Your S3 Secret Access Key</li>
  <li><code class="language-plaintext highlighter-rouge">S3_REGION</code>: Your S3 region</li>
  <li><code class="language-plaintext highlighter-rouge">S3_ENDPOINT</code>: Optional, needed if you use a clone (ex; DigitalOcean Space)</li>
</ul>

<h4 id="s3-variables">S3 Variables</h4>

<ul>
  <li><code class="language-plaintext highlighter-rouge">S3_BUCKET</code>: Your S3 bucket</li>
  <li><code class="language-plaintext highlighter-rouge">S3_PATH</code>: Path where we will save the files inside the bucket (ex; <code class="language-plaintext highlighter-rouge">apps/unity-test</code>)</li>
  <li><code class="language-plaintext highlighter-rouge">S3_URL</code>: URL prefix to use when sharing links (ex; <code class="language-plaintext highlighter-rouge">https://cdn.domain.com</code>)</li>
</ul>

<p><br /></p>

<h3 id="discord-notifications">Discord Notifications</h3>

<p>Optional notifications to a channel of your choice in Discord when a build is done with links to test the app. Follow <a href="https://support.discord.com/hc/en-us/articles/228383668-Intro-to-Webhooks">this guide</a>.</p>

<h4 id="discord-secrets">Discord Secrets</h4>

<ul>
  <li><code class="language-plaintext highlighter-rouge">DISCORD_WEBHOOK</code>: Your Webhook URL</li>
</ul>

<h4 id="discord-variables">Discord Variables</h4>

<ul>
  <li><code class="language-plaintext highlighter-rouge">DISCORD_USERNAME</code>: Username of your bot</li>
  <li><code class="language-plaintext highlighter-rouge">DISCORD_AVATAR</code>: URL to an image file</li>
</ul>

<p><br /></p>

<h3 id="personal-access-token-pat">Personal Access Token (PAT)</h3>

<p>We also need to generate a <a href="https://github.com/settings/tokens">Personal Access Token</a> for Github. This will enable us to create Github Release and increment the build number variables for each platforms. Need all <strong>repo</strong> access. Follow <a href="/post/2025/02/02/code-signing-apple.html#generate-a-personal-access-token-pat">this guide</a>.</p>

<h4 id="github-secrets">Github Secrets</h4>

<ul>
  <li><code class="language-plaintext highlighter-rouge">GH_PAT</code>: The value of your token</li>
</ul>

<p><br /></p>

<h3 id="unity">Unity</h3>

<p>For the Unity’s license activation we need to add a few more secrets. Follow <a href="https://game.ci/docs/github/activation#setting-up-your-unity-license">this guide</a>.</p>

<p>Locate your license file:</p>
<ul>
  <li>Windows: <code class="language-plaintext highlighter-rouge">C:\ProgramData\Unity\Unity_lic.ulf</code></li>
  <li>Mac: <code class="language-plaintext highlighter-rouge">/Library/Application Support/Unity/Unity_lic.ulf</code></li>
  <li>Linux: <code class="language-plaintext highlighter-rouge">~/.local/share/unity3d/Unity/Unity_lic.ulf</code></li>
</ul>

<h4 id="unity-secrets">Unity Secrets</h4>

<ul>
  <li><code class="language-plaintext highlighter-rouge">UNITY_SERIAL</code>: If using a professional license, copy your serial</li>
  <li><code class="language-plaintext highlighter-rouge">UNITY_LICENSE</code>: Copy the contents of your <code class="language-plaintext highlighter-rouge">.ulf</code> license file if using a personal license</li>
  <li><code class="language-plaintext highlighter-rouge">UNITY_EMAIL</code>: Enter the email address associated with your Unity account</li>
  <li><code class="language-plaintext highlighter-rouge">UNITY_PASSWORD</code>: Enter the password for your Unity account</li>
</ul>

<p><br /></p>

<h3 id="misc">Misc</h3>

<p>Some miscellaneous secrets to personalize the workflows.</p>

<h4 id="misc-variables">Misc Variables</h4>

<ul>
  <li><code class="language-plaintext highlighter-rouge">APP_NAME</code>: The value that will be used to name the file (ex; <code class="language-plaintext highlighter-rouge">my-game</code> for “my-game.zip”)</li>
  <li><code class="language-plaintext highlighter-rouge">APP_NAME_DISPLAY</code>: Name of your app for display (ex; <code class="language-plaintext highlighter-rouge">My Game</code>)</li>
  <li><code class="language-plaintext highlighter-rouge">APP_COMPANY</code>: Company name for some metadata (ex; <code class="language-plaintext highlighter-rouge">Your Name</code>)</li>
  <li><code class="language-plaintext highlighter-rouge">APP_UNITY_PATH</code>: Path to your Unity project (ex; <code class="language-plaintext highlighter-rouge">Unity.Test</code>)</li>
  <li><code class="language-plaintext highlighter-rouge">APP_UNITY_VERSION</code>: The unity version (ex; <code class="language-plaintext highlighter-rouge">6000.0.35f1</code>)</li>
</ul>

<p><br /></p>

<h2 id="run-the-actions">Run the actions</h2>

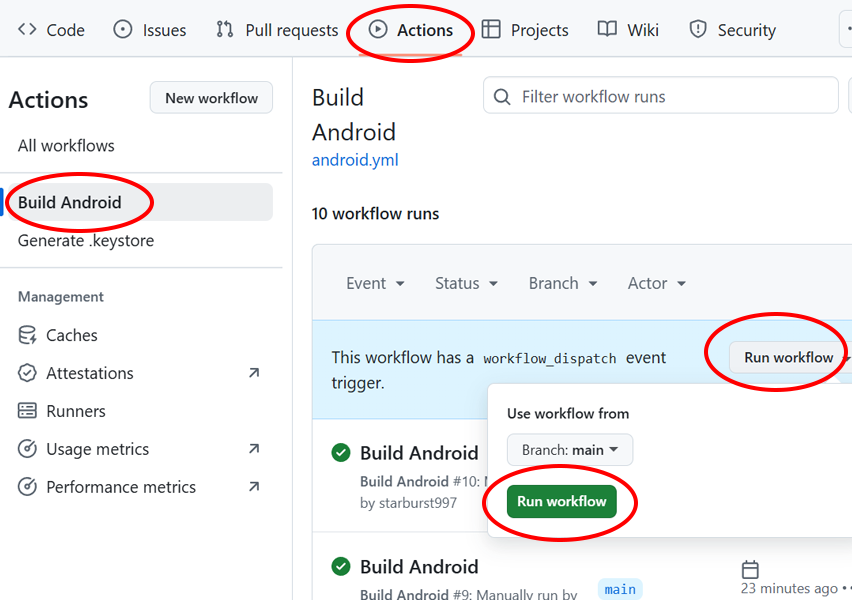
<p>Now that we have all the needed secrets and variables, we can call the workflow for each platforms individually to test each release. To do so, go to the <strong>Actions</strong> tab of your repository in Github, select a platform on the left panel and click <strong>Run workflow</strong>.</p>

<p>iOS / macOS requires that you run the <strong>Apple Setup</strong> workflow once to link it to the <a href="https://docs.fastlane.tools/actions/match/">match</a> repository.</p>

<p>For Android, iOS and macOS you’ll also want to create the App Page in their respective app store, make sure you followed the guide for each platform carefully.</p>

<p>The workflows reference the original files available in <a href="https://github.com/starburst997/unity-github-actions/tree/v1/.github/workflows">another branch</a>. This allow to provide update easily. But feel free to simply copy the originals instead and adapt.</p>

<p><br /></p>

<h2 id="use-self-hosted-runners">Use self-hosted runners</h2>

<p><em>(optional)</em> While you can build all the platforms using Github’s runners, to keep the bills low and speed up the build process, I strongly suggest that you setup your own <a href="https://docs.github.com/en/actions/hosting-your-own-runners/managing-self-hosted-runners/about-self-hosted-runners">self-hosted runners</a>.</p>

<p>Except for the workflows that require a specific platform to compile on (ex; macOS for iOS), they should all be cross-platforms.</p>

<p>Keep your repository private just to be safe if you use one!</p>

<p>Personally, I’ve setup a <a href="https://ubuntu.com/download/desktop">Linux</a> VM (via <a href="https://www.vmware.com/">VMWare</a>) that auto-start on my Windows machine. This allow me to better control how much resources it can use so it doesn’t disrupt my work (I never notice a build is compilling).</p>

<p>Execute the <a href="https://github.com/starburst997/unity-github-actions/blob/main/scripts/workflows/self-host.sh">scripts/workflows/self-host.sh</a> script to install missing softwares from a fresh <code class="language-plaintext highlighter-rouge">Ubuntu 24.04</code>.</p>

<p>Apart from the jobs that requires a specific OS, a linux runner should be enough to ensure that the vast majority of the work is done locally so you save both time and money.</p>

<p>Simply set the <code class="language-plaintext highlighter-rouge">runner</code> and <code class="language-plaintext highlighter-rouge">runner-extra</code> variables in each workflows to use <code class="language-plaintext highlighter-rouge">self-hosted</code>.</p>

<h3 id="use-a-local-cache">Use a local cache</h3>

<p><em>(optional)</em> By using the <a href="https://gha-cache-server.falcondev.io/">Actions Cache Server</a> we can use a local cache for our self-hosted runners without any modifications to our workflows instead of going back and forth with Github’s servers.</p>

<p>Create a yml file for docker (follow <a href="https://docs.docker.com/get-started/">this guide</a> to setup docker).</p>

<h4 id="docker-composeyml">docker-compose.yml</h4>
<div class="language-yml highlighter-rouge"><div class="highlight"><pre class="highlight"><code><span class="na">version</span><span class="pi">:</span> <span class="s1">'</span><span class="s">3.9'</span>
<span class="na">name</span><span class="pi">:</span> <span class="s">cache-fix</span>
<span class="na">services</span><span class="pi">:</span>
  <span class="na">cache-server</span><span class="pi">:</span>
    <span class="na">image</span><span class="pi">:</span> <span class="s">ghcr.io/falcondev-oss/github-actions-cache-server:4</span>
    <span class="na">ports</span><span class="pi">:</span>
      <span class="pi">-</span> <span class="s1">'</span><span class="s">3000:3000'</span>
    <span class="na">environment</span><span class="pi">:</span>
      <span class="na">URL_ACCESS_TOKEN</span><span class="pi">:</span> <span class="s">XXXXXXXX</span>
      <span class="na">API_BASE_URL</span><span class="pi">:</span> <span class="s">http://localhost:3000</span>
      <span class="na">CLEANUP_OLDER_THAN_DAYS</span><span class="pi">:</span> <span class="m">30</span>
    <span class="na">volumes</span><span class="pi">:</span>
      <span class="pi">-</span> <span class="s">cache-data:/app/.data</span>
    <span class="na">restart</span><span class="pi">:</span> <span class="s">unless-stopped</span>

<span class="na">volumes</span><span class="pi">:</span>
  <span class="na">cache-data</span><span class="pi">:</span>
</code></pre></div></div>

<p>And start the cache server: <code class="language-plaintext highlighter-rouge">docker compose up</code> (inside your VM)</p>

<p>Set this environment variable inside <code class="language-plaintext highlighter-rouge">~/actions-runner/.env</code></p>

<div class="language-sh highlighter-rouge"><div class="highlight"><pre class="highlight"><code><span class="nv">ACTIONS_CACHE_URL</span><span class="o">=</span>http://localhost:3000/XXXXXXXX/
</code></pre></div></div>

<p>Now we need to patch the DLLs of our Github Runner to use our <code class="language-plaintext highlighter-rouge">ACTIONS_CACHE_URL</code> environment variable that will point to our cache server.</p>

<div class="language-sh highlighter-rouge"><div class="highlight"><pre class="highlight"><code><span class="nb">cp</span> <span class="nt">-n</span> ~/actions-runner/bin/Runner.Worker.dll ~/Runner.Worker.backup.dll
<span class="nb">sed</span> <span class="nt">-i</span> <span class="s1">'s/\x41\x00\x43\x00\x54\x00\x49\x00\x4F\x00\x4E\x00\x53\x00\x5F\x00\x43\x00\x41\x00\x43\x00\x48\x00\x45\x00\x5F\x00\x55\x00\x52\x00\x4C\x00/\x41\x00\x43\x00\x54\x00\x49\x00\x4F\x00\x4E\x00\x53\x00\x5F\x00\x43\x00\x41\x00\x43\x00\x48\x00\x45\x00\x5F\x00\x4F\x00\x52\x00\x4C\x00/g'</span> ~/actions-runner/bin/Runner.Worker.dll
<span class="nb">sed</span> <span class="nt">-i</span> <span class="s1">'s/\x41\x00\x43\x00\x54\x00\x49\x00\x4F\x00\x4E\x00\x53\x00\x5F\x00\x43\x00\x41\x00\x43\x00\x48\x00\x45\x00\x5F\x00\x53\x00\x45\x00\x52\x00\x56\x00\x49\x00\x43\x00\x45\x00\x5F\x00\x56\x00\x32\x00/\x41\x00\x43\x00\x54\x00\x49\x00\x4F\x00\x4E\x00\x53\x00\x5F\x00\x43\x00\x41\x00\x43\x00\x48\x00\x45\x00\x5F\x00\x53\x00\x45\x00\x52\x00\x56\x00\x49\x00\x43\x00\x45\x00\x5F\x00\x56\x00\x31\x00/g'</span> ~/actions-runner/bin/Runner.Worker.dll
</code></pre></div></div>

<p>Don’t worry, it simply replace the string <code class="language-plaintext highlighter-rouge">ACTIONS_CACHE_URL</code> inside the DLL so our variable doesn’t get overwritten.</p>

<p><em>(they should really allow this option officially…)</em></p>

<p><br /></p>

<h2 id="use-an-organization">Use an organization</h2>

<p><em>(optional)</em> By using an organization instead of your personal account, you can setup all the secrets to be shared accross all the repositories (<em>only paid plans</em>), making it even faster to setup a new project. Bonus: you only need to setup one self-hosted runner as well since they are locked to one repository each otherwise.</p>

<p>You’ll need to fork this template and replace all instances of <code class="language-plaintext highlighter-rouge">uses: starburst997/unity-github-actions</code> with <code class="language-plaintext highlighter-rouge">uses: &lt;YOUR_ORG&gt;&gt;/unity-github-actions</code>. This is needed because referenced workflows needs to be from the same organization to inherit secrets. See <a href="https://github.com/starburst997/unity-github-actions/compare/main...jd-boiv-in:unity-github-actions:main">this diff</a>.</p>

<p><em>(temporary until I fix this issue)</em> You’ll also need to fork <a href="https://github.com/starburst997/yearly-version">this repository</a> and replace all instances as well in your forked template repository in the <code class="language-plaintext highlighter-rouge">v1</code> branch to use this new fork instead. See <a href="https://github.com/starburst997/unity-github-actions/compare/v1...jd-boiv-in:unity-github-actions:v1">this diff</a>.</p>

<p><br /></p>

<h2 id="lfs">LFS</h2>

<p>Enable LFS by renaming <code class="language-plaintext highlighter-rouge">.gitattributes.disabled</code> to <code class="language-plaintext highlighter-rouge">.gitattributes</code>.</p>

<p><br /></p>

<h2 id="doing-a-release">Doing a release</h2>

<p>The way I do my releases, I first create a build for a given platform by using <strong>Run workflow</strong> in <strong>Actions</strong> and set the <strong>Release Candidate</strong> option to <code class="language-plaintext highlighter-rouge">true</code>. I test it, fixes any issues and then move to the next platform. If an issue is platform specific, I fix it but I don’t make another build for the other platforms I’ve already built and tested.</p>

<p>Once I’m satisfied, I run the <strong>Release</strong> action by selecting the <strong>Use release candidates</strong> option which will then look in <strong>S3</strong> for all the latest candidate builds for all the platforms and copy them to the release folder. The action will create a neat Discord notification, increment the release number and do a Github release.</p>

<p>The <strong>Release</strong> workflow will also output variables for each platforms that you can use to personalize your final release action (ex; ping your server).</p>

<p>For Google Play / Apple App Store, I manually select the build I vetted from the internal lanes. I don’t do automatic release on stores.</p>

<p><br /></p>

<h2 id="end-results">End results</h2>

<center class="images borders">
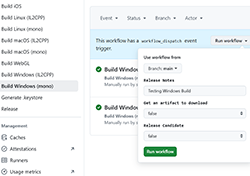
  <div><a href="https://jd.boiv.in/assets/posts/2025-02-11-unity-github-actions/results-01.png" target="_blank"><img src="https://jd.boiv.in/assets/posts/2025-02-11-unity-github-actions/small/results-01.png" alt="Build binary using Github Action" title="Build binary using Github Action" /></a><br />1</div>&nbsp;&nbsp;
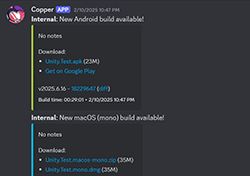
  <div><a href="https://jd.boiv.in/assets/posts/2025-02-11-unity-github-actions/results-02.png" target="_blank"><img src="https://jd.boiv.in/assets/posts/2025-02-11-unity-github-actions/small/results-02.png" alt="Discord Notifications" title="Discord Notifications" /></a><br />2</div>&nbsp;&nbsp;
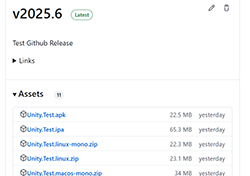
  <div><a href="https://jd.boiv.in/assets/posts/2025-02-11-unity-github-actions/results-03.png" target="_blank"><img src="https://jd.boiv.in/assets/posts/2025-02-11-unity-github-actions/small/results-03.png" alt="Github release" title="Github release" /></a><br />3</div>&nbsp;&nbsp;
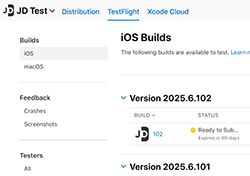
  <div><a href="https://jd.boiv.in/assets/posts/2025-02-11-unity-github-actions/results-04.png" target="_blank"><img src="https://jd.boiv.in/assets/posts/2025-02-11-unity-github-actions/small/results-04.png" alt="Automatic publishing to Apple App Store" title="Automatic publishing to Apple App Store" /></a><br />4</div>
</center>

<ol>
  <li>
    <p>Build the platform of your choice with Github Actions.</p>
  </li>
  <li>
    <p>Discord notifications with links to download, play in your browser and commit diff.</p>
  </li>
  <li>
    <p><a href="https://github.com/starburst997/unity-github-actions/releases">Github release</a> with binaries for all platforms.</p>
  </li>
  <li>
    <p>Automatic publishing to Apple App Store and Google Play.</p>
  </li>
</ol>

<p><br /></p>

<h2 id="conclusion">Conclusion</h2>

<p>It took a bit more time than I expected but at least I have a workflow for building and publishing my unity apps that doesn’t sucks, is <em>easy</em> to setup and that I can re-use from project to project.</p>

<p>I don’t need to worry about certificates or read the same stack overflow answer years after years on how to generate some keys, I can simply set it up one time and be done (with automatic renewal).</p>

<p>The “building the unity app” step is pretty self-contained and could be adapted for any frameworks / engines, maybe <a href="https://godotengine.org/">Godot</a> could be next…</p>

<p><br /></p>

<p>Code-signing / distributing app series:</p>
<ul>
  <li>Part 1: <a href="/post/2025/01/29/code-signing.html">Code Signing for Windows as an Individual Developer</a></li>
  <li>Part 2: <a href="/post/2025/02/02/code-signing-apple.html">Code Signing for Apple without a mac</a></li>
  <li>Part 3: <a href="/post/2025/02/05/android-publish.html">Code Signing for Android via Github Actions</a></li>
  <li>Part 4: <a href="/post/2025/02/11/unity-github-actions.html">Build and publish your Unity Game using Github Actions</a></li>
</ul>

<p><br /></p>]]></content><author><name>Jean-Denis Boivin</name></author><category term="post" /><summary type="html"><![CDATA[(TL;DR: Build and publish your Unity app using Github Actions via GameCI)]]></summary></entry><entry><title type="html">Code Signing for Android via Github Actions</title><link href="https://jd.boiv.in/post/2025/02/05/android-publish.html" rel="alternate" type="text/html" title="Code Signing for Android via Github Actions" /><published>2025-02-05T22:00:00+00:00</published><updated>2025-02-05T22:00:00+00:00</updated><id>https://jd.boiv.in/post/2025/02/05/android-publish</id><content type="html" xml:base="https://jd.boiv.in/post/2025/02/05/android-publish.html"><![CDATA[<p><em>(<strong>TL;DR</strong>: By using <a href="https://docs.fastlane.tools/actions/supply/">fastlane supply</a> and <a href="https://github.com/features/actions">Github Action</a> we can compile and publish an Android app automatically)</em></p>

<p><em>(Part three of my series on code-signing / distributing apps, check <a href="/post/2025/02/11/unity-github-actions.html">Part 4 on Building Unity Game using Github Action</a>)</em></p>

<p><br /></p>

<h2 id="create-github-repository">Create Github Repository</h2>

<p>Create a Github Repository for your project. Feel free to use <a href="https://github.com/starburst997/android-code-sign">this repository</a> as a template since it already contains all the workflows files.</p>

<p><br /></p>

<h2 id="installing-fastlane">Installing fastlane</h2>

<p>We need to install <a href="https://fastlane.tools/">fastlane</a> locally on our machine, first makes sure you have <a href="https://www.ruby-lang.org/en/documentation/installation/#rubyinstaller">ruby</a> installed (personally I prefer via <a href="https://learn.microsoft.com/en-us/windows/wsl/install">WSL2</a>).</p>

<p>Also you need to makes sure <a href="https://bundler.io/">Bundler</a> is installed:</p>

<div class="language-sh highlighter-rouge"><div class="highlight"><pre class="highlight"><code>gem <span class="nb">install </span>bundler
</code></pre></div></div>

<p>Now create a file called <code class="language-plaintext highlighter-rouge">Gemfile</code> in the root:</p>

<div class="language-ruby highlighter-rouge"><div class="highlight"><pre class="highlight"><code><span class="n">source</span> <span class="s2">"https://rubygems.org"</span>
<span class="n">gem</span> <span class="s2">"fastlane"</span>
<span class="n">gem</span> <span class="s1">'fastlane-plugin-github_action'</span><span class="p">,</span> <span class="ss">git: </span><span class="s2">"https://github.com/starburst997/fastlane-plugin-github_action"</span>
</code></pre></div></div>

<p>Notice that we’re using my fork of <a href="https://github.com/starburst997/fastlane-plugin-github_action">joshdholtz/fastlane-plugin-github_action</a>, this is because the published gem is out of date.</p>

<p>Now run:</p>

<div class="language-sh highlighter-rouge"><div class="highlight"><pre class="highlight"><code>bundle <span class="nb">install</span>
</code></pre></div></div>

<p><br /></p>

<h2 id="create-a-google-play-console-account">Create a Google Play Console Account</h2>

<p><a href="https://play.google.com/console/signup">Sign up</a> for a <strong>Google Play Console</strong> account, you’ll need to pay a one-time fee of $25 and verify your identity.</p>

<p>You can follow the <a href="https://support.google.com/googleplay/android-developer/answer/6112435">instructions here</a> but it’s pretty straight-forward.</p>

<p><br /></p>

<h2 id="create-a-google-service-account">Create a Google Service Account</h2>

<p>To programmatically access the <a href="https://play.google.com/console/?hl=en">Google Play Console</a>, you will need a dedicated <strong>Google Service</strong> account with API access.</p>

<p>The <a href="https://docs.fastlane.tools/actions/supply/">fastlane documentation</a> highlight the steps but here’s a summary:</p>

<center class="images borders">
  <div><a href="/assets/posts/2025-02-05-android-publish/google-service-01.png" target="_blank"><img src="/assets/posts/2025-02-05-android-publish/google-service-01.png" alt="Create Google Project" title="Create Google Project" /></a><br />1</div>&nbsp;&nbsp;
  <div><a href="/assets/posts/2025-02-05-android-publish/google-service-02.png" target="_blank"><img src="/assets/posts/2025-02-05-android-publish/google-service-02.png" alt="Enable Google Play Developer API" title="Enable Google Play Developer API" /></a><br />2</div>&nbsp;&nbsp;
  <div><a href="/assets/posts/2025-02-05-android-publish/google-service-03.png" target="_blank"><img src="/assets/posts/2025-02-05-android-publish/google-service-03.png" alt="Select your project" title="Select your project" /></a><br />3</div>&nbsp;&nbsp;
  <div><a href="/assets/posts/2025-02-05-android-publish/google-service-04.png" target="_blank"><img src="/assets/posts/2025-02-05-android-publish/google-service-04.png" alt="Create a new Service Account" title="Create a new Service Account" /></a><br />4</div>
</center>

<ol>
  <li>
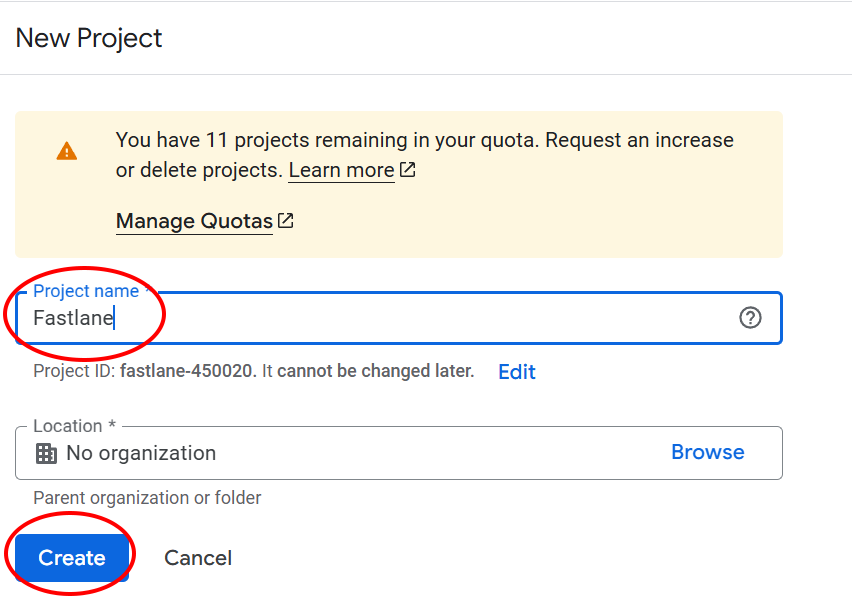
    <p>Create a <a href="https://console.cloud.google.com/projectcreate">Google Cloud Project</a> (or use an existing one). Give it a name and click create (<a href="https://cloud.google.com/resource-manager/docs/creating-managing-projects">more info</a>).</p>
  </li>
  <li>
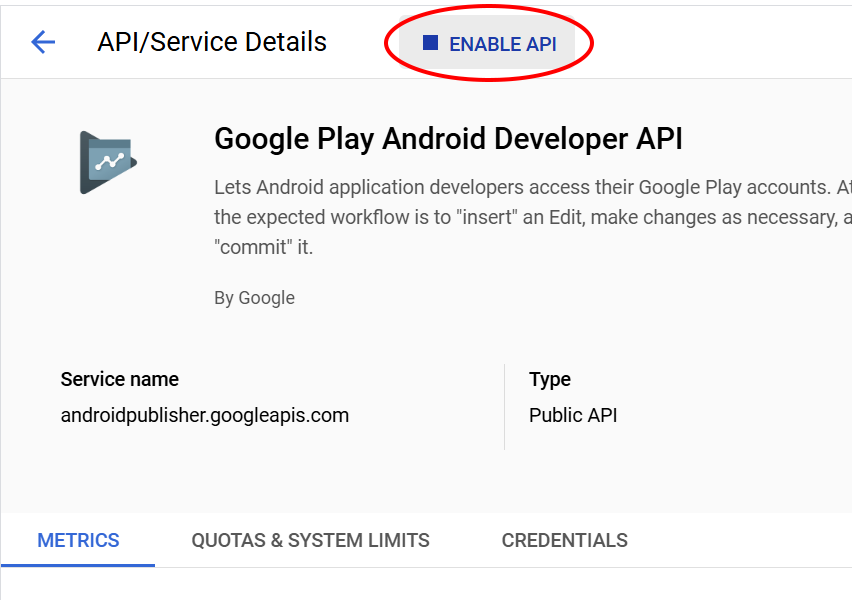
    <p>Enable the <a href="https://console.developers.google.com/apis/api/androidpublisher.googleapis.com/?hl=en">Google Play Developer API</a> by clicking the <strong>Enable API</strong> button for your newly created project.</p>
  </li>
  <li>
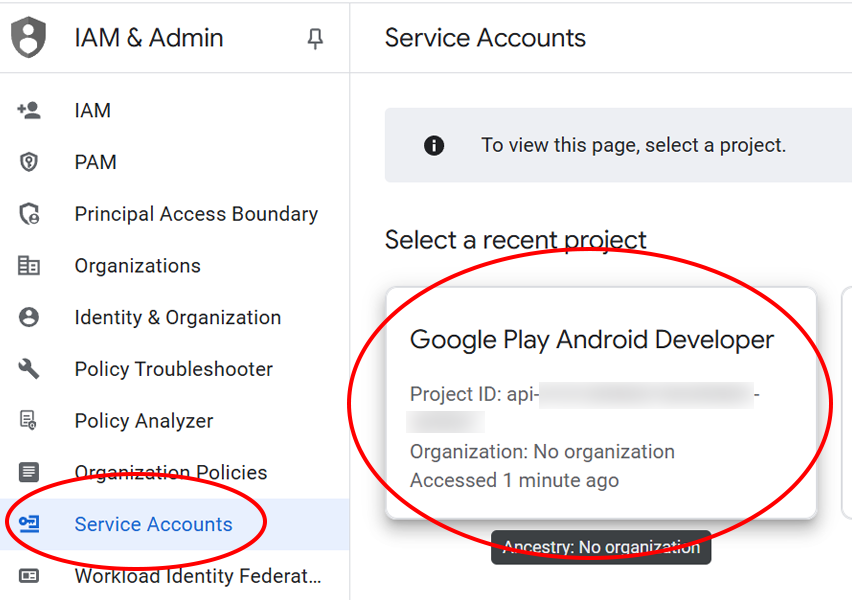
    <p>Open <a href="https://console.cloud.google.com/iam-admin/serviceaccounts?hl=en">Service Accounts</a> on Google Cloud and select your project.</p>
  </li>
  <li>
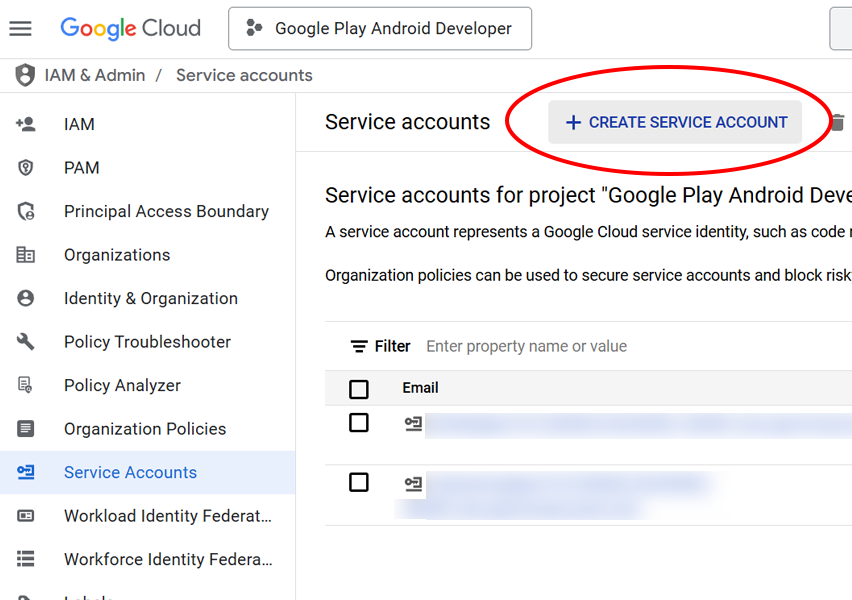
    <p>Create a new <strong>Service Account</strong> by clicking the create button.</p>
  </li>
</ol>

<center class="images borders">
  <div><a href="/assets/posts/2025-02-05-android-publish/google-service-05.png" target="_blank"><img src="/assets/posts/2025-02-05-android-publish/google-service-05.png" alt="Fill form, copy email" title="Fill form, copy email" /></a><br />5</div>&nbsp;&nbsp;
  <div><a href="/assets/posts/2025-02-05-android-publish/google-service-06.png" target="_blank"><img src="/assets/posts/2025-02-05-android-publish/google-service-06.png" alt="Select Managed Key" title="Select Managed Key" /></a><br />6</div>&nbsp;&nbsp;
  <div><a href="/assets/posts/2025-02-05-android-publish/google-service-07.png" target="_blank"><img src="/assets/posts/2025-02-05-android-publish/google-service-07.png" alt="Create new key" title="Create new key" /></a><br />7</div>&nbsp;&nbsp;
  <div><a href="/assets/posts/2025-02-05-android-publish/google-service-08.png" target="_blank"><img src="/assets/posts/2025-02-05-android-publish/google-service-08.png" alt="Save JSON key" title="Save JSON key" /></a><br />8</div>
</center>

<ol>
  <li>
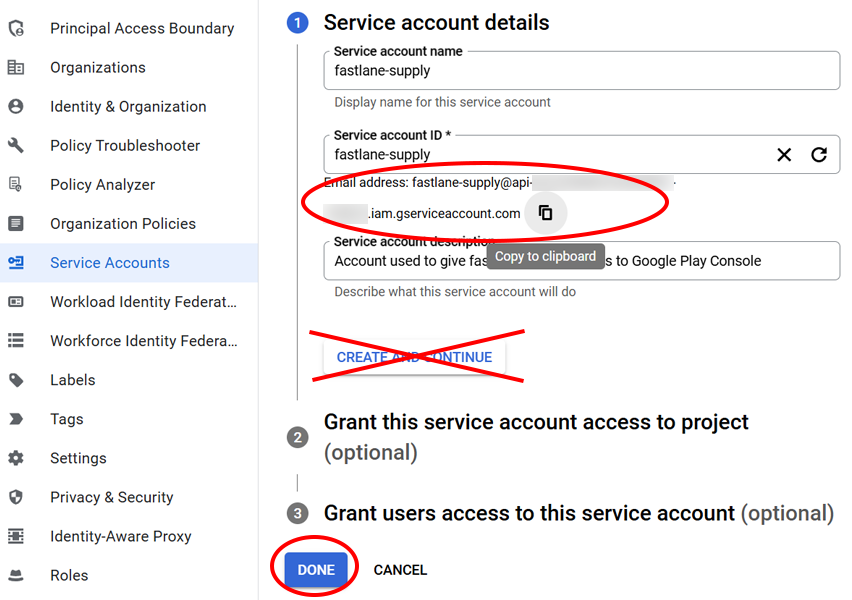
    <p>Give it a name and ID, copy the resulting <strong>Email address</strong> (we will need it later). Click on <strong>Done</strong>, <em>NOT</em> <del>Create and Continue</del>.</p>
  </li>
  <li>
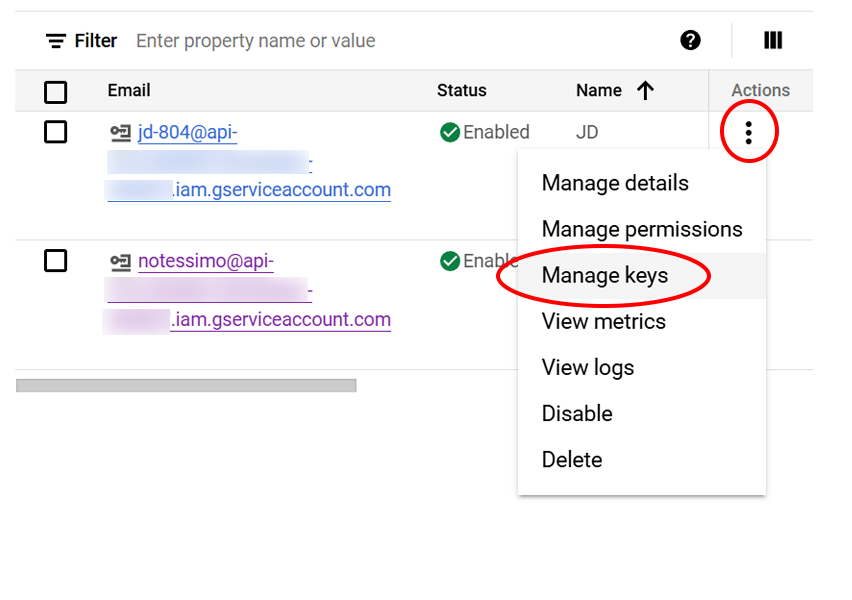
    <p>Click on the vertical <strong>three-dot icon</strong> (under <strong>Actions</strong>) of your newly created account, and select <strong>Manage keys</strong>.</p>
  </li>
  <li>
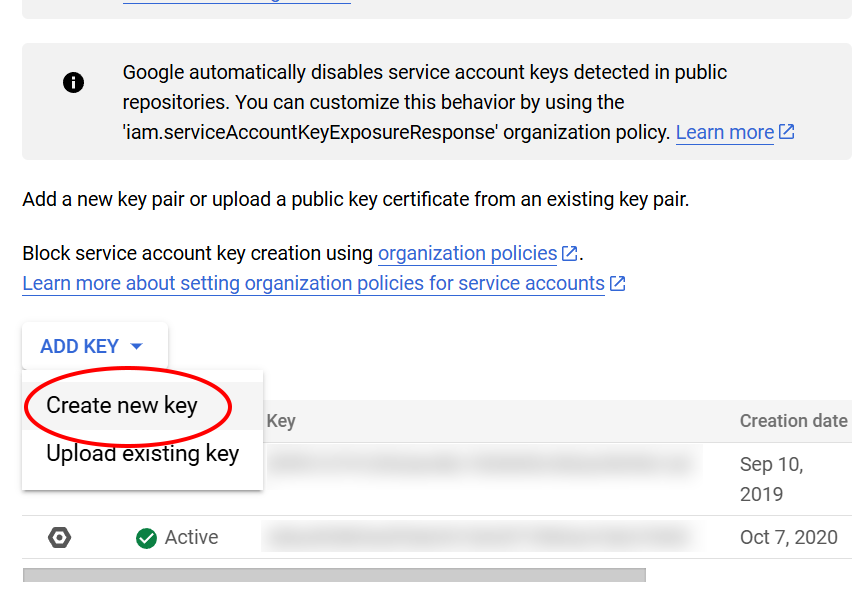
    <p>Click on <strong>Add key</strong> and select <strong>Create new key</strong>.</p>
  </li>
  <li>
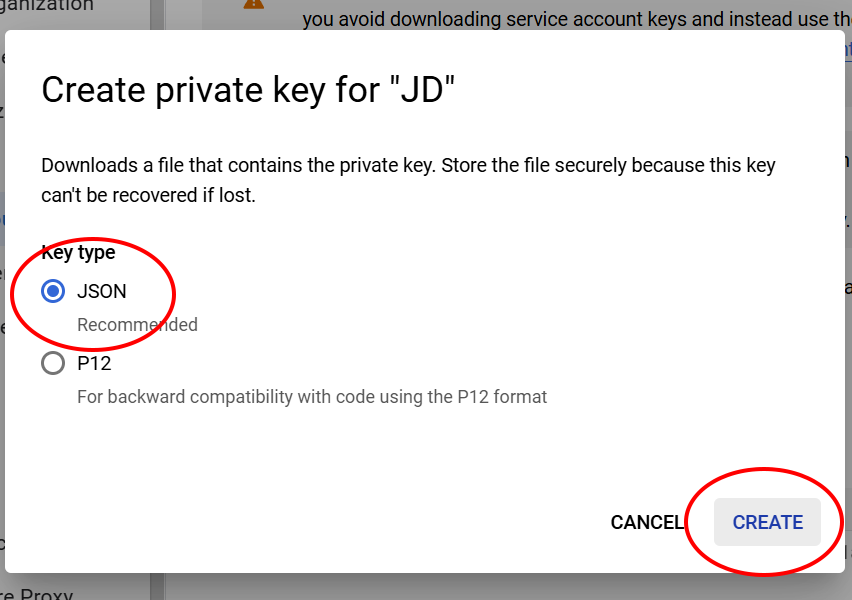
    <p>Make sure to select <strong>JSON</strong>, click <strong>Create</strong> and save the file on your computer.</p>
  </li>
</ol>

<p><br /></p>

<h2 id="invite-service-account-to-google-play-console">Invite Service Account to Google Play Console</h2>

<center class="images borders">
  <div><a href="/assets/posts/2025-02-05-android-publish/invite-service-01.png" target="_blank"><img src="/assets/posts/2025-02-05-android-publish/invite-service-01.png" alt="Invite new user" title="Invite new user" /></a><br />1</div>&nbsp;&nbsp;
  <div><a href="/assets/posts/2025-02-05-android-publish/invite-service-02.png" target="_blank"><img src="/assets/posts/2025-02-05-android-publish/invite-service-02.png" alt="Paste email address" title="Paste email address" /></a><br />2</div>&nbsp;&nbsp;
  <div><a href="/assets/posts/2025-02-05-android-publish/invite-service-03.png" target="_blank"><img src="/assets/posts/2025-02-05-android-publish/invite-service-03.png" alt="Choose permissions" title="Choose permissions" /></a><br />3</div>
</center>

<ol>
  <li>
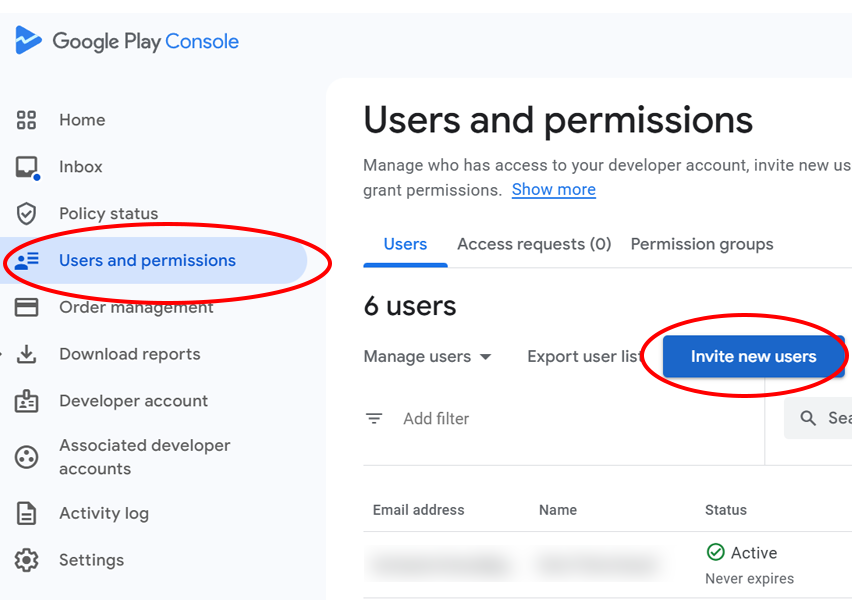
    <p>Open the <a href="https://play.google.com/console/?hl=en">Google Play Console</a> and select <strong>Users and Permissions</strong>. Click <strong>Invite new users</strong>.</p>
  </li>
  <li>
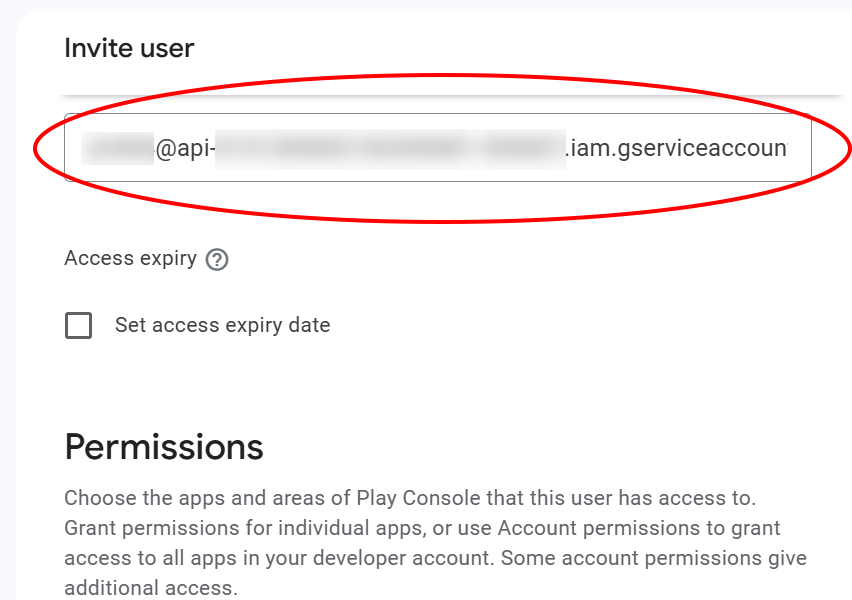
    <p>Paste the <strong>email address</strong> of the <strong>Service Account</strong> you saved for later (<code class="language-plaintext highlighter-rouge">xxxx@yyyy.iam.gserviceaccount.com</code>).</p>
  </li>
  <li>
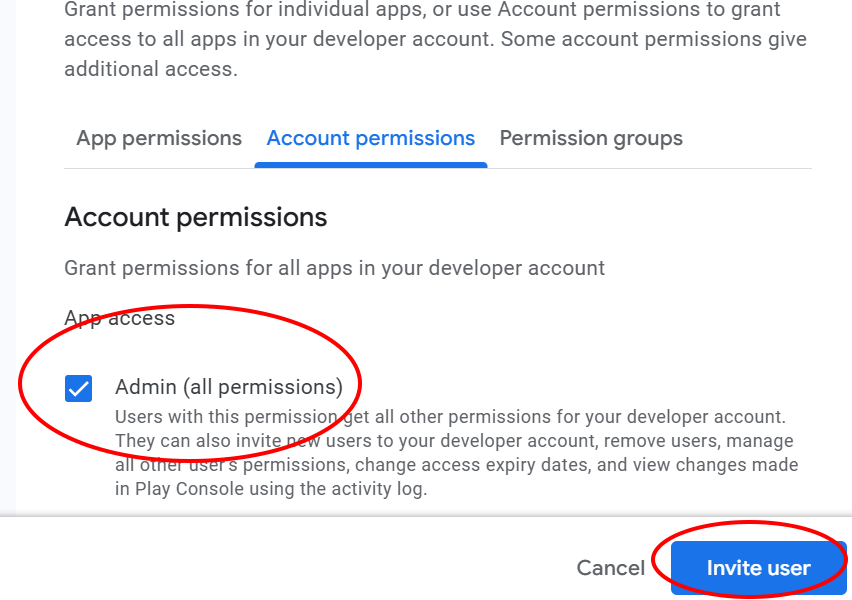
    <p>Choose the permissions: <strong>Admin (all permissions)</strong>. Click on <strong>Invite User</strong>.</p>
  </li>
</ol>

<p><br /></p>

<h2 id="test-your-json-file">Test your JSON file</h2>

<p>We can now test that the connection is valid using your <strong>JSON file</strong> by running this command:</p>

<div class="language-sh highlighter-rouge"><div class="highlight"><pre class="highlight"><code>bundle <span class="nb">exec </span>fastlane run validate_play_store_json_key json_key:/path/to/your/downloaded/file.json
</code></pre></div></div>

<p>Look for <code class="language-plaintext highlighter-rouge">Successfully established connection to Google Play Store</code>.</p>

<p><br /></p>

<h2 id="generate-a-personal-access-token-pat">Generate a Personal Access Token (PAT)</h2>

<center class="images borders">
  <div><a href="/assets/posts/2025-02-02-code-signing-apple/pat_01.png" target="_blank"><img src="/assets/posts/2025-02-02-code-signing-apple/pat_01.png" alt="Generate New Token (Classic)" title="Generate New Token (Classic)" /></a><br />1</div>&nbsp;&nbsp;
  <div><a href="/assets/posts/2025-02-02-code-signing-apple/pat_02.png" target="_blank"><img src="/assets/posts/2025-02-02-code-signing-apple/pat_02.png" alt="Use repo score" title="Use repo score" /></a><br />2</div>
</center>

<p>We also need to generate a <strong>Personal Access Token</strong> for Github.</p>

<p>This will enables us to increment a build number after each build.</p>

<ol>
  <li>
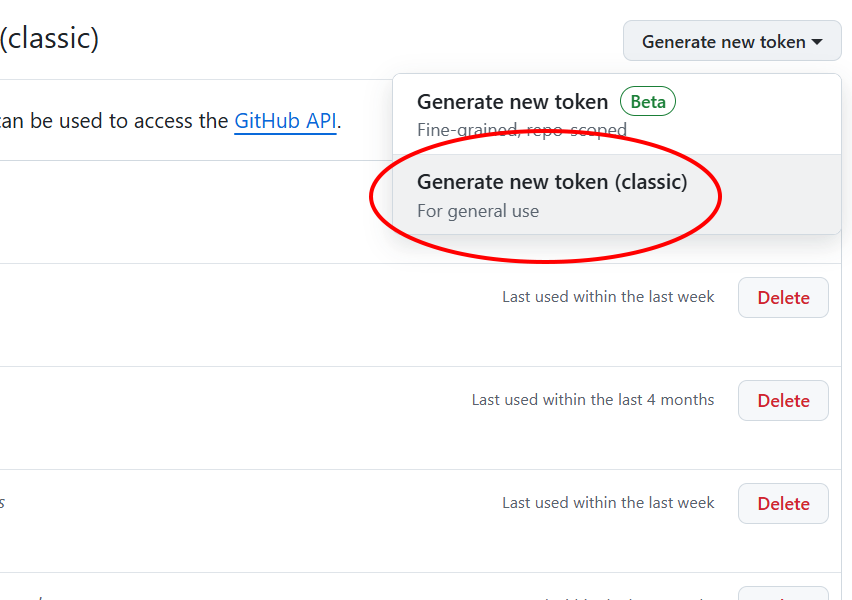
    <p>Visit your <a href="https://github.com/settings/tokens">settings page</a> and click on <strong>Generate new token</strong> and select <strong>Generate new token (classic)</strong>.</p>
  </li>
  <li>
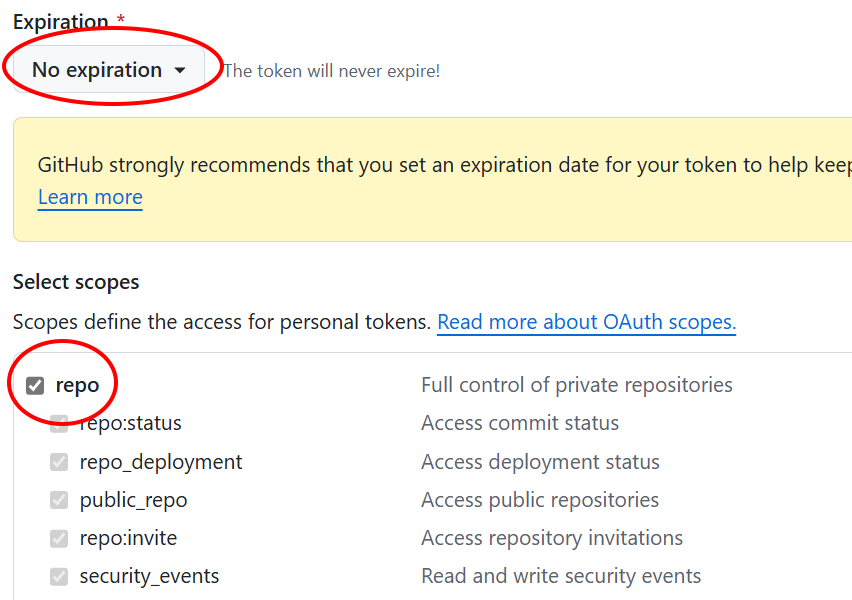
    <p>We need all the <strong>repo</strong> scope enabled. Set <strong>no expiration</strong>. Click <strong>Generate token</strong> and save the value.</p>
  </li>
</ol>

<h3 id="save-secrets">Save secrets</h3>

<p>Save this secret in the github repository for your project:</p>

<ul>
  <li><code class="language-plaintext highlighter-rouge">GH_PAT</code>: The value of your newly generated token</li>
</ul>

<p><br /></p>

<h2 id="generate-an-upload-key-and-keystore">Generate an upload key and keystore</h2>

<p>You can generate your key using <a href="https://developer.android.com/studio/publish/app-signing#generate-key">Android Studio</a>, but here’s how you can do it on the command line using <a href="https://docs.oracle.com/javase/7/docs/technotes/tools/solaris/keytool.html">keytool</a> (available in your JDK’s bin folder):</p>

<div class="language-sh highlighter-rouge"><div class="highlight"><pre class="highlight"><code>keytool <span class="nt">-genkey</span> <span class="nt">-v</span> <span class="nt">-keystore</span> .keystore <span class="nt">-keyalg</span> RSA <span class="nt">-keysize</span> 2048 <span class="nt">-validity</span> 10000
</code></pre></div></div>

<p>You’ll be prompt to add some information, keep notes of the <strong>password</strong> (use the same for both) and the <strong>alias</strong>.</p>

<p>For ease of use afterward, we’ll save the keystore as <strong>base64</strong> and save it as a secret in our repository.</p>

<div class="language-sh highlighter-rouge"><div class="highlight"><pre class="highlight"><code><span class="nb">base64</span> .keystore
</code></pre></div></div>

<p>I’ve also created a <a href="https://github.com/starburst997/keystore-gh-actions">Github Action</a> that you can run in <a href="https://github.com/starburst997/android-code-sign">this repository</a> called: <strong>Generate .keystore</strong> (<a href="https://github.com/starburst997/android-code-sign/blob/main/.github/workflows/keystore.yml">.yml</a>). You need to set the secrets: <code class="language-plaintext highlighter-rouge">ANDROID_KEYSTORE_PASS</code> and <code class="language-plaintext highlighter-rouge">ANDROID_KEYALIAS_PASS</code> first since there is no way to input password string in Github Action yet. Makes sure you added the <code class="language-plaintext highlighter-rouge">GH_PAT</code> secret as well.</p>

<p>The action will add the <code class="language-plaintext highlighter-rouge">ANDROID_KEYALIAS_NAME</code> and <code class="language-plaintext highlighter-rouge">ANDROID_KEYSTORE_BASE64</code> secrets once done.</p>

<p>Either the PKCS12 or JKS variant will works.</p>

<p><br /></p>

<h2 id="save-secrets-1">Save secrets</h2>

<p>We can now add all the necessary secrets to our repository:</p>

<ul>
  <li><code class="language-plaintext highlighter-rouge">GOOGLE_PLAY_KEY_FILE</code>: The <strong>JSON</strong> file content from the <strong>Service Account</strong>.</li>
  <li><code class="language-plaintext highlighter-rouge">ANDROID_KEYALIAS_NAME</code>: The <strong>alias</strong> used for the <strong>.keystore</strong>.</li>
  <li><code class="language-plaintext highlighter-rouge">ANDROID_KEYSTORE_PASS</code>: The <strong>password</strong> used for the <strong>.keystore</strong>.</li>
  <li><code class="language-plaintext highlighter-rouge">ANDROID_KEYALIAS_PASS</code>: The <strong>password</strong> used for the <strong>.keystore</strong> (same as above).</li>
  <li><code class="language-plaintext highlighter-rouge">ANDROID_KEYSTORE_BASE64</code>: The <strong>base64</strong> value of the <strong>.keystore</strong> file.</li>
  <li><code class="language-plaintext highlighter-rouge">ANDROID_PACKAGE_NAME</code>: The package name of your app.</li>
</ul>

<p><em>(Save those variables inside a Password Manager for re-use in future projects, except for the package name, they won’t change)</em></p>

<p><br /></p>

<h2 id="build-aab">Build .aab</h2>

<p>Before you can upload your app via <a href="https://docs.fastlane.tools/actions/supply/">fastlane</a>, you need to manually submit your app once (see <a href="https://github.com/fastlane/fastlane/issues/14686">fastlane/fastlane#14686</a>).</p>

<p>The <a href="https://github.com/starburst997/android-code-sign/tree/main/android">android folder</a> contains a simple “Hello World” project.</p>

<center class="images borders">
  <div><a href="/assets/posts/2025-02-05-android-publish/action-01.png" target="_blank"><img src="/assets/posts/2025-02-05-android-publish/action-01.png" alt="Run Build action" title="Run Build action" /></a><br />1</div>&nbsp;&nbsp;
  <div><a href="/assets/posts/2025-02-05-android-publish/action-02.png" target="_blank"><img src="/assets/posts/2025-02-05-android-publish/action-02.png" alt="Download artifact" title="Download artifact" /></a><br />2</div>
</center>

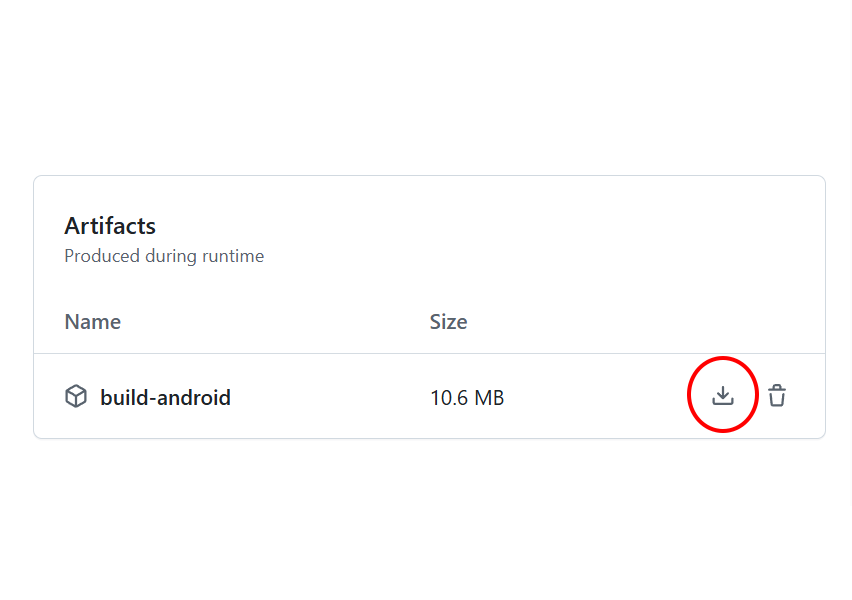
<ol>
  <li><strong>Build</strong> your app using the Github Action (<strong>Build Android</strong>). Go to the <strong>Actions</strong> tab and click <strong>Run Workflow</strong>.</li>
  <li><strong>Download</strong> the artifact once the action is done.</li>
</ol>

<p><br /></p>

<h2 id="create-app-in-google-play-console">Create app in Google Play Console</h2>

<center class="images borders">
  <div><a href="/assets/posts/2025-02-05-android-publish/create-app-01.png" target="_blank"><img src="/assets/posts/2025-02-05-android-publish/create-app-01.png" alt="Create App" title="Create App" /></a><br />1</div>&nbsp;&nbsp;
  <div><a href="/assets/posts/2025-02-05-android-publish/create-app-02.png" target="_blank"><img src="/assets/posts/2025-02-05-android-publish/create-app-02.png" alt="Fill form" title="Fill form" /></a><br />2</div>&nbsp;&nbsp;
  <div><a href="/assets/posts/2025-02-05-android-publish/create-app-03.png" target="_blank"><img src="/assets/posts/2025-02-05-android-publish/create-app-03.png" alt="Create new release" title="Create new release" /></a><br />3</div>&nbsp;&nbsp;
  <div><a href="/assets/posts/2025-02-05-android-publish/create-app-04.png" target="_blank"><img src="/assets/posts/2025-02-05-android-publish/create-app-04.png" alt="Upload .aab" title="Upload .aab" /></a><br />4</div>
</center>

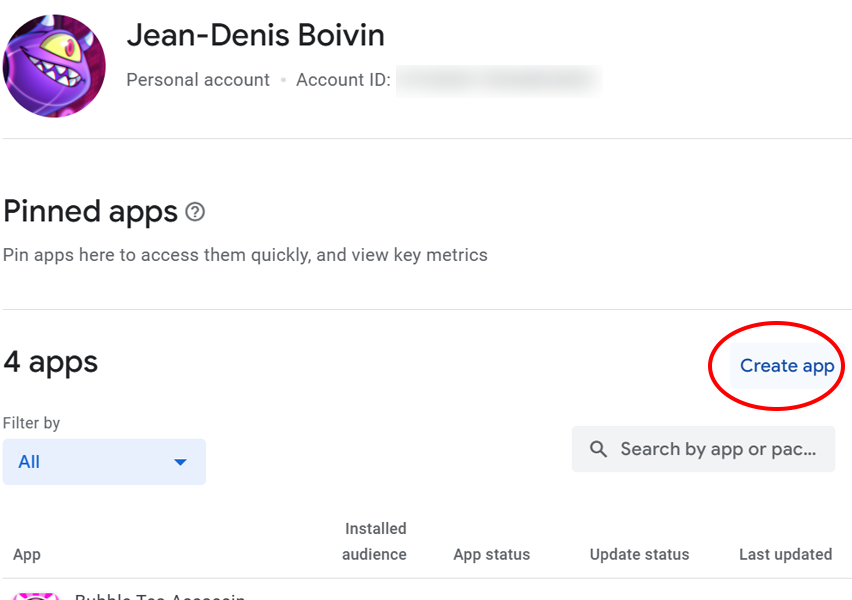
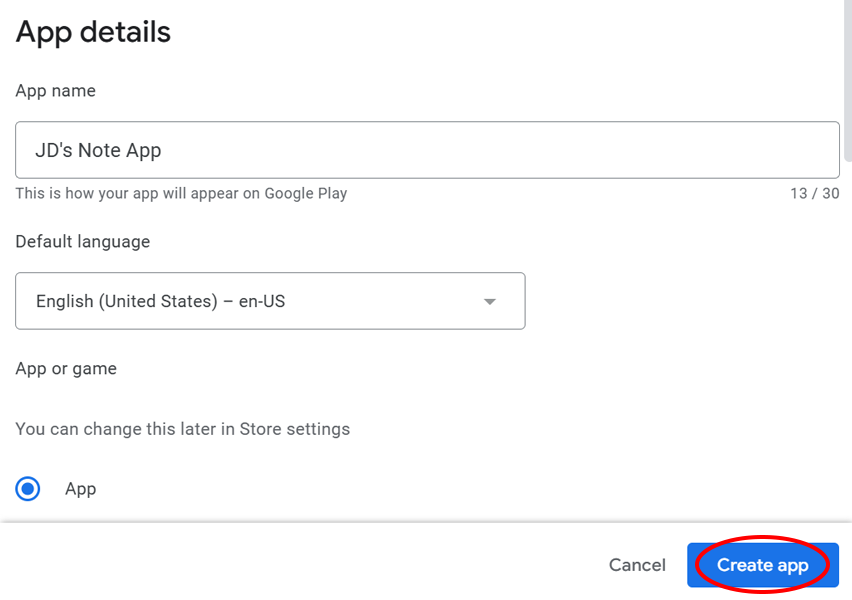
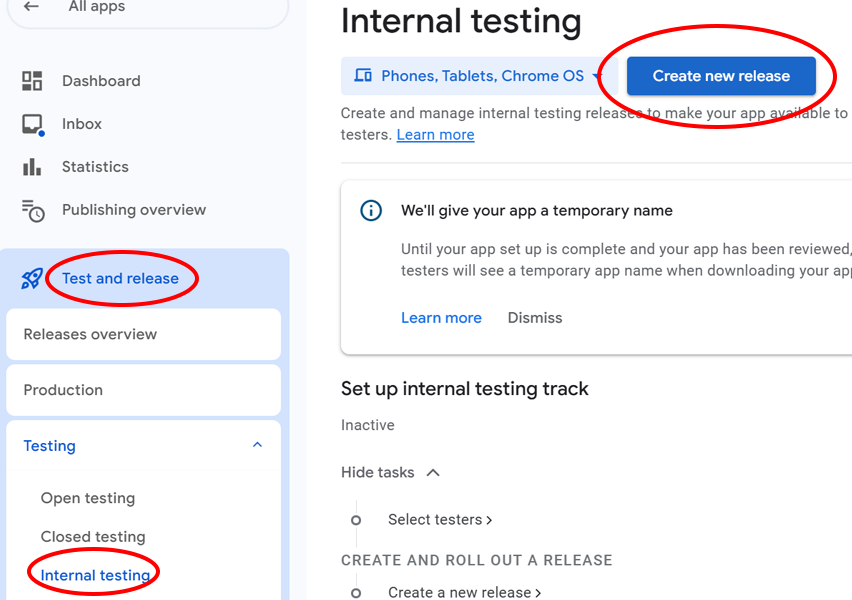
<ol>
  <li>
    <p>Open the <a href="https://play.google.com/console/?hl=en">Google Play Console</a> and click <strong>Create app</strong>.</p>
  </li>
  <li>
    <p>Fill out the form and click <strong>Create app</strong>.</p>
  </li>
  <li>
    <p>In the <strong>Test and release</strong> section, select <strong>testing</strong> and then <strong>Internal testing</strong>.Click <strong>Create new release</strong>.</p>
  </li>
  <li>
    <p>Drag and drop your <strong>.aab</strong>, enter release name and notes. Click <strong>Save and publish</strong></p>
  </li>
</ol>

<p><br /></p>

<h2 id="create-fastfiles">Create Fastfiles</h2>

<h4 id="fastlaneappfile">fastlane/Appfile</h4>
<div class="language-ruby highlighter-rouge"><div class="highlight"><pre class="highlight"><code><span class="n">for_platform</span> <span class="ss">:android</span> <span class="k">do</span>
  <span class="n">package_name</span><span class="p">(</span><span class="no">ENV</span><span class="p">[</span><span class="s2">"ANDROID_PACKAGE_NAME"</span><span class="p">])</span>
  <span class="n">json_key_file</span><span class="p">(</span><span class="no">ENV</span><span class="p">[</span><span class="s2">"GOOGLE_PLAY_KEY_FILE_PATH"</span><span class="p">])</span>
<span class="k">end</span>
</code></pre></div></div>

<h4 id="fastlanefastfile">fastlane/Fastfile</h4>
<div class="language-ruby highlighter-rouge"><div class="highlight"><pre class="highlight"><code><span class="n">org</span><span class="p">,</span> <span class="n">repo</span> <span class="o">=</span> <span class="p">(</span><span class="no">ENV</span><span class="p">[</span><span class="s2">"GITHUB_REPOSITORY"</span><span class="p">]</span><span class="o">||</span><span class="s2">""</span><span class="p">).</span><span class="nf">split</span><span class="p">(</span><span class="s2">"/"</span><span class="p">)</span>
<span class="n">match_org</span><span class="p">,</span> <span class="n">match_repo</span> <span class="o">=</span> <span class="p">(</span><span class="no">ENV</span><span class="p">[</span><span class="s2">"MATCH_REPOSITORY"</span><span class="p">]</span><span class="o">||</span><span class="s2">""</span><span class="p">).</span><span class="nf">split</span><span class="p">(</span><span class="s2">"/"</span><span class="p">)</span>

<span class="n">platform</span> <span class="ss">:android</span> <span class="k">do</span>
  <span class="n">desc</span> <span class="s2">"Upload a new Android version to the production Google Play Store"</span>
  <span class="n">lane</span> <span class="ss">:production</span> <span class="k">do</span>
    <span class="n">upload_to_play_store</span><span class="p">(</span><span class="ss">track: </span><span class="s1">'production'</span><span class="p">,</span> <span class="ss">release_status: </span><span class="s1">'completed'</span><span class="p">,</span> <span class="ss">aab: </span><span class="s2">"</span><span class="si">#{</span><span class="no">ENV</span><span class="p">[</span><span class="s1">'ANDROID_BUILD_FILE_PATH'</span><span class="p">]</span><span class="si">}</span><span class="s2">"</span><span class="p">)</span>
  <span class="k">end</span>

  <span class="n">desc</span> <span class="s2">"Upload a new Android internal version to Google Play"</span>
  <span class="n">lane</span> <span class="ss">:internal</span> <span class="k">do</span>
    <span class="n">upload_to_play_store</span><span class="p">(</span><span class="ss">track: </span><span class="s1">'internal'</span><span class="p">,</span> <span class="ss">release_status: </span><span class="s1">'completed'</span><span class="p">,</span> <span class="ss">aab: </span><span class="s2">"</span><span class="si">#{</span><span class="no">ENV</span><span class="p">[</span><span class="s1">'ANDROID_BUILD_FILE_PATH'</span><span class="p">]</span><span class="si">}</span><span class="s2">"</span><span class="p">)</span>
  <span class="k">end</span>
<span class="k">end</span>
</code></pre></div></div>

<p><br /></p>

<h2 id="create-workflows">Create workflows</h2>

<p>By using <code class="language-plaintext highlighter-rouge">workflow_call</code> we can simplify the workflow file by referencing an external one, but feel free to copy the original instead to fit your pipeline better.</p>

<p>Save those inside the <code class="language-plaintext highlighter-rouge">.github/workflows</code> directory of your repository.</p>

<h4 id="androidyml-original">android.yml (<a href="https://github.com/starburst997/android-code-sign/blob/v1/.github/workflows/android.yml">original</a>)</h4>
<div class="language-yml highlighter-rouge"><div class="highlight"><pre class="highlight"><code><span class="na">name</span><span class="pi">:</span> <span class="s">Build Android</span>

<span class="na">on</span><span class="pi">:</span> 
  <span class="na">workflow_dispatch</span><span class="pi">:</span>
  <span class="na">workflow_call</span><span class="pi">:</span>

<span class="na">jobs</span><span class="pi">:</span>
  <span class="na">build</span><span class="pi">:</span>
    <span class="na">uses</span><span class="pi">:</span> <span class="s">starburst997/android-code-sign/.github/workflows/android.yml@v1</span>
    <span class="na">secrets</span><span class="pi">:</span> <span class="s">inherit</span>
    <span class="na">with</span><span class="pi">:</span>
      <span class="na">path</span><span class="pi">:</span> <span class="s1">'</span><span class="s">android'</span>
      <span class="na">module</span><span class="pi">:</span> <span class="s1">'</span><span class="s">app'</span>
      <span class="na">version</span><span class="pi">:</span> <span class="s1">'</span><span class="s">1.0'</span>
</code></pre></div></div>

<h4 id="publish_androidyml-original">publish_android.yml (<a href="https://github.com/starburst997/android-code-sign/blob/v1/.github/workflows/publish_android.yml">original</a>)</h4>
<div class="language-yml highlighter-rouge"><div class="highlight"><pre class="highlight"><code><span class="na">name</span><span class="pi">:</span> <span class="s">Publish Android</span>

<span class="na">on</span><span class="pi">:</span> 
  <span class="na">workflow_dispatch</span><span class="pi">:</span>

<span class="na">jobs</span><span class="pi">:</span>
  <span class="na">build</span><span class="pi">:</span>
    <span class="na">uses</span><span class="pi">:</span> <span class="s">./.github/workflows/android.yml</span>
    <span class="na">secrets</span><span class="pi">:</span> <span class="s">inherit</span>

  <span class="na">publish</span><span class="pi">:</span>
    <span class="na">uses</span><span class="pi">:</span> <span class="s">starburst997/android-code-sign/.github/workflows/publish_android.yml@v1</span>
    <span class="na">needs</span><span class="pi">:</span> <span class="pi">[</span><span class="nv">build</span><span class="pi">]</span>
    <span class="na">secrets</span><span class="pi">:</span> <span class="s">inherit</span>
    <span class="na">with</span><span class="pi">:</span>
      <span class="na">lane</span><span class="pi">:</span> <span class="s1">'</span><span class="s">internal'</span>
</code></pre></div></div>

<p>Notice that we need to specify the project’s path, module and version.</p>

<p><br /></p>

<h2 id="publish-an-update">Publish an update</h2>

<p>Now you can call the <strong>Publish Android</strong> action and you should see a new build appears in your internal test lane.</p>

<p>Makes sure your app has been <strong>reviewed</strong> by filling all the necessary steps in <a href="https://play.google.com/console/?hl=en">Google Play Console</a>, otherwise you’ll get an error: <code class="language-plaintext highlighter-rouge">Only releases with status draft may be created on draft app.</code></p>

<p>The workflow will also automatically increment the build number and save it as a variable in the repository.</p>

<p>I’ve also included a <a href="https://github.com/starburst997/android-code-sign/blob/main/.github/workflows/release.yml">release workflow</a> as an example.</p>

<p><br /></p>

<p>Code-signing / distributing app series:</p>
<ul>
  <li>Part 1: <a href="/post/2025/01/29/code-signing.html">Code Signing for Windows as an Individual Developer</a></li>
  <li>Part 2: <a href="/post/2025/02/02/code-signing-apple.html">Code Signing for Apple without a mac</a></li>
  <li>Part 3: <a href="/post/2025/02/05/android-publish.html">Code Signing for Android via Github Actions</a></li>
  <li>Part 4: <a href="/post/2025/02/11/unity-github-actions.html">Build and publish your Unity Game using Github Actions</a></li>
</ul>

<p><br /></p>]]></content><author><name>Jean-Denis Boivin</name></author><category term="post" /><summary type="html"><![CDATA[(TL;DR: By using fastlane supply and Github Action we can compile and publish an Android app automatically)]]></summary></entry><entry><title type="html">Code Signing for Apple without a mac</title><link href="https://jd.boiv.in/post/2025/02/02/code-signing-apple.html" rel="alternate" type="text/html" title="Code Signing for Apple without a mac" /><published>2025-02-02T22:00:00+00:00</published><updated>2025-02-02T22:00:00+00:00</updated><id>https://jd.boiv.in/post/2025/02/02/code-signing-apple</id><content type="html" xml:base="https://jd.boiv.in/post/2025/02/02/code-signing-apple.html"><![CDATA[<p><em>(<strong>TL;DR</strong>: By using <a href="https://docs.fastlane.tools/actions/match/">fastlane match</a> and <a href="https://github.com/features/actions">Github Action</a> we can compile and publish a code-signed iOS / macOS app without ever using a mac in person)</em></p>

<p><em>(Part two of my series on code-signing / distributing apps, check <a href="/post/2025/02/05/android-publish.html">Part 3 on Android</a>)</em></p>

<p><br /></p>

<h2 id="introduction">Introduction</h2>

<p>Code-signing on Apple platform has been a requirement for quite some times now, so devs are used to it if you are publishing on that platform. It is, I think, much easier to setup than with <a href="/post/2025/01/29/code-signing.html">Windows</a> but that is due in part with <a href="https://fastlane.tools/">fastlane</a> reducing much of the headaches.</p>

<p>Before you jump in, you need to enroll in the <a href="https://developer.apple.com/programs/enroll/">Apple Developer Program</a> which is about $99 per year.</p>

<p><br /></p>

<h2 id="create-github-repository">Create Github Repository</h2>

<p>Create a Github Repository for your project. Feel free to use the <a href="https://github.com/starburst997/apple-code-sign">sample repository</a> as a template since it already contains all the workflows files.</p>

<p><br /></p>

<h2 id="installing-fastlane">Installing fastlane</h2>

<p>We need to install <a href="https://fastlane.tools/">fastlane</a> locally on our machine, first makes sure you have <a href="https://www.ruby-lang.org/en/documentation/installation/#rubyinstaller">ruby</a> installed (personally I prefer via <a href="https://learn.microsoft.com/en-us/windows/wsl/install">WSL2</a>).</p>

<p>Also you need to makes sure <a href="https://bundler.io/">Bundler</a> is installed:</p>

<div class="language-sh highlighter-rouge"><div class="highlight"><pre class="highlight"><code>gem <span class="nb">install </span>bundler
</code></pre></div></div>

<p>Now create a file called <code class="language-plaintext highlighter-rouge">Gemfile</code> in the root:</p>

<div class="language-ruby highlighter-rouge"><div class="highlight"><pre class="highlight"><code><span class="n">source</span> <span class="s2">"https://rubygems.org"</span>
<span class="n">gem</span> <span class="s2">"fastlane"</span>
<span class="n">gem</span> <span class="s1">'fastlane-plugin-github_action'</span><span class="p">,</span> <span class="ss">git: </span><span class="s2">"https://github.com/starburst997/fastlane-plugin-github_action"</span>
</code></pre></div></div>

<p>Notice that we’re using my fork of <a href="https://github.com/starburst997/fastlane-plugin-github_action">joshdholtz/fastlane-plugin-github_action</a>, this is because the published gem is out of date and also because there was an issue preventing us to re-use the same repository for <code class="language-plaintext highlighter-rouge">fastlane match</code> again for other projects.</p>

<p>Now run:</p>

<div class="language-sh highlighter-rouge"><div class="highlight"><pre class="highlight"><code>bundle <span class="nb">install</span>
</code></pre></div></div>

<p><br /></p>

<h2 id="create-app-in-app-store-connect">Create app in App Store Connect</h2>

<center class="images borders">
  <div><a href="/assets/posts/2025-02-02-code-signing-apple/create_app_01.png" target="_blank"><img src="/assets/posts/2025-02-02-code-signing-apple/create_app_01.png" alt="New App" title="New App" height="200" /></a><br />1</div>&nbsp;&nbsp;
  <div><a href="/assets/posts/2025-02-02-code-signing-apple/create_app_02.png" target="_blank"><img src="/assets/posts/2025-02-02-code-signing-apple/create_app_02.png" alt="New App Form" title="New App Form" height="200" /></a><br />2</div>&nbsp;&nbsp;
  <div><a href="/assets/posts/2025-02-02-code-signing-apple/create_app_03.png" target="_blank"><img src="/assets/posts/2025-02-02-code-signing-apple/create_app_03.png" alt="Create Bundle ID" title="Create Bundle ID" height="200" /></a><br />3</div>
</center>

<ol>
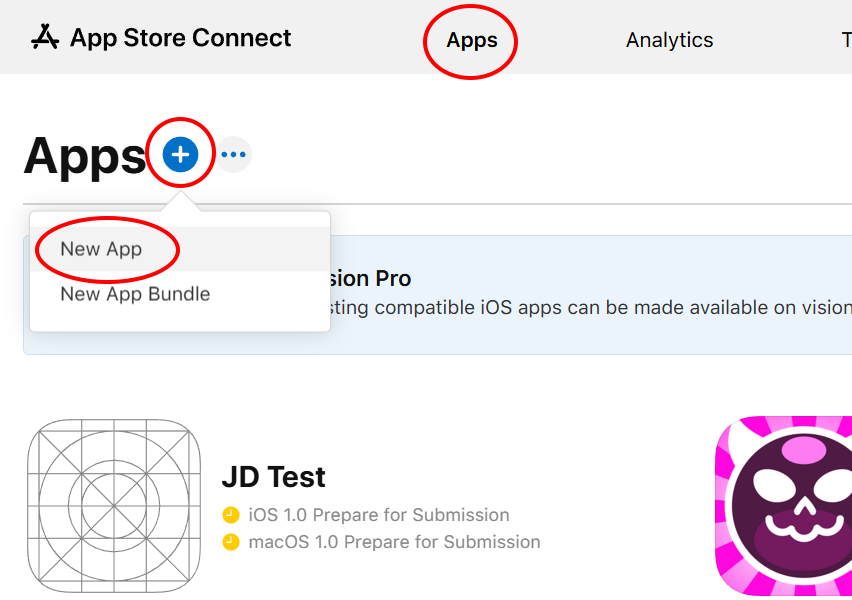
  <li>
    <p>Register your app in <a href="https://appstoreconnect.apple.com/apps">App Store Connect</a>, click on the <strong>(+)</strong> button and select <strong>New App</strong>. You might create a single app for both platforms.</p>
  </li>
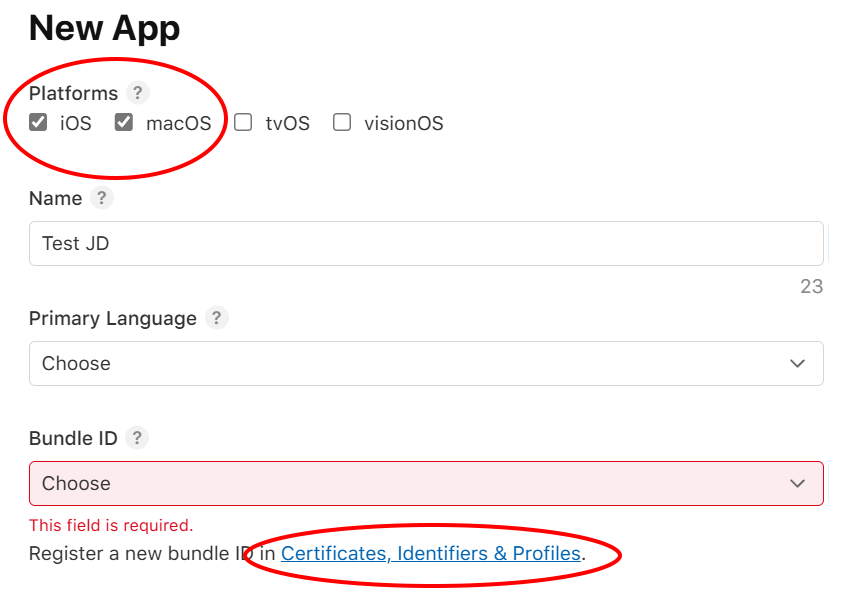
  <li>
    <p>You’ll be asked to pick a <strong>Bundle ID</strong> which can be created in the <strong>Apple Developer</strong> website under the <a href="https://developer.apple.com/account/resources/identifiers/bundleId/add/bundle">Certificates, Identifiers &amp; Profiles</a> section.</p>
  </li>
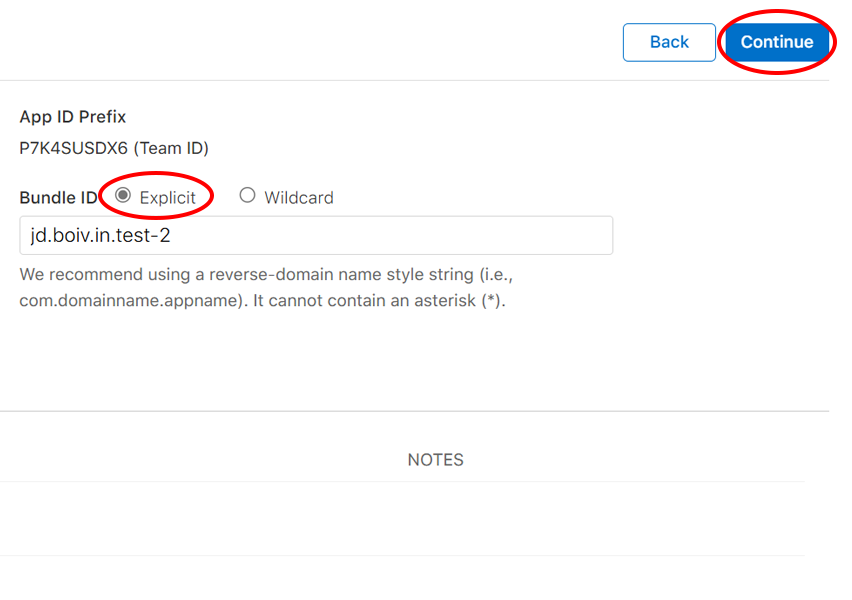
  <li>
    <p>Remember it’s value and pick the <strong>Explicit</strong> option.</p>
  </li>
</ol>

<h3 id="save-secrets">Save secrets</h3>

<p>Save these 2 secrets in the github repository for your project (both equals if you registered only one app):</p>

<ul>
  <li><code class="language-plaintext highlighter-rouge">IOS_BUNDLE_ID</code>: The iOS bundle ID</li>
  <li><code class="language-plaintext highlighter-rouge">MAC_BUNDLE_ID</code>: The macOS bundle ID</li>
</ul>

<p><br /></p>

<h2 id="generate-app-store-connect-api-key">Generate App Store Connect API Key</h2>

<center class="images borders">
  <div><a href="/assets/posts/2025-02-02-code-signing-apple/api_key_01.png" target="_blank"><img src="/assets/posts/2025-02-02-code-signing-apple/api_key_01.png" alt="New API Key" title="New API Key" height="200" /></a><br />1</div>&nbsp;&nbsp;
  <div><a href="/assets/posts/2025-02-02-code-signing-apple/api_key_02.png" target="_blank"><img src="/assets/posts/2025-02-02-code-signing-apple/api_key_02.png" alt="New API Key form" title="New API Key form" height="200" /></a><br />2</div>
</center>

<p>App Store Connect API Key is the recomended way to sign in using fastlane.</p>

<p>However if you want to also sign macOS app for individual distribution on your website, you will need to use the standard username / password procedure, this is because it requires the <strong>Account Holder</strong> permission to do so which is not (yet) possible with API Key. We’ll discuss that in the next steps.</p>

<ol>
  <li>
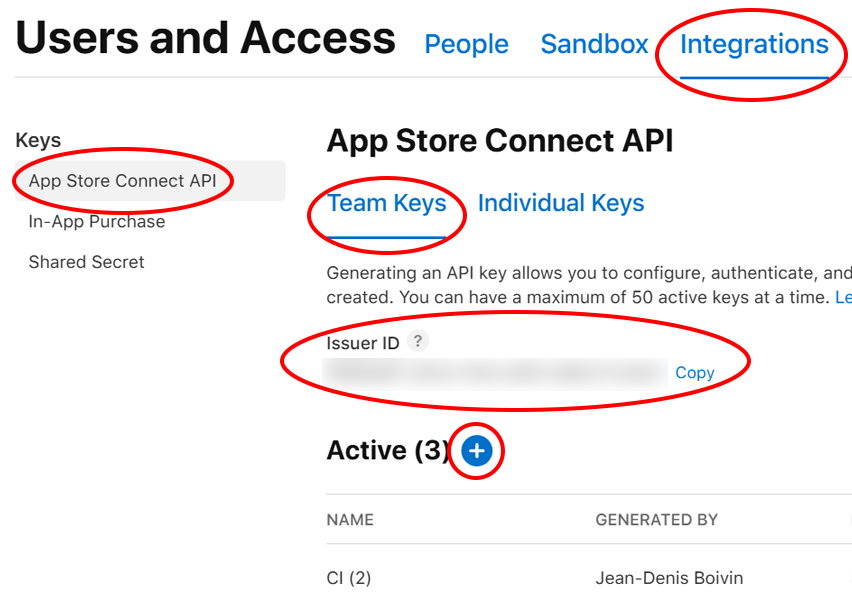
    <p>Go to your <a href="https://appstoreconnect.apple.com/access/integrations/api">Users and Access</a> page on <a href="https://appstoreconnect.apple.com/">App Store Connect</a>. Go to the <strong>Integrations</strong> tab and makes sure to select the section <strong>App Store Connect API</strong> on the left side panel and the <strong>Team Keys</strong> tab.
<br /><br />
Takes note of the <strong>Issuer ID</strong> value.</p>
  </li>
  <li>
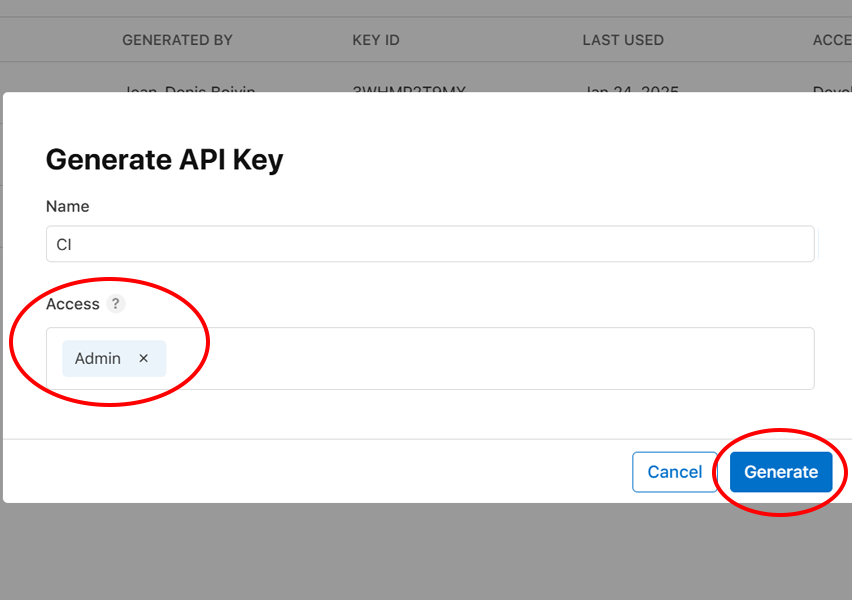
    <p>Create a new Key by clicking the <strong>(+)</strong> button, give it a name and select the <strong>Admin</strong> access.
<br /><br />
Takes note of the <strong>Key ID</strong> and download the generated <strong>P8 file</strong> (open the file in a text editor, we will save the entire value inside a secret).</p>
  </li>
</ol>

<p><em>(Sadly, <strong>Individual Keys</strong> won’t work since they are not fully compatible yet with <a href="https://docs.fastlane.tools/actions/match/">match</a> / <a href="https://docs.fastlane.tools/actions/sigh/">sigh</a> but that might change in the future)</em></p>

<h3 id="save-secrets-1">Save secrets</h3>

<p>Save these 3 secrets in the github repository for your project:</p>

<ul>
  <li><code class="language-plaintext highlighter-rouge">APPSTORE_ISSUER_ID</code>: The <strong>Issuer ID</strong> from above</li>
  <li><code class="language-plaintext highlighter-rouge">APPSTORE_KEY_ID</code>: The <strong>Key ID</strong> from your generated API Key</li>
  <li><code class="language-plaintext highlighter-rouge">APPSTORE_P8</code>: The text content of the downloaded <strong>P8 file</strong></li>
</ul>

<p><br /></p>

<h2 id="generate-session-token">Generate Session token</h2>

<p>This step is necessary if you need the <code class="language-plaintext highlighter-rouge">developer_id</code> certificate to sign “.app” for individual distribution. Technically, if we use that route, we could skip the <strong>API Key</strong> step as well but these can still be useful, so I recommend doing both steps.</p>

<p>Since Apple requires 2FA, saving the username / password in secrets is not enough, thankfully we can generate a <strong>Session Token</strong> (valid only for a short time) that we really only need once to save the certificate in the match repository (and in the future when that certificate expires).</p>

<p>Takes note of both your Apple ID <strong>username</strong> and <strong>password</strong>.</p>

<p>Generate a <strong>Session Token</strong> using <a href="https://docs.fastlane.tools/getting-started/ios/authentication/">fastlane spaceauth</a>:</p>

<div class="language-sh highlighter-rouge"><div class="highlight"><pre class="highlight"><code>fastlane spaceauth <span class="nt">-u</span> YOUR_USERNAME
</code></pre></div></div>

<p>Copy <em>(right-click in most terminal)</em> the generated value (without the <code class="language-plaintext highlighter-rouge">export FASTLANE_SESSION=</code> prefix).</p>

<h3 id="save-secrets-2">Save secrets</h3>

<p>Save these 3 secrets in the github repository for your project:</p>

<ul>
  <li><code class="language-plaintext highlighter-rouge">FASTLANE_USER</code>: Your Apple ID username</li>
  <li><code class="language-plaintext highlighter-rouge">FASTLANE_PASSWORD</code>: Your Apple ID password</li>
  <li><code class="language-plaintext highlighter-rouge">FASTLANE_SESSION</code>: The value of <code class="language-plaintext highlighter-rouge">fastlane spaceauth</code></li>
</ul>

<p><br /></p>

<h2 id="create-the-fastlane-match-repository">Create the fastlane match repository</h2>

<p>The <code class="language-plaintext highlighter-rouge">fastlane match</code> command can save all of your Apple certificates / profiles inside a private git repository for convenience and use in a CI environment.</p>

<p>Create a new empty <strong>PRIVATE</strong> github repository (any name you want).</p>

<h3 id="save-secrets-3">Save secrets</h3>

<p>Save these 2 secrets in the github repository for your <strong>project</strong> (not the newly created one for match):</p>

<ul>
  <li><code class="language-plaintext highlighter-rouge">MATCH_REPOSITORY</code>: Your newly created private repo (ex: <code class="language-plaintext highlighter-rouge">starburst997/fastlane-match</code>)</li>
  <li><code class="language-plaintext highlighter-rouge">MATCH_PASSWORD</code>: A unique password of your choice (save it in your password manager for re-use in other projects)</li>
</ul>

<p><br /></p>

<h2 id="generate-a-personal-access-token-pat">Generate a Personal Access Token (PAT)</h2>

<center class="images borders">
  <div><a href="/assets/posts/2025-02-02-code-signing-apple/pat_01.png" target="_blank"><img src="/assets/posts/2025-02-02-code-signing-apple/pat_01.png" alt="Generate New Token (Classic)" title="Generate New Token (Classic)" /></a><br />1</div>&nbsp;&nbsp;
  <div><a href="/assets/posts/2025-02-02-code-signing-apple/pat_02.png" target="_blank"><img src="/assets/posts/2025-02-02-code-signing-apple/pat_02.png" alt="Use repo score" title="Use repo score" /></a><br />2</div>
</center>

<p>We also need to generate a <strong>Personal Access Token</strong> for Github.</p>

<ol>
  <li>
    <p>Visit your <a href="https://github.com/settings/tokens">settings page</a> and click on <strong>Generate new token</strong> and select <strong>Generate new token (classic)</strong>.</p>
  </li>
  <li>
    <p>We need all the <strong>repo</strong> scope enabled. Set <strong>no expiration</strong>. Click <strong>Generate token</strong> and save the value.</p>
  </li>
</ol>

<h3 id="save-secrets-4">Save secrets</h3>

<p>Save this secret in the github repository for your project:</p>

<ul>
  <li><code class="language-plaintext highlighter-rouge">GH_PAT</code>: The value of your newly generated token</li>
</ul>

<p><br /></p>

<h2 id="additionals-secrets">Additionals secrets</h2>

<p>Also add these 3 secrets to your github repository:</p>

<ul>
  <li><code class="language-plaintext highlighter-rouge">APPLE_DEVELOPER_EMAIL</code>: Your Apple ID</li>
  <li><code class="language-plaintext highlighter-rouge">APPLE_CONNECT_EMAIL</code>: Apple Connect email (same as above if using a single shared developer)</li>
  <li><code class="language-plaintext highlighter-rouge">APPLE_TEAM_ID</code>: Team Id from your <a href="https://developer.apple.com/account/#/membership/">Apple Developer Account - Membership Details</a></li>
</ul>

<p><br /></p>

<h2 id="secrets-reviews">Secrets reviews</h2>

<p>Makes sure you have all of these 14 secrets in your github repository:</p>

<ul>
  <li><code class="language-plaintext highlighter-rouge">IOS_BUNDLE_ID</code></li>
  <li><code class="language-plaintext highlighter-rouge">MAC_BUNDLE_ID</code></li>
  <li><code class="language-plaintext highlighter-rouge">APPSTORE_ISSUER_ID</code></li>
  <li><code class="language-plaintext highlighter-rouge">APPSTORE_KEY_ID</code></li>
  <li><code class="language-plaintext highlighter-rouge">APPSTORE_P8</code></li>
  <li><code class="language-plaintext highlighter-rouge">FASTLANE_USER</code></li>
  <li><code class="language-plaintext highlighter-rouge">FASTLANE_PASSWORD</code></li>
  <li><code class="language-plaintext highlighter-rouge">FASTLANE_SESSION</code></li>
  <li><code class="language-plaintext highlighter-rouge">MATCH_REPOSITORY</code></li>
  <li><code class="language-plaintext highlighter-rouge">MATCH_PASSWORD</code></li>
  <li><code class="language-plaintext highlighter-rouge">GH_PAT</code></li>
  <li><code class="language-plaintext highlighter-rouge">APPLE_DEVELOPER_EMAIL</code></li>
  <li><code class="language-plaintext highlighter-rouge">APPLE_CONNECT_EMAIL</code></li>
  <li><code class="language-plaintext highlighter-rouge">APPLE_TEAM_ID</code></li>
</ul>

<p><em>(Save those variables inside a Password Manager for re-use in future projects, except for the bundle ids, they won’t change)</em></p>

<p><br /></p>

<h2 id="create-fastfiles">Create Fastfiles</h2>

<p>By using <code class="language-plaintext highlighter-rouge">import_from_git</code> we can reference external <em>Fastfile</em> files, but feel free to copy the original instead to fit your pipeline better.</p>

<h4 id="fastlaneappfile">fastlane/Appfile</h4>
<div class="language-ruby highlighter-rouge"><div class="highlight"><pre class="highlight"><code><span class="n">for_platform</span> <span class="ss">:ios</span> <span class="k">do</span>
  <span class="n">apple_dev_portal_id</span><span class="p">(</span><span class="no">ENV</span><span class="p">[</span><span class="s1">'APPLE_DEVELOPER_EMAIL'</span><span class="p">])</span>
  <span class="n">itunes_connect_id</span><span class="p">(</span><span class="no">ENV</span><span class="p">[</span><span class="s1">'APPLE_CONNECT_EMAIL'</span><span class="p">])</span>
  <span class="n">team_id</span><span class="p">(</span><span class="no">ENV</span><span class="p">[</span><span class="s1">'APPLE_TEAM_ID'</span><span class="p">])</span>
  <span class="n">itc_team_id</span><span class="p">(</span><span class="no">ENV</span><span class="p">[</span><span class="s1">'APPLE_TEAM_ID'</span><span class="p">])</span>
  <span class="n">app_identifier</span><span class="p">(</span><span class="no">ENV</span><span class="p">[</span><span class="s1">'IOS_BUNDLE_ID'</span><span class="p">])</span>
<span class="k">end</span>

<span class="n">for_platform</span> <span class="ss">:mac</span> <span class="k">do</span>
  <span class="n">apple_dev_portal_id</span><span class="p">(</span><span class="no">ENV</span><span class="p">[</span><span class="s1">'APPLE_DEVELOPER_EMAIL'</span><span class="p">])</span>
  <span class="n">itunes_connect_id</span><span class="p">(</span><span class="no">ENV</span><span class="p">[</span><span class="s1">'APPLE_CONNECT_EMAIL'</span><span class="p">])</span>
  <span class="n">team_id</span><span class="p">(</span><span class="no">ENV</span><span class="p">[</span><span class="s1">'APPLE_TEAM_ID'</span><span class="p">])</span>
  <span class="n">itc_team_id</span><span class="p">(</span><span class="no">ENV</span><span class="p">[</span><span class="s1">'APPLE_TEAM_ID'</span><span class="p">])</span>
  <span class="n">app_identifier</span><span class="p">(</span><span class="no">ENV</span><span class="p">[</span><span class="s1">'MAC_BUNDLE_ID'</span><span class="p">])</span>
<span class="k">end</span>
</code></pre></div></div>

<h4 id="fastlanefastfile-ios--macos">fastlane/Fastfile (<a href="https://github.com/starburst997/apple-code-sign/blob/v1/fastlane/iOS/Fastfile">iOS</a> / <a href="https://github.com/starburst997/apple-code-sign/blob/v1/fastlane/macOS/Fastfile">macOS</a>)</h4>
<div class="language-ruby highlighter-rouge"><div class="highlight"><pre class="highlight"><code><span class="n">import_from_git</span><span class="p">(</span>
  <span class="ss">url: </span><span class="s2">"https://github.com/starburst997/apple-code-sign.git"</span><span class="p">,</span>
  <span class="ss">branch: </span><span class="s2">"v1"</span><span class="p">,</span>
  <span class="ss">path: </span><span class="s2">"fastlane/iOS/Fastfile"</span>
<span class="p">)</span>

<span class="n">import_from_git</span><span class="p">(</span>
  <span class="ss">url: </span><span class="s2">"https://github.com/starburst997/apple-code-sign.git"</span><span class="p">,</span>
  <span class="ss">branch: </span><span class="s2">"v1"</span><span class="p">,</span>
  <span class="ss">path: </span><span class="s2">"fastlane/macOS/Fastfile"</span>
<span class="p">)</span>
</code></pre></div></div>

<p><br /></p>

<h2 id="create-workflows">Create workflows</h2>

<p>By using <code class="language-plaintext highlighter-rouge">workflow_call</code> we can simplify the workflow file by referencing an external one, but feel free to copy the original instead to fit your pipeline better.</p>

<p>Save those inside the <code class="language-plaintext highlighter-rouge">.github/workflows</code> directory of your repository.</p>

<h4 id="apple_setupyml-original">apple_setup.yml (<a href="https://github.com/starburst997/apple-code-sign/blob/v1/.github/workflows/apple_setup.yml">original</a>)</h4>
<div class="language-yml highlighter-rouge"><div class="highlight"><pre class="highlight"><code><span class="na">name</span><span class="pi">:</span> <span class="s">Apple Setup</span>

<span class="na">on</span><span class="pi">:</span> <span class="s">workflow_dispatch</span>

<span class="na">jobs</span><span class="pi">:</span>
  <span class="na">setup</span><span class="pi">:</span>
    <span class="na">uses</span><span class="pi">:</span> <span class="s">starburst997/apple-code-sign/.github/workflows/apple_setup.yml@v1</span>
    <span class="na">secrets</span><span class="pi">:</span> <span class="s">inherit</span>
    <span class="na">with</span><span class="pi">:</span>
      <span class="na">generate_macos</span><span class="pi">:</span> <span class="no">true</span>
      <span class="na">generate_ios</span><span class="pi">:</span> <span class="no">true</span>
      <span class="na">generate_appstore</span><span class="pi">:</span> <span class="no">true</span>
      <span class="na">generate_developer_id</span><span class="pi">:</span> <span class="no">true</span>
      <span class="na">use_session</span><span class="pi">:</span> <span class="no">true</span>
</code></pre></div></div>

<h4 id="iosyml-original">ios.yml (<a href="https://github.com/starburst997/apple-code-sign/blob/v1/.github/workflows/ios.yml">original</a>)</h4>
<div class="language-yml highlighter-rouge"><div class="highlight"><pre class="highlight"><code><span class="na">name</span><span class="pi">:</span> <span class="s">Build iOS</span>

<span class="na">on</span><span class="pi">:</span> 
  <span class="na">workflow_dispatch</span><span class="pi">:</span>

<span class="na">jobs</span><span class="pi">:</span>
  <span class="na">build</span><span class="pi">:</span>
    <span class="na">uses</span><span class="pi">:</span> <span class="s">starburst997/apple-code-sign/.github/workflows/ios.yml@v1</span>
    <span class="na">secrets</span><span class="pi">:</span> <span class="s">inherit</span>
    <span class="na">with</span><span class="pi">:</span>
      <span class="na">project_path</span><span class="pi">:</span> <span class="s">iOS</span>
      <span class="na">xcodeproj_path</span><span class="pi">:</span> <span class="s">Test.xcodeproj</span>
      <span class="na">plist_path</span><span class="pi">:</span> <span class="s">Test/Info.plist</span>
      <span class="na">project_target</span><span class="pi">:</span> <span class="s">Test</span>
      <span class="na">version</span><span class="pi">:</span> <span class="s2">"</span><span class="s">2025.1"</span>
      <span class="na">artifact</span><span class="pi">:</span> <span class="no">false</span>
</code></pre></div></div>

<h4 id="macosyml-original">macos.yml (<a href="https://github.com/starburst997/apple-code-sign/blob/v1/.github/workflows/macos.yml">original</a>)</h4>
<div class="language-yml highlighter-rouge"><div class="highlight"><pre class="highlight"><code><span class="na">name</span><span class="pi">:</span> <span class="s">Build MacOS</span>

<span class="na">on</span><span class="pi">:</span> 
  <span class="na">workflow_dispatch</span><span class="pi">:</span>

<span class="na">jobs</span><span class="pi">:</span>
  <span class="na">build</span><span class="pi">:</span>
    <span class="na">uses</span><span class="pi">:</span> <span class="s">starburst997/apple-code-sign/.github/workflows/macos.yml@v1</span>
    <span class="na">secrets</span><span class="pi">:</span> <span class="s">inherit</span>
    <span class="na">with</span><span class="pi">:</span>
      <span class="na">project_path</span><span class="pi">:</span> <span class="s">macOS</span>
      <span class="na">xcodeproj_path</span><span class="pi">:</span> <span class="s">Test.xcodeproj</span>
      <span class="na">plist_path</span><span class="pi">:</span> <span class="s">Test/Info.plist</span>
      <span class="na">project_target</span><span class="pi">:</span> <span class="s">Test</span>
      <span class="na">version</span><span class="pi">:</span> <span class="s2">"</span><span class="s">2025.1"</span>
      <span class="na">artifact</span><span class="pi">:</span> <span class="no">true</span>
      <span class="na">generate_appstore</span><span class="pi">:</span> <span class="no">true</span>
      <span class="na">generate_developer_id</span><span class="pi">:</span> <span class="no">true</span>
      <span class="na">generate_dmg</span><span class="pi">:</span> <span class="no">true</span>
</code></pre></div></div>

<p>Notice that we need to specify the project’s path, target, plist and version.</p>

<p>If you want to upload the artifact to use in your workflow (ex; upload to S3 afterward), set <code class="language-plaintext highlighter-rouge">artifact: true</code>. The artifact name for iOS is <code class="language-plaintext highlighter-rouge">build-ios</code> and for macOS is <code class="language-plaintext highlighter-rouge">build-macos</code>.</p>

<p><br /></p>

<h2 id="initialize-fastlane-match">Initialize fastlane match</h2>

<p>Go into the <strong>Actions</strong> tab of your project’s github repository and run the action <strong>Apple Setup</strong> (disable <code class="language-plaintext highlighter-rouge">use_session</code> if you want to use <strong>API Key</strong>).</p>

<p>Notice that your match repository will now be populated with the certificates and profiles for your app, it will also save the deploy key as a secret inside your repo.</p>

<p>In the future (in a year), you might want to run again to renew any expired certificates. The <strong>Developer ID Application</strong> will need to be renewed in ~5 year.</p>

<p><br /></p>

<h2 id="build-and-distribute-app">Build and Distribute App</h2>

<p>Now you can manually run the action <strong>Build iOS</strong> and <strong>Build Mac</strong> to build your app and have it uploaded to Testflight. If you’re satisfied with your builds, you can then use those to publish on the AppStore inside App Store Connect.</p>

<p>The workflow will also automatically increment the build number and save it as a variable in the repository.</p>

<p>I’ve also included a <a href="https://github.com/starburst997/apple-code-sign/blob/main/.github/workflows/release.yml">release workflow</a> as an example.</p>

<p>The macOS builds also includes an optional <strong>.dmg</strong> and <strong>.app.zip</strong> ready to be hosted, both are <a href="https://developer.apple.com/documentation/security/notarizing-macos-software-before-distribution">notarized and stapled</a>.</p>

<p><br /></p>

<h2 id="conclusion">Conclusion</h2>

<p>You can now build and distribute an iOS or macOS app without owning a mac. Of course, you’ll want one to properly develop and test your apps. However, in the age of cross-platform development, if your app runs well on one platform, it should works well on Apple’s devices too and being able to build those on Github Action lower the barrier cost a lot.</p>

<p><br /></p>

<p>Code-signing / distributing app series:</p>
<ul>
  <li>Part 1: <a href="/post/2025/01/29/code-signing.html">Code Signing for Windows as an Individual Developer</a></li>
  <li>Part 2: <a href="/post/2025/02/02/code-signing-apple.html">Code Signing for Apple without a mac</a></li>
  <li>Part 3: <a href="/post/2025/02/05/android-publish.html">Code Signing for Android via Github Actions</a></li>
  <li>Part 4: <a href="/post/2025/02/11/unity-github-actions.html">Build and publish your Unity Game using Github Actions</a></li>
</ul>

<p><br /></p>]]></content><author><name>Jean-Denis Boivin</name></author><category term="post" /><summary type="html"><![CDATA[(TL;DR: By using fastlane match and Github Action we can compile and publish a code-signed iOS / macOS app without ever using a mac in person)]]></summary></entry><entry><title type="html">Code Signing for Windows as an Individual Developer</title><link href="https://jd.boiv.in/post/2025/01/29/code-signing.html" rel="alternate" type="text/html" title="Code Signing for Windows as an Individual Developer" /><published>2025-01-29T22:00:00+00:00</published><updated>2025-01-29T22:00:00+00:00</updated><id>https://jd.boiv.in/post/2025/01/29/code-signing</id><content type="html" xml:base="https://jd.boiv.in/post/2025/01/29/code-signing.html"><![CDATA[<p><em>(<strong>TL;DR</strong>: Get code signing working for Windows with immediate SmartScreen reputation via Github Action, check this <a href="https://github.com/starburst997/windows-code-sign">sample repository</a> to see how simple it can get once everything is setup)</em></p>

<p><em>(Part one of my series on code-signing / distributing apps, check <a href="/post/2025/02/02/code-signing-apple.html">Part 2 on Apple</a>)</em></p>

<p><br /></p>

<h2 id="introduction">Introduction</h2>

<p>For the longest time, code signing on Windows required to buy certificates from rather sketchy companies (<a href="https://www.sectigo.com/">Sectigo</a> / <a href="https://www.digicert.com/">DigiCert</a> / etc…). This also required quite a lengthy process with terrible customer services to get verified (requiring in some case to <a href="https://www.sectigo.com/knowledge-base/detail/OV-Code-Signing-Validation-for-Organizations-and-Individuals/kA01N000000brb0">hire a Lawer or CA</a>), exorbitant prices (500$+ / year) and the use of primitive technologies (forcing to <a href="https://signmycode.com/resources/generate-code-signing-certificate-using-internet-explorer-mode-in-microsoft-edge">use internet explorer</a> to generate the private key).</p>

<p>Finally, <a href="https://techcommunity.microsoft.com/blog/microsoft-security-blog/trusted-signing-is-now-open-for-individual-developers-to-sign-up-in-public-previ/4273554">Microsoft recently launched</a> a service under <a href="https://en.wikipedia.org/wiki/Microsoft_Azure">Azure</a> to help ease this process and get ready in just a few minutes with a relatively affordable price and easy verification for Individual Developer.</p>

<p><em>(this post is not sponsored, I was just quite relieved to see there was finally a viable solution)</em></p>

<p><br /></p>

<h2 id="what-is-code-signing">What is Code Signing</h2>

<p>Ever saw a <a href="https://en.wikipedia.org/wiki/Microsoft_SmartScreen">scary warning</a> while downloading a EXE?</p>

<center class="images">
  <a href="/assets/posts/2025-01-29-code-signing/warning_5.png" target="_blank"><img src="/assets/posts/2025-01-29-code-signing/warning_5.png" alt="Scary Warning 1" title="Scary Warning 1" height="200" /></a>&nbsp;&nbsp;
  <a href="/assets/posts/2025-01-29-code-signing/warning_3.png" target="_blank"><img src="/assets/posts/2025-01-29-code-signing/warning_3.png" alt="Scary Warning 2" title="Scary Warning 1" height="200" /></a>
</center>

<p>This is because the application is <strong>NOT</strong> code signed. This is an awful experience for anyone trying to download something and as a developer, is gut wrenching to feel powerless to remove this barrier without caving in to the Certificates Mafia Monopoly.</p>

<p><em>(to be fair, if your app gets enough downloads, at some unknown point in times, <a href="https://stackoverflow.com/a/66582477">Microsoft will remove this warning</a> but nothing is certains)</em></p>

<p><a href="https://en.wikipedia.org/wiki/Code_signing">Code Signing</a> is a great practice and ensure that the EXE hasn’t been tampered with and comes from the developer who built it by using a cryptographic hash. If a code signed application is found to have malware, the certificate can be revoked and Windows won’t allow it to be run.</p>

<p>Apple have been doing this too for a while but the process is <a href="https://docs.fastlane.tools/actions/match/">rather painless</a> and affordable through their <a href="https://developer.apple.com/support/compare-memberships/">Apple Developer Program</a> (<em>which anyone making iOS app already have anyway</em>).</p>

<p>Linux doesn’t have any of that <em>(in the context of scary popup from downloading binaries in the browser)</em>.</p>

<p><br /></p>

<h2 id="setup-code-signing-in-azure">Setup code signing in Azure</h2>

<center class="images borders">
  <a href="/assets/posts/2025-01-29-code-signing/azure.png" target="_blank"><img src="/assets/posts/2025-01-29-code-signing/azure.png" alt="Sign up for Azure" title="Sign up for Azure" height="200" /></a>
</center>

<p><a href="https://azure.microsoft.com/en-us/pricing/purchase-options/azure-account">Create an account</a> (new account come with free credits) and sign in to the <a href="https://portal.azure.com/">Azure portal</a>.</p>

<p><em>Makes sure you use the link above and click <strong>Try Azure for free</strong> or <strong>Pay as you go</strong> and fill the forms, otherwise you might get connected to the Microsoft Services tenant instead of your own and will see authentication issues.</em></p>

<p>You should have a default Subscription / Tenant (if not, you didn’t fill the forms as stated above).</p>

<p><br /></p>

<h3 id="register-the-trusted-signing-resource-provider">Register the Trusted Signing resource provider</h3>

<center class="images borders">
  <div><a href="/assets/posts/2025-01-29-code-signing/provider_1.png" target="_blank"><img src="/assets/posts/2025-01-29-code-signing/provider_1.png" alt="Search for Subscriptions" title="Search for Subscriptions" height="200" /></a><br />1</div>&nbsp;&nbsp;
  <div><a href="/assets/posts/2025-01-29-code-signing/provider_2.png" target="_blank"><img src="/assets/posts/2025-01-29-code-signing/provider_2.png" alt="Select Resource providers" title="Select Resource providers" height="200" /></a><br />2</div>&nbsp;&nbsp;
  <div><a href="/assets/posts/2025-01-29-code-signing/provider_3.png" target="_blank"><img src="/assets/posts/2025-01-29-code-signing/provider_3.png" alt="Register CodeSigning" title="Register CodeSigning" height="200" /></a><br />3</div>
</center>

<ol>
  <li>
    <p>In the <a href="https://portal.azure.com/">Azure portal</a>, search for <strong>Subscriptions</strong> service, click on your subscription.</p>
  </li>
  <li>
    <p>Select <strong>Resource providers</strong> under <strong>Settings</strong> on the left panel.</p>
  </li>
  <li>
    <p>Search for <strong>Microsoft.CodeSigning</strong>, click on “…” and select <strong>Register</strong>.</p>
  </li>
</ol>

<p><br /></p>

<h3 id="create-a-trusted-signing-account">Create a Trusted Signing account</h3>

<center class="images borders">
  <div><a href="/assets/posts/2025-01-29-code-signing/account_1.png" target="_blank"><img src="/assets/posts/2025-01-29-code-signing/account_1.png" alt="Create account" title="Create account" height="200" /></a><br />1</div>&nbsp;&nbsp;
  <div><a href="/assets/posts/2025-01-29-code-signing/account_2.png" target="_blank"><img src="/assets/posts/2025-01-29-code-signing/account_2.png" alt="Fill info" title="Fill info" height="200" /></a><br />2</div>
</center>

<ol>
  <li>
    <p>In the <a href="https://portal.azure.com/">Azure portal</a>, search for <strong>Trusted Signing Accounts</strong> service and <strong>Create</strong> one.</p>
  </li>
  <li>
    <p>Fill the form by selecting your <strong>Subscription</strong>, select <strong>Create new</strong> for <strong>Resource group</strong> (use any name you want). Pick an <strong>Account name</strong> (any name you want), a <strong>Region</strong> and finally a <strong>Pricing tier</strong>.</p>
  </li>
</ol>

<p><br /></p>

<h3 id="assign-roles">Assign roles</h3>

<center class="images borders">
  <div><a href="/assets/posts/2025-01-29-code-signing/role_1.png" target="_blank"><img src="/assets/posts/2025-01-29-code-signing/role_1.png" alt="Select account" title="Select account" height="200" /></a><br />1</div>&nbsp;&nbsp;
  <div><a href="/assets/posts/2025-01-29-code-signing/role_2.png" target="_blank"><img src="/assets/posts/2025-01-29-code-signing/role_2.png" alt="Add role assignment" title="Add role assignment" height="200" /></a><br />2</div>&nbsp;&nbsp;
  <div><a href="/assets/posts/2025-01-29-code-signing/role_3.png" target="_blank"><img src="/assets/posts/2025-01-29-code-signing/role_3.png" alt="Select role" title="Select role" height="200" /></a><br />3</div>&nbsp;&nbsp;
  <div><a href="/assets/posts/2025-01-29-code-signing/role_4.png" target="_blank"><img src="/assets/posts/2025-01-29-code-signing/role_4.png" alt="Add member" title="Add member" height="200" /></a><br />4</div>
</center>

<ol>
  <li>
    <p>In the <a href="https://portal.azure.com/">Azure portal</a>, search for <strong>Trusted Signing Accounts</strong> service and select the account you just created.</p>
  </li>
  <li>
    <p>On the left panel select <strong>Access Control (IAM)</strong> and pick <strong>Add</strong> / <strong>Add role assignment</strong>.</p>
  </li>
  <li>
    <p>Search for <strong>Trusted Signing</strong>, you’ll see two roles (<strong>Trusted Signing Certificate Profile Signer</strong> and <strong>Trusted Signing Identity Verifier</strong>) you’ll need to add both, one at a time.</p>
  </li>
  <li>
    <p>Select one role, go <strong>Next</strong>, click on <strong>+ Select members</strong>, select your user and click <strong>Review + assign</strong>.</p>
  </li>
</ol>

<p><br /></p>

<p>Repeat for the second role.</p>

<p><br /></p>

<h3 id="create-an-identity-validation-request">Create an identity validation request</h3>

<center class="images borders">
  <div><a href="/assets/posts/2025-01-29-code-signing/identity_1.png" target="_blank"><img src="/assets/posts/2025-01-29-code-signing/identity_1.png" alt="Create account" title="Create account" height="200" /></a><br />1</div>&nbsp;&nbsp;
  <div><a href="/assets/posts/2025-01-29-code-signing/identity_2.png" target="_blank"><img src="/assets/posts/2025-01-29-code-signing/identity_2.png" alt="Fill form" title="Fill form" height="200" /></a><br />2</div>&nbsp;&nbsp;
  <div><a href="/assets/posts/2025-01-29-code-signing/identity_3.png" target="_blank"><img src="/assets/posts/2025-01-29-code-signing/identity_3.png" alt="Au10tix" title="Au10tix" height="200" /></a><br />3</div>
</center>

<ol>
  <li>
    <p>In the <a href="https://portal.azure.com/">Azure portal</a>, search for <strong>Trusted Signing Accounts</strong> service and select your account.<br /><br />
On the left panel, under <strong>Settings</strong> / <strong>Objects</strong> click <strong>Identity validations</strong>. On the top-left dropdown (<strong>Organization</strong>) switch to <strong>Individual</strong> and then click <strong>New identity</strong> / <strong>Public</strong>.</p>
  </li>
  <li>
    <p>Fill the form with your name, address, etc. and click <strong>Create</strong>.</p>
  </li>
  <li>
    <p>After a little while the status will change to <strong>Action Required</strong>, click on your name and click the link under <strong>“Please complete your verification here”</strong>.
<br /><br />
You’ll then start the verification process which requires a mobile phone, some government IDs (I used my driver license) and the <a href="https://www.microsoft.com/en-ca/security/mobile-authenticator-app">Microsoft Authenticator App</a>. I was pleasantly surprised by how easy and streamlined the process was. Simply follow the instructions, which is pretty much take selfie, take picture of ID and scan some QR code. Makes sure to use an ID where you can see your address.
<br /><br />
Once this is done, it takes around 5-10 minutes before the status changes to <strong>Completed</strong>.</p>
  </li>
</ol>

<p><br /></p>

<h3 id="create-a-certificate-profile">Create a Certificate profile</h3>

<center class="images borders">
  <div><a href="/assets/posts/2025-01-29-code-signing/certicate_1.png" target="_blank"><img src="/assets/posts/2025-01-29-code-signing/certicate_1.png" alt="Create certificate" title="Create certificate" height="200" /></a><br />1</div>&nbsp;&nbsp;
  <div><a href="/assets/posts/2025-01-29-code-signing/certicate_2.png" target="_blank"><img src="/assets/posts/2025-01-29-code-signing/certicate_2.png" alt="Fill form" title="Fill form" height="200" /></a><br />2</div>
</center>

<ol>
  <li>
    <p>In the <a href="https://portal.azure.com/">Azure portal</a>, search for <strong>Trusted Signing Accounts</strong> service and select your account.
<br /><br />
On the left panel, under <strong>Settings</strong> / <strong>Objects</strong> click <strong>Certificate profiles</strong>. Then click on <strong>Create</strong> / <strong>Public Trust</strong>.</p>
  </li>
  <li>
    <p>Pick a name for your certificate, including the address / post code is optional. Click <strong>Create</strong>.</p>
  </li>
</ol>

<p><br /></p>

<p><em>(don’t worry about the expiration date, the certificate auto-renew every 24h)</em></p>

<p><br /></p>

<h2 id="sign-your-app-locally">Sign your app locally</h2>

<p>You are now ready to sign your first application!</p>

<h3 id="note-some-values">Note some values</h3>

<center class="images borders">
  <div><a href="/assets/posts/2025-01-29-code-signing/local_1.png" target="_blank"><img src="/assets/posts/2025-01-29-code-signing/local_1.png" alt="Trusted Signing account" title="Trusted Signing account" height="200" /></a><br />1</div>&nbsp;&nbsp;
  <div><a href="/assets/posts/2025-01-29-code-signing/local_2.png" target="_blank"><img src="/assets/posts/2025-01-29-code-signing/local_2.png" alt="Certificate profile" title="Certificate profile" height="200" /></a><br />2</div>&nbsp;&nbsp;
  <div><a href="/assets/posts/2025-01-29-code-signing/local_3.png" target="_blank"><img src="/assets/posts/2025-01-29-code-signing/local_3.png" alt="Tenant ID" title="Tenant ID" height="200" /></a><br />3</div>
</center>

<ol>
  <li>
    <p>First, we need to takes note of a few variables, copy your <strong>Trusted Signing account</strong> name you used earlier (also take note of the <strong>Location</strong>)</p>
  </li>
  <li>
    <p>Find your <strong>Certificate profile</strong> name as well.</p>
  </li>
  <li>
    <p>You also need your <strong>Tenant ID</strong>, search for <strong>Microsoft Entra ID</strong> in the <a href="https://portal.azure.com/">Azure portal</a> and copy the value.</p>
  </li>
</ol>

<p><br /></p>

<h3 id="install-signtool">Install SignTool</h3>

<p>For the next steps, I used <a href="https://learn.microsoft.com/en-us/powershell/scripting/install/installing-powershell-on-windows?view=powershell-7.5"><strong>PowerShell 7</strong></a>, makes sure you are also up-to-date with <a href="https://dotnet.microsoft.com/en-us/download/dotnet"><strong>dotnet</strong></a> (8+).</p>

<p>Install the <a href="https://download.microsoft.com/download/6d9cb638-4d5f-438d-9f21-23f0f4405944/TrustedSigningClientTools.msi"><strong>Trusted Signing Tools</strong></a> / <a href="https://aka.ms/installazurecliwindowsx64"><strong>Azure CLI</strong></a> via winget (or via installer)</p>

<div class="language-sh highlighter-rouge"><div class="highlight"><pre class="highlight"><code>winget <span class="nb">install</span> <span class="nt">-e</span> <span class="nt">--id</span> Microsoft.Azure.TrustedSigningClientTools
winget <span class="nb">install</span> <span class="nt">-e</span> <span class="nt">--id</span> Microsoft.AzureCLI
</code></pre></div></div>

<p>Now we need an additional file (<em>Azure.CodeSigning.Dlib.dll</em>) that is only available in the latest <a href="https://www.nuget.org/packages/Microsoft.Trusted.Signing.Client"><strong>Microsoft.Trusted.Signing.Client</strong></a> nuget (click on <strong>Download package</strong> on the right).</p>

<p>(<em><strong>.nupkg</strong> are simply <strong>.zip</strong> files, so rename it and extract it somewhere, remember it’s path</em>)</p>

<p><br /></p>

<h3 id="sign-your-exe">Sign your EXE</h3>

<p>Create a JSON file with the variables we noted above (save the path)</p>

<div class="language-json highlighter-rouge"><div class="highlight"><pre class="highlight"><code><span class="p">{</span><span class="w">
  </span><span class="nl">"Endpoint"</span><span class="p">:</span><span class="w"> </span><span class="s2">"https://eus.codesigning.azure.net"</span><span class="p">,</span><span class="w">
  </span><span class="nl">"CodeSigningAccountName"</span><span class="p">:</span><span class="w"> </span><span class="s2">"&lt;TRUSTED_SIGNING_ACCOUNT_NAME&gt;"</span><span class="p">,</span><span class="w">
  </span><span class="nl">"CertificateProfileName"</span><span class="p">:</span><span class="w"> </span><span class="s2">"&lt;CERTIFICATE_PROFILE_NAME&gt;"</span><span class="w">
</span><span class="p">}</span><span class="w">
</span></code></pre></div></div>

<p>Based on the <strong>Location</strong> of your account, use the correct <strong>Endpoint</strong> url</p>

<!--
- East US: `"https://eus.codesigning.azure.net"`
- West US3: `"https://wus3.codesigning.azure.net"`
- West Central US: `"https://wcus.codesigning.azure.net"`
- West US 2: `"https://wus2.codesigning.azure.net"`
- North Europe: `"https://neu.codesigning.azure.net"`
- West Europe: `"https://weu.codesigning.azure.net"`
-->

<div class="language-sh highlighter-rouge"><div class="highlight"><pre class="highlight"><code><span class="s2">"East US"</span> <span class="o">=</span> <span class="s2">"https://eus.codesigning.azure.net"</span>
<span class="s2">"West US3"</span> <span class="o">=</span> <span class="s2">"https://wus3.codesigning.azure.net"</span>
<span class="s2">"West Central US"</span> <span class="o">=</span> <span class="s2">"https://wcus.codesigning.azure.net"</span>
<span class="s2">"West US 2"</span> <span class="o">=</span> <span class="s2">"https://wus2.codesigning.azure.net"</span>
<span class="s2">"North Europe"</span> <span class="o">=</span> <span class="s2">"https://neu.codesigning.azure.net"</span>
<span class="s2">"West Europe"</span> <span class="o">=</span> <span class="s2">"https://weu.codesigning.azure.net"</span>
</code></pre></div></div>

<p>Login to Azure using your Tenant ID</p>

<div class="language-sh highlighter-rouge"><div class="highlight"><pre class="highlight"><code>az login <span class="nt">--tenant</span> &lt;TENANT_ID&gt;
</code></pre></div></div>

<p>Now we can sign any EXE! Notice that the value <code class="language-plaintext highlighter-rouge">10.0.22621.0</code> might change in the future.</p>

<div class="language-sh highlighter-rouge"><div class="highlight"><pre class="highlight"><code>&amp; <span class="s2">"C:</span><span class="se">\P</span><span class="s2">rogram Files (x86)</span><span class="se">\W</span><span class="s2">indows Kits</span><span class="se">\1</span><span class="s2">0</span><span class="se">\b</span><span class="s2">in</span><span class="se">\1</span><span class="s2">0.0.22621.0</span><span class="se">\x</span><span class="s2">64</span><span class="se">\s</span><span class="s2">igntool.exe"</span> <span class="sb">`</span>
sign /v /debug /fd SHA256 /tr <span class="s2">"http://timestamp.acs.microsoft.com"</span> /td SHA256 <span class="sb">`</span>
/dlib <span class="s2">"&lt;PATH_TO_MICROSOFT_TRUSTED_SIGNING_CLIENT&gt;</span><span class="se">\b</span><span class="s2">in</span><span class="se">\x</span><span class="s2">64</span><span class="se">\A</span><span class="s2">zure.CodeSigning.Dlib.dll"</span> <span class="sb">`</span>
/dmdf <span class="s2">"&lt;PATH_TO_JSON&gt;"</span> <span class="sb">`</span>
<span class="s2">"&lt;PATH_TO_EXE&gt;"</span>
</code></pre></div></div>

<p>Congrats! You now have a code signed app! Upload it somewhere and use your browser to <a href="https://cdn.notessimo.com/misc/codesign/CodeSignCpp.exe">download it</a>, notice how there is no scary popup at all anymore!</p>

<p><br /></p>

<h2 id="sign-your-app-with-github-action">Sign your app with Github Action</h2>

<p>Now that everything works locally, we can easily automate the code signing steps using <a href="https://github.com/features/actions">Github Action</a>.</p>

<h3 id="create-an-app">Create an App</h3>

<center class="images borders">
  <div><a href="/assets/posts/2025-01-29-code-signing/gh_1.png" target="_blank"><img src="/assets/posts/2025-01-29-code-signing/gh_1.png" alt="App registrations" title="App registrations" height="200" /></a><br />1</div>&nbsp;&nbsp;
  <div><a href="/assets/posts/2025-01-29-code-signing/gh_2.png" target="_blank"><img src="/assets/posts/2025-01-29-code-signing/gh_2.png" alt="Certificate profile" title="Certificate profile" height="200" /></a><br />2</div>&nbsp;&nbsp;
  <div><a href="/assets/posts/2025-01-29-code-signing/gh_5.png" target="_blank"><img src="/assets/posts/2025-01-29-code-signing/gh_5.png" alt="Copy Client ID" title="Copy Client ID" height="200" /></a><br />3</div>&nbsp;&nbsp;
  <div><a href="/assets/posts/2025-01-29-code-signing/gh_4.png" target="_blank"><img src="/assets/posts/2025-01-29-code-signing/gh_4.png" alt="Create secret" title="Create secret" height="200" /></a><br />4</div>
</center>

<ol>
  <li>
    <p>In the <a href="https://portal.azure.com/">Azure portal</a>, search for <strong>App registrations</strong> service and click on <strong>New registration</strong>.</p>
  </li>
  <li>
    <p>Give it a name and select the <strong>Single Tenant</strong> option, click on <strong>Register</strong>.</p>
  </li>
  <li>
    <p>In your newly created app, note the <strong>Application (client) ID</strong>.</p>
  </li>
  <li>
    <p>Select <strong>Manage</strong> / <strong>Certificates &amp; secrets</strong> and click on <strong>New client secret</strong>, give it a name &amp; expiration date and note the <strong>Value</strong>.</p>
  </li>
</ol>

<p><br /></p>

<p><em>(sadly the “no expiration” option is not available anymore)</em></p>

<p><br /></p>

<h3 id="assign-roles-1">Assign roles</h3>

<center class="images borders">
  <div><a href="/assets/posts/2025-01-29-code-signing/role_1.png" target="_blank"><img src="/assets/posts/2025-01-29-code-signing/role_1.png" alt="Select account" title="Select account" height="200" /></a><br />1</div>&nbsp;&nbsp;
  <div><a href="/assets/posts/2025-01-29-code-signing/role_2.png" target="_blank"><img src="/assets/posts/2025-01-29-code-signing/role_2.png" alt="Add role assignment" title="Add role assignment" height="200" /></a><br />2</div>&nbsp;&nbsp;
  <div><a href="/assets/posts/2025-01-29-code-signing/role_3.png" target="_blank"><img src="/assets/posts/2025-01-29-code-signing/role_3.png" alt="Select role" title="Select role" height="200" /></a><br />3</div>&nbsp;&nbsp;
  <div><a href="/assets/posts/2025-01-29-code-signing/gh_3.png" target="_blank"><img src="/assets/posts/2025-01-29-code-signing/gh_3.png" alt="Search for app" title="Search for app" height="200" /></a><br />4</div>
</center>

<ol>
  <li>
    <p>We also need to add the <strong>Trusted Signing Certificate Profile Signer</strong> role to the app just like we did on our user.
<br /><br />
In the <a href="https://portal.azure.com/">Azure portal</a>, search for <strong>Trusted Signing Accounts</strong> service and select your account.</p>
  </li>
  <li>
    <p>On the left panel select <strong>Access Control (IAM)</strong> and pick <strong>Add</strong> / <strong>Add role assignment</strong>.</p>
  </li>
  <li>
    <p>Search for <strong>Trusted Signing Certificate Profile Signer</strong>, go <strong>Next</strong></p>
  </li>
  <li>
    <p>Click on <strong>+ Select members</strong>, search for your App name (it won’t show up by default) and click <strong>Review + assign</strong>.</p>
  </li>
</ol>

<p><br /></p>

<h3 id="create-git-repository">Create GIT repository</h3>

<center class="images borders">
  <div><a href="/assets/posts/2025-01-29-code-signing/gh_7.png" target="_blank"><img src="/assets/posts/2025-01-29-code-signing/gh_7.png" alt="Create repository" title="Create repository" height="200" /></a><br />1</div>&nbsp;&nbsp;
  <div><a href="/assets/posts/2025-01-29-code-signing/gh_6.png" target="_blank"><img src="/assets/posts/2025-01-29-code-signing/gh_6.png" alt="Add secrets" title="Add secrets" height="200" /></a><br />2</div>
</center>

<ol>
  <li>
    <p>Create your git repository on <a href="https://github.com/new">Github</a>, or clone my <a href="https://github.com/starburst997/windows-code-sign">sample repository</a> which includes a basic C++ application.</p>
  </li>
  <li>
    <p>Add these 6 secrets to your repository (<strong>Settings</strong> / <strong>Security</strong> / <strong>Secrets and variables</strong> / <strong>Actions</strong>, click <strong>New repository secret</strong>).</p>
    <ul>
      <li><code class="language-plaintext highlighter-rouge">AZURE_CLIENT_ID</code>: Your app client ID</li>
      <li><code class="language-plaintext highlighter-rouge">AZURE_CLIENT_SECRET</code>: Your app secret value</li>
      <li><code class="language-plaintext highlighter-rouge">AZURE_SIGNING_ACCOUNT</code>: Your Trusted Signing Accounts name</li>
      <li><code class="language-plaintext highlighter-rouge">AZURE_SIGNING_CERTIFICATE</code>: Your Certificate profile name</li>
      <li><code class="language-plaintext highlighter-rouge">AZURE_TENANT_ID</code>: Your Tenant ID</li>
      <li><code class="language-plaintext highlighter-rouge">AZURE_ENDPOINT</code>: https://eus.codesigning.azure.net/</li>
    </ul>
  </li>
</ol>

<p><em>(Save those variables inside a Password Manager for re-use in future projects as they won’t change)</em></p>

<p><br /></p>

<h3 id="generate-a-personal-access-token-pat">Generate a Personal Access Token (PAT)</h3>

<center class="images borders">
  <div><a href="/assets/posts/2025-02-02-code-signing-apple/pat_01.png" target="_blank"><img src="/assets/posts/2025-02-02-code-signing-apple/small/pat_01.png" alt="Generate New Token (Classic)" title="Generate New Token (Classic)" /></a><br />1</div>&nbsp;&nbsp;
  <div><a href="/assets/posts/2025-02-02-code-signing-apple/pat_02.png" target="_blank"><img src="/assets/posts/2025-02-02-code-signing-apple/small/pat_02.png" alt="Use repo score" title="Use repo score" /></a><br />2</div>&nbsp;&nbsp;
</center>

<p><em>(Optional)</em> We also need to generate a <strong>Personal Access Token</strong> for Github if you want to test the sample <strong>Release</strong> workflow.</p>

<ol>
  <li>
    <p>Visit your <a href="https://github.com/settings/tokens">settings page</a> and click on <strong>Generate new token</strong> and select <strong>Generate new token (classic)</strong>.</p>
  </li>
  <li>
    <p>We need all the <strong>repo</strong> scope enabled. Set <strong>no expiration</strong>. Click <strong>Generate token</strong> and save the value.</p>
  </li>
</ol>

<p>Save this secret in the github repository for your project:</p>

<ul>
  <li><code class="language-plaintext highlighter-rouge">GH_PAT</code>: The value of your newly generated token</li>
</ul>

<p><br /></p>

<h3 id="create-worflow-file">Create worflow file</h3>

<p>Create a workflow file in your repository (<strong>.github/workflows/windows.yml</strong>)</p>

<div class="language-yaml highlighter-rouge"><div class="highlight"><pre class="highlight"><code><span class="na">name</span><span class="pi">:</span> <span class="s">Build Windows</span>

<span class="na">on</span><span class="pi">:</span> 
  <span class="c1">#push</span>
  <span class="na">workflow_dispatch</span><span class="pi">:</span>

<span class="na">jobs</span><span class="pi">:</span>
  <span class="na">build</span><span class="pi">:</span>
    <span class="na">name</span><span class="pi">:</span> <span class="s">Build Windows</span>
    <span class="na">runs-on</span><span class="pi">:</span> <span class="s">windows-latest</span>
    <span class="na">steps</span><span class="pi">:</span>
      <span class="pi">-</span> <span class="na">uses</span><span class="pi">:</span> <span class="s">actions/checkout@v4</span>
      
      <span class="pi">-</span> <span class="na">name</span><span class="pi">:</span> <span class="s">Add msbuild to PATH</span>
        <span class="na">uses</span><span class="pi">:</span> <span class="s">microsoft/setup-msbuild@v2</span>

      <span class="pi">-</span> <span class="na">name</span><span class="pi">:</span> <span class="s">Build app for release</span>
        <span class="na">working-directory</span><span class="pi">:</span> <span class="s">CodeSignCpp</span>
        <span class="na">run</span><span class="pi">:</span> <span class="s">msbuild /property:Configuration=Release /property:Platform=x64</span>

      <span class="pi">-</span> <span class="na">name</span><span class="pi">:</span> <span class="s">Sign files with Trusted Signing</span>
        <span class="na">uses</span><span class="pi">:</span> <span class="s">azure/trusted-signing-action@v0.5.1</span>
        <span class="na">with</span><span class="pi">:</span>
          <span class="na">azure-tenant-id</span><span class="pi">:</span> <span class="s">${{ secrets.AZURE_TENANT_ID }}</span>
          <span class="na">azure-client-id</span><span class="pi">:</span> <span class="s">${{ secrets.AZURE_CLIENT_ID }}</span>
          <span class="na">azure-client-secret</span><span class="pi">:</span> <span class="s">${{ secrets.AZURE_CLIENT_SECRET }}</span>
          <span class="na">endpoint</span><span class="pi">:</span> <span class="s">${{ secrets.AZURE_ENDPOINT }}</span>
          <span class="na">trusted-signing-account-name</span><span class="pi">:</span> <span class="s">${{ secrets.AZURE_SIGNING_ACCOUNT }}</span>
          <span class="na">certificate-profile-name</span><span class="pi">:</span> <span class="s">${{ secrets.AZURE_SIGNING_CERTIFICATE }}</span>
          <span class="na">files-folder</span><span class="pi">:</span> <span class="s">${{ github.workspace }}\CodeSignCpp\bin\Release-x64</span>
          <span class="na">files-folder-filter</span><span class="pi">:</span> <span class="s">exe,dll</span>
          <span class="na">file-digest</span><span class="pi">:</span> <span class="s">SHA256</span>
          <span class="na">timestamp-rfc3161</span><span class="pi">:</span> <span class="s">http://timestamp.acs.microsoft.com</span>
          <span class="na">timestamp-digest</span><span class="pi">:</span> <span class="s">SHA256</span>

      <span class="pi">-</span> <span class="na">uses</span><span class="pi">:</span> <span class="s">actions/upload-artifact@v4</span>
        <span class="na">with</span><span class="pi">:</span>
          <span class="na">name</span><span class="pi">:</span> <span class="s">build-windows</span>
          <span class="na">path</span><span class="pi">:</span> <span class="s">CodeSignCpp/bin/Release-x64</span>
</code></pre></div></div>

<p>Thanks to the <a href="https://github.com/azure/trusted-signing-action">azure/trusted-signing-action</a> action, all the heavy works is done, leaving us with a pretty simple workflow.</p>

<p><br /></p>

<h3 id="run-the-action">Run the action</h3>

<center class="images borders">
  <div><a href="/assets/posts/2025-01-29-code-signing/gh_8.png" target="_blank"><img src="/assets/posts/2025-01-29-code-signing/gh_8.png" alt="Start action" title="Start action" height="200" /></a><br />1</div>&nbsp;&nbsp;
  <div><a href="/assets/posts/2025-01-29-code-signing/gh_9.png" target="_blank"><img src="/assets/posts/2025-01-29-code-signing/gh_9.png" alt="Download artifact" title="Download artifact" height="200" /></a><br />2</div>
</center>

<ol>
  <li>
    <p>You can then start the action by going to the <strong>Actions</strong> tabs, selecting your action (<strong>Build Windows</strong>) and click on <strong>Run workflow</strong>.</p>
  </li>
  <li>
    <p>Once the action has finished running, you can see the uploaded artifact and download your signed application!</p>
  </li>
</ol>

<p><br /></p>

<p>See the result for yourself: <a href="https://cdn.notessimo.com/misc/codesign/CodeSignCpp.exe">Signed</a> / <a href="https://cdn.notessimo.com/misc/codesign/CodeSignCpp-unsigned.exe">Unsigned</a></p>

<p>Immediate <a href="https://en.wikipedia.org/wiki/Microsoft_SmartScreen">SmartScreen</a> reputation as well! Which is something that even some of the expensive code signing certificates don’t supply.</p>

<p><br /></p>

<h2 id="conclusion">Conclusion</h2>

<p>I am really glad Microsoft finally made it easy and affordable to code sign EXE on Windows, hopefully they will keep the price low for individual developer. Now, any new project I do, I can simply copy / paste the secrets into the new repository, copy the workflow file and be setup with code signing in just a few seconds.</p>

<p><br /></p>

<p>Code-signing / distributing app series:</p>
<ul>
  <li>Part 1: <a href="/post/2025/01/29/code-signing.html">Code Signing for Windows as an Individual Developer</a></li>
  <li>Part 2: <a href="/post/2025/02/02/code-signing-apple.html">Code Signing for Apple without a mac</a></li>
  <li>Part 3: <a href="/post/2025/02/05/android-publish.html">Code Signing for Android via Github Actions</a></li>
  <li>Part 4: <a href="/post/2025/02/11/unity-github-actions.html">Build and publish your Unity Game using Github Actions</a></li>
</ul>

<p><br /></p>]]></content><author><name>Jean-Denis Boivin</name></author><category term="post" /><summary type="html"><![CDATA[(TL;DR: Get code signing working for Windows with immediate SmartScreen reputation via Github Action, check this sample repository to see how simple it can get once everything is setup)]]></summary></entry><entry><title type="html">The never-ending ascending pitch illusion from Super Mario 64</title><link href="https://jd.boiv.in/post/2022/11/05/mario64.html" rel="alternate" type="text/html" title="The never-ending ascending pitch illusion from Super Mario 64" /><published>2022-11-05T14:56:00+00:00</published><updated>2022-11-05T14:56:00+00:00</updated><id>https://jd.boiv.in/post/2022/11/05/mario64</id><content type="html" xml:base="https://jd.boiv.in/post/2022/11/05/mario64.html"><![CDATA[<p>Recently posted a clip of <a href="https://notessimo.net">Notessimo</a> showcasing the “Endless Staircases” from Super Mario 64 on <a href="https://www.reddit.com/r/blackmagicfuckery/comments/ymvzhg/the_neverending_ascending_pitch_illusion_from/">Reddit</a>.
It kind of blew up getting on the front page with nearly <strong>30k upvotes</strong> and <strong>1.7M+ video views</strong>!</p>

<p>It uses an auditory illusion called the “<a href="https://en.wikipedia.org/wiki/Shepard_tone">Shepard Tone</a>”. It gives the impression of a never-ending ascending pitch.</p>

<p>The higher the notes on the staff, the higher the pitch. There are two sequences of notes separated by two octaves (so one sequence has a higher pitch and the other has a lower pitch).</p>

<p>Part of the trick is that as the loop breaks, the notes from the higher sequence will gradually lower their volume while the notes from the lower sequence will become louder, tricking the brain that the pitch is still continuously ascending while in reality it didn’t.</p>

<p>Here’s the V2 (more accurate sounds and note opacity) in 4K on on <a href="https://www.youtube.com/watch?v=MhAEmx_bXnk">YouTube</a>, it was also a good stress test for the video export to makes sure it can export high-resolution videos.</p>

<p>Check it out as well in the <a href="https://notessimo.net/s/g5sLOIGxBD">composer</a> to play with the notes!</p>

<center class="video-wrapper"><iframe width="560" height="315" src="https://www.youtube.com/embed/MhAEmx_bXnk" title="YouTube video player" frameborder="0" allow="accelerometer; autoplay; clipboard-write; encrypted-media; gyroscope; picture-in-picture" allowfullscreen=""></iframe></center>]]></content><author><name>Jean-Denis Boivin</name></author><category term="post" /><summary type="html"><![CDATA[Recently posted a clip of Notessimo showcasing the “Endless Staircases” from Super Mario 64 on Reddit. It kind of blew up getting on the front page with nearly 30k upvotes and 1.7M+ video views!]]></summary></entry><entry><title type="html">Brief overview of the tech behind Notessimo (part 1)</title><link href="https://jd.boiv.in/post/2022/11/01/tech.html" rel="alternate" type="text/html" title="Brief overview of the tech behind Notessimo (part 1)" /><published>2022-11-01T14:56:00+00:00</published><updated>2022-11-01T14:56:00+00:00</updated><id>https://jd.boiv.in/post/2022/11/01/tech</id><content type="html" xml:base="https://jd.boiv.in/post/2022/11/01/tech.html"><![CDATA[<h3 id="a-brief-overview-of-the-tech-used-to-create-notessimo">A brief overview of the tech used to create <a href="https://notessimo.net">Notessimo</a>.</h3>

<h4 id="the-flash-days-2007-2014">The Flash Days (2007-2014)</h4>

<p><a href="https://notessimo.net/compose/past">Past versions</a> of <a href="https://notessimo.net">Notessimo</a> used to be in <a href="https://en.wikipedia.org/wiki/Adobe_Flash">Flash</a>, it was quite the limited platform, especially back in the V1 days (~2007). To produce sounds dynamically I had to resort to a clever trick of actually generating byte by byte a <code class="language-plaintext highlighter-rouge">.swf</code> (flash file format) that represented an empty flash file with only a single sound object being played and load those bytes! If I remember correctly, to play without gap, the length also had to be a multiple of 2048 and properly timed to play at the correct frame, surprisingly it worked pretty well!</p>

<center class="images">
<a href="https://en.wikipedia.org/wiki/Adobe_Flash" target="_blank"><img src="https://cdn.notessimo.com/misc/blog/Flash.webp" alt="Flash Logo" height="100" /></a>&nbsp;&nbsp;&nbsp;&nbsp;
<!--<a href="https://en.wikipedia.org/wiki/PHP" target="_blank"><img src="https://cdn.notessimo.com/misc/blog/php.png" alt="PHP Logo" height="80"/></a>&nbsp;&nbsp;-->
<a href="https://www.phpbb.com/" target="_blank"><img src="https://cdn.notessimo.com/misc/blog/phpbb.png" alt="phpbb Logo" height="80" /></a>&nbsp;&nbsp;
<a href="https://www.mysql.com/" target="_blank"><img src="https://cdn.notessimo.com/misc/blog/mysql.jpg" alt="MySQL Logo" height="100" /></a>&nbsp;&nbsp;
<br /><br />
</center>

<p>V2 introduced the website (<a href="https://en.wikipedia.org/wiki/PHP">php</a>) and forum (<a href="https://www.phpbb.com/">phpBB</a>) along with the database (<a href="https://www.mysql.com/">mysql</a>) of user-generated content. V3 improve on that, still being made in Flash but the website was now using <a href="https://invisioncommunity.com/">Invision Power Board</a>.</p>

<center class="images">
<a href="https://cdn.notessimo.com/web/static/compose/V1-1.jpg" target="_blank"><img src="https://cdn.notessimo.com/web/static/compose/V1-1.jpg" alt="Notessimo V1" width="230" /></a>&nbsp;&nbsp;
<a href="https://cdn.notessimo.com/web/static/compose/V2-1.jpg" target="_blank"><img src="https://cdn.notessimo.com/web/static/compose/V2-1.jpg" alt="Notessimo V2" width="230" /></a>&nbsp;&nbsp;
<a href="https://cdn.notessimo.com/web/static/compose/V3-1.jpg" target="_blank"><img src="https://cdn.notessimo.com/web/static/compose/V3-1.jpg" alt="Notessimo V3" width="230" /></a><br /><br />
</center>
<p><em>Above from left to right: V1 (2007), V2 (2008), V3 (2014)</em></p>

<p><br /></p>
<h4 id="revival-2020-pandemic---present">Revival (2020 Pandemic - Present)</h4>

<p>I was pretty under-stimulated at my current job at the time and decided to start out a <a href="https://en.wikipedia.org/wiki/Music_tracker">Mod Tracker</a> player in <a href="https://en.wikipedia.org/wiki/C_Sharp_(programming_language)">C#</a> as a fun side-project at home to improve my <code class="language-plaintext highlighter-rouge">unsafe</code> / low-level / optimization skill in C#. With the news that <a href="https://www.adobe.com/ca/products/flashplayer/end-of-life.html">Flash was going to die</a>, I felt pretty bad that soon all the (70k+) songs in the database were going to become unplayable and be forever lost. I then repurpose my library to also support the Notessimo file format with a focus on fast dynamic music synthesis usable for video games.</p>

<center class="images">
<a href="https://en.wikipedia.org/wiki/C_Sharp_(programming_language)" target="_blank"><img src="https://cdn.notessimo.com/misc/blog/csharp.png" alt="C# Logo" height="85" /></a>&nbsp;&nbsp;&nbsp;&nbsp;&nbsp;&nbsp;
<a href="https://en.wikipedia.org/wiki/Music_tracker" target="_blank"><img src="https://cdn.notessimo.com/misc/blog/mod.gif" alt="Mod Tracker" height="100" /></a><br /><br />
</center>

<p>With the pandemic now forcing us all at home, what started as a simple player to preserve all the user-generated content evolved to a brand-new re-imagining of the composer for the modern age.</p>

<p>I settled with <a href="https://unity.com/">Unity</a> as the framework for the composer / player; battle-tested, video games oriented, use C# and used by nearly everyone in the industry, it was a no-brainer. Although, very far from perfect sadly, but my love / hate relationship with Unity will be discussed in further details in future posts.</p>

<center class="images">
<a href="https://unity.com/" target="_blank"><img src="https://cdn.notessimo.com/misc/blog/unity.png" alt="Unity Logo" height="85" /></a><br /><br />
</center>

<p>I needed a brand-new website as well and decided to go with <a href="https://nextjs.org/">NextJS</a>, wanted to see what the fuss was all about since it uses <a href="https://reactjs.org/">React</a>. Loved the concept behind NextJS, everything is stored as static files that can be generated / updated on-demand, you get an html version that is served on the first request and subsequent pages only load a small json files. Makes eveything lightning fast compared to the vast majority of websites that still do server-side rendering. React on the other hand, I had a mixed reception, especially since when I started using it, everything was <a href="https://reactjs.org/docs/components-and-props.html">class-based</a>, took a break, and came back with everything now being functional components. Not sure it was for the best though, but I jumped on the bandwagon nonetheless since I wanted to keep my web-dev skills up to date (React is the most popular web-framework at the time of writing).</p>

<center class="images">
<a href="https://nextjs.org/" target="_blank"><img src="https://cdn.notessimo.com/misc/blog/nextjs.png" alt="NextJS Logo" height="85" /></a>&nbsp;&nbsp;&nbsp;&nbsp;&nbsp;&nbsp;
<a href="https://reactjs.org/" target="_blank"><img src="https://cdn.notessimo.com/misc/blog/react.png" alt="React Logo" height="70" /></a>&nbsp;&nbsp;&nbsp;&nbsp;&nbsp;&nbsp;
<a href="https://en.wikipedia.org/wiki/TypeScript" target="_blank"><img src="https://cdn.notessimo.com/misc/blog/typescript.png" alt="Typescript Logo" height="70" /></a><br /><br />
</center>

<p>On the backend side I decided to check out <a href="https://kubernetes.io/">Kubernetes</a> and absolutely loved it! Never will I go back to the good-old days of <a href="https://en.wikipedia.org/wiki/Secure_Shell">SSH</a> into a <a href="https://en.wikipedia.org/wiki/Virtual_private_server">VPS</a>, manually editing config file, upgrading linux, etc. I keep a minimum of 2 pods running for each of the services I created along with load-balancing. Currently, it is overkill since Notessimo doesn’t need multiple machines but again, it was something I wanted to try to keep my skills up to date, previously I had use <a href="https://aws.amazon.com/elasticbeanstalk/">ElasticBeanstalk</a>. And even if it only uses one machine currently, I will argue that the simplicity of having just a single <code class="language-plaintext highlighter-rouge">.yaml</code> per service (+imposing limits) and the ability to easily move between hosting provider if I wanted to, is well worth it.</p>

<center class="images">
<a href="https://kubernetes.io/" target="_blank"><img src="https://cdn.notessimo.com/misc/blog/kubernetes2.png" alt="Kubernetes Logo" height="80" /></a><br /><br />
</center>

<p>For the database I settled with <a href="https://www.postgresql.org/">PostgreSQL</a>, having used MySQL in the past, I wanted to try something different this time around. For a quick rest API interface, I used <a href="https://www.php.net/">PHP</a>, not very sexy, but it gets the job done and the vast majority of the workload is simply talking to the database via manually crafted SQL requests.</p>

<center class="images">
<a href="https://www.postgresql.org/" target="_blank"><img src="https://cdn.notessimo.com/misc/blog/postgresql.png" alt="PostreSQL Logo" height="50" /></a>&nbsp;&nbsp;&nbsp;&nbsp;
<a href="https://en.wikipedia.org/wiki/PHP" target="_blank"><img src="https://cdn.notessimo.com/misc/blog/php.png" alt="PHP Logo" height="60" /></a>&nbsp;&nbsp;
<br /><br />
</center>

<p>Storage is done on an <a href="https://aws.amazon.com/s3/">S3</a>-like service and delivered through a <a href="https://en.wikipedia.org/wiki/Content_delivery_network">CDN</a>.</p>

<center class="images">
<a href="https://aws.amazon.com/s3/" target="_blank"><img src="https://cdn.notessimo.com/misc/blog/S3.png" alt="S3 Logo" height="80" /></a>&nbsp;&nbsp;&nbsp;&nbsp;&nbsp;&nbsp;
<a href="https://aws.amazon.com/cloudfront/" target="_blank"><img src="https://cdn.notessimo.com/misc/blog/cloudfront.png" alt="Cloudfront Logo" height="80" /></a>&nbsp;&nbsp;
<br /><br />
</center>

<p>The community forum was moved to <a href="https://www.discourse.org/">Discourse</a> with its own <a href="https://community.notessimo.net">domain</a> and with a custom plugin that offers deep integration with Notessimo, like the ability to share song as embed similar to YouTube. It is also used as the account management / login system. I cannot recommend Discourse enough as an operator, it is extremely well made.</p>

<center class="images">
<a href="https://www.discourse.org/" target="_blank"><img src="https://cdn.notessimo.com/misc/blog/discourse.png" alt="Discourse Logo" height="80" /></a><br /><br />
</center>

<p>Putting all of that together we get the new and improved Notessimo! The app come bundled with a WebView so the website / community is always easily accessible and can talk to the Unity app.</p>

<center class="images">
<a href="https://cdn.notessimo.com/misc/blog/Tech3.jpg" target="_blank"><img src="https://cdn.notessimo.com/misc/blog/Tech3.jpg" alt="Webview / Unity" width="600" /></a><br /><br />
</center>

<p>Thanks to Unity’s cross-platform support (and WebView being now available natively on all platforms), we can have a native version of the app for <a href="https://testflight.apple.com/join/e9rpQsKx">iOS</a> / <a href="https://play.google.com/store/apps/details?id=com.failsafegames.tracker">Android</a> / <a href="https://cdn2.notessimo.com/release/notessimo/Windows/Notessimo.application">Windows</a> / <a href="https://testflight.apple.com/join/e9rpQsKx">Mac</a> or even on the <a href="https://notessimo.net">Web</a> with Unity’s WebGL export.</p>

<p>This new version is vastly more complex than previous version of Notessimo but is also easier to maintain and allow for much more features, like the <a href="https://notessimo.net/browse/instruments">instruments database</a> (currently at over 14K+ instruments!).</p>

<p>Thanks for reading! Enjoy this <a href="https://notessimo.net/s/d59zUgGexa">awesome song</a> by <a href="https://notessimo.net/u/Ace1257">Antonim</a>!</p>

<center class="video-wrapper"><iframe width="560" height="315" src="https://www.youtube.com/embed/fL-1y7VR5A0" title="YouTube video player" frameborder="0" allow="accelerometer; autoplay; clipboard-write; encrypted-media; gyroscope; picture-in-picture" allowfullscreen=""></iframe></center>]]></content><author><name>Jean-Denis Boivin</name></author><category term="post" /><summary type="html"><![CDATA[A brief overview of the tech used to create Notessimo.]]></summary></entry><entry><title type="html">Super Mario Paint support (v2022.15)</title><link href="https://jd.boiv.in/post/2022/10/27/mario-paint.html" rel="alternate" type="text/html" title="Super Mario Paint support (v2022.15)" /><published>2022-10-27T14:56:00+00:00</published><updated>2022-10-27T14:56:00+00:00</updated><id>https://jd.boiv.in/post/2022/10/27/mario-paint</id><content type="html" xml:base="https://jd.boiv.in/post/2022/10/27/mario-paint.html"><![CDATA[<p><a href="https://github.com/DC37/Super-Mario-Paint">Super Mario Paint</a> is probably the most popular of the <a href="https://en.wikipedia.org/wiki/Mario_Paint">Mario Paint</a> clones (<a href="https://discord.com/invite/MfQK5TF">join their discord community</a>!). <a href="https://notessimo.net">Notessimo</a> started has a clone of Mario Paint as well even if it has diverged a lot since the first version.</p>

<center class="images">
<a href="https://cdn.notessimo.com/web/static/compose/SMP1.3.png" target="_blank"><img src="https://cdn.notessimo.com/web/static/compose/SMP1.3.png" alt="Super Mario Paint v1.3" width="280" /></a>&nbsp;&nbsp;&nbsp;&nbsp;
<a href="https://cdn.notessimo.com/web/static/compose/V1-1.jpg" target="_blank"><img src="https://cdn.notessimo.com/web/static/compose/V1-1.jpg" alt="Notessimo V1" width="350" /></a><br /><br />
</center>
<p><em>Above <a href="https://github.com/DC37/Super-Mario-Paint">Super Mario Paint</a> v1.3 (left), <a href="https://notessimo.net/compose/past/#v1">Notessimo V1</a> (right)</em>
<br /><br /></p>

<p>The file format is pretty simple, just a <code class="language-plaintext highlighter-rouge">.txt</code> file with each line representing 1 beat.</p>
<div class="language-plaintext highlighter-rouge"><div class="highlight"><pre class="highlight"><code>TEMPO: 400.000000, EXT: 0, TIME: 4/4, SOUNDSET: 
1:0,MARIO C5,MARIO B2,MARIO E3,MARIO C4,VOL: 96
1:1,MUSHROOM B4,VOL: 96
1:2,YOSHI F4,VOL: 96
1:3,STAR C4,VOL: 96
2:0,FLOWER B3,VOL: 96
...
</code></pre></div></div>

<p>There is some subtilty though, an instrument will continue to play until it encounters another note from the same instrument (or a special “mute” note). Most soundfonts for Super Mario Paint seems to have instruments that cannot play infinitely (no looping sample) so they will end automatically by themselves when their sample’s end (I use this fact to precisely calculate the expected note length in the conversion process so the note “bounce” appropriately).</p>

<p>Since it is only one beat per line, to get really creative, expert painters will use insane tempo (2400+). This makes for a poor viewing experience, so there is an option as well to “compress” the tempo and get to something much more enjoyable (ex: 200).</p>

<p>It is also possible to combine multiple <code class="language-plaintext highlighter-rouge">.txt</code> together, so the option to upload a <code class="language-plaintext highlighter-rouge">.zip</code> is also available. Custom soundfonts are also supported, a big feature I wanted to add for notessimo was the ability to share custom instruments so the ability to upload a <code class="language-plaintext highlighter-rouge">.SF2</code> was already implemented (a “playlist” of the instruments is created and available as a choice).</p>

<p>Super Mario Paint import is free and available right now to be exported to video!</p>

<p>Big shoutout to <a href="https://notessimo.net/u/Wikkid_Vommit">CyanSMP64</a> for testing the features! And check out the result below, <a href="https://notessimo.net/s/BMXpLJIH1F">Lone Digger</a> by <a href="https://en.wikipedia.org/wiki/Caravan_Palace">Caravan Palace</a> done by <a href="https://notessimo.net/u/Xanderoni">Xanderoni</a>.</p>

<center class="video-wrapper"><iframe width="560" height="315" src="https://www.youtube.com/embed/Thy8Epx646U" title="YouTube video player" frameborder="0" allow="accelerometer; autoplay; clipboard-write; encrypted-media; gyroscope; picture-in-picture" allowfullscreen=""></iframe></center>]]></content><author><name>Jean-Denis Boivin</name></author><category term="post" /><summary type="html"><![CDATA[Super Mario Paint is probably the most popular of the Mario Paint clones (join their discord community!). Notessimo started has a clone of Mario Paint as well even if it has diverged a lot since the first version.]]></summary></entry><entry><title type="html">Audio / Video export (v2022.13)</title><link href="https://jd.boiv.in/post/2022/10/23/video.html" rel="alternate" type="text/html" title="Audio / Video export (v2022.13)" /><published>2022-10-23T14:56:00+00:00</published><updated>2022-10-23T14:56:00+00:00</updated><id>https://jd.boiv.in/post/2022/10/23/video</id><content type="html" xml:base="https://jd.boiv.in/post/2022/10/23/video.html"><![CDATA[<p>Being able to export to video was a much-requested feature for the longest time and it is finally available! Still a bit rough but functional!</p>

<p>Previously users would screen record the notessimo player</p>

<center class="video-wrapper"><iframe width="560" height="315" src="https://www.youtube.com/embed/VyYUMKREyoU" title="YouTube video player" frameborder="0" allow="accelerometer; autoplay; clipboard-write; encrypted-media; gyroscope; picture-in-picture" allowfullscreen=""></iframe></center>

<p>Besides the obvious watermark and low quality, it is also very hard to get a consistant perfect 60fps while screen recording which I think really helps improve the overall quality perception of the video.</p>

<p>Only <code class="language-plaintext highlighter-rouge">.avi</code> export is available currently but <code class="language-plaintext highlighter-rouge">.mp4</code> is coming very soon, I didn’t want to just hastily bundled a 100MB+ <code class="language-plaintext highlighter-rouge">ffmpeg</code> build along the binary and the <code class="language-plaintext highlighter-rouge">.avi</code> format is extremely simple to support (with the downside of creating gigantic file but quality-wise, it is perfect).</p>

<p>Audio export is also available in <code class="language-plaintext highlighter-rouge">.wav</code>, <code class="language-plaintext highlighter-rouge">.mp3</code> and <code class="language-plaintext highlighter-rouge">.ogg</code>!</p>

<p>You can now see the difference with the new video exporter by comparing an <a href="https://notessimo.net/s/eBORKaihIJ">upload</a> from one of the users, <a href="https://notessimo.net/u/Ace1257">Antonim</a>, the output is now a perfect 60fps with perfect audio sync and quality!</p>

<center class="video-wrapper"><iframe width="560" height="315" src="https://www.youtube.com/embed/Uw8V9jDDsF4" title="YouTube video player" frameborder="0" allow="accelerometer; autoplay; clipboard-write; encrypted-media; gyroscope; picture-in-picture" allowfullscreen=""></iframe></center>]]></content><author><name>Jean-Denis Boivin</name></author><category term="post" /><summary type="html"><![CDATA[Being able to export to video was a much-requested feature for the longest time and it is finally available! Still a bit rough but functional!]]></summary></entry><entry><title type="html">Early Access (Alpha) to Notessimo available</title><link href="https://jd.boiv.in/post/2022/10/20/alpha.html" rel="alternate" type="text/html" title="Early Access (Alpha) to Notessimo available" /><published>2022-10-20T14:56:00+00:00</published><updated>2022-10-20T14:56:00+00:00</updated><id>https://jd.boiv.in/post/2022/10/20/alpha</id><content type="html" xml:base="https://jd.boiv.in/post/2022/10/20/alpha.html"><![CDATA[<p>The early access to the alpha is now available! Everybody can download the app (open testing) on <a href="https://testflight.apple.com/join/e9rpQsKx">iOS</a> / <a href="https://play.google.com/store/apps/details?id=com.failsafegames.tracker">Android</a> / <a href="https://cdn2.notessimo.com/release/notessimo/Windows/Notessimo.application">Windows</a> / <a href="https://testflight.apple.com/join/e9rpQsKx">Mac</a> or <a href="https://notessimo.net">Web</a> with <em>Read Only</em> access.</p>

<p><a href="https://www.patreon.com/notessimo">Patreon</a> user have instant access to <em>Edit Mode</em> which allow them to create and edit songs. When the app will release, a free-tier will be available and <em>Edit Mode</em> will be available to all. No ETA yet but I do aim for a 2023 full-release.</p>

<p>Makes sure to browse the <a href="https://notessimo.net/t/songs/all/latest">latest songs</a> a bunch of them were made using the alpha!</p>

<center class="images">
<a href="https://cdn.notessimo.com/web/static/compose/V4-1.jpg" target="_blank"><img src="https://cdn.notessimo.com/web/static/compose/V4-1.jpg" alt="V4 Screenshot" width="350" /></a>&nbsp;&nbsp;&nbsp;&nbsp;
<a href="https://cdn.notessimo.com/web/static/compose/V4-2.jpg" target="_blank"><img src="https://cdn.notessimo.com/web/static/compose/V4-2.jpg" alt="V4 Screenshot" width="350" /></a><br /><br />
</center>
<center class="images">
<a href="https://cdn.notessimo.com/web/static/compose/V4-3.jpg" target="_blank"><img src="https://cdn.notessimo.com/web/static/compose/V4-3.jpg" alt="V4 Screenshot" width="350" /></a>&nbsp;&nbsp;&nbsp;&nbsp;
<a href="https://cdn.notessimo.com/web/static/compose/V4-4.jpg" target="_blank"><img src="https://cdn.notessimo.com/web/static/compose/V4-4.jpg" alt="V4 Screenshot" width="350" /></a>
</center>

<p>Enjoy this <a href="https://notessimo.net/s/C9r9qCytSH">awesome song</a> by <a href="https://notessimo.net/u/Lexas">Lexas</a>!</p>

<center class="video-wrapper"><iframe width="560" height="315" src="https://www.youtube.com/embed/xKk45XHOatw" title="YouTube video player" frameborder="0" allow="accelerometer; autoplay; clipboard-write; encrypted-media; gyroscope; picture-in-picture" allowfullscreen=""></iframe></center>]]></content><author><name>Jean-Denis Boivin</name></author><category term="post" /><summary type="html"><![CDATA[The early access to the alpha is now available! Everybody can download the app (open testing) on iOS / Android / Windows / Mac or Web with Read Only access.]]></summary></entry></feed>